Varigence Blog
The Top Five Challenges of Data Lakes and how to overcome them with a Data Lakehouse
Overview
BimlFlex's next version will support Databricks automation, allowing users to integrate Databricks into their data pipelines seamlessly, extending to all layers from Staging to Data Mart, and our preview has already been well-received by some of our customers. In addition, our upcoming blog post will provide details on how to configure and execute a fully automated Databricks solution.
This Databricks automation support is a significant development for businesses seeking to integrate Databricks into their existing data pipelines. By streamlining the integration process, users can save time and reduce costs. The resulting benefits of increased efficiency and improved data quality can help businesses remain competitive in a constantly evolving marketplace. In addition, BimlFlex with Databricks automation support ensures consistent and accurate data processing, ultimately leading to more robust data insights and decision-making for businesses of all sizes.
In our upcoming blog post, we'll dive into how to set up a fully automated Databricks solution. But first, let's discuss why this is significant.
Data Quality
Data lakes are a valuable source of data. However, their immense size and varied quality can be daunting. Accuracy is paramount when leveraging this vast resource for analytics; otherwise, decision-making may lead to unreliable results due to incomplete or inconsistent sources containing errors. Quality control and proper management must happen early if these powerful tools reach their potential.
Organizations can address data challenges by deploying robust validation and cleansing processes to ensure their data is accurate and consistent, ensuring accuracy, uniformity, and confidence in decision-making. First, ensure data quality by efficiently using Databricks or Azure Synapse Analytics to implement a Lakehouse. Next, transform your data into a uniform format and enhance accuracy with predefined rules for validating all values. Finally, Speed up your analysis process to ensure accuracy - implement BimlFlex automation and avoid the potential risks of formatting discrepancies.
Data Governance
Another challenge with data lakes is ensuring proper data governance. This includes controlling who has access to the data, enforcing data access policies, and tracking how the data is used. Without appropriate governance measures in place, a breach of security could put crucial information and your business objectives at risk.
BimlFlex automation for Databricks and Azure Synapse has advanced data governance features, and organizations can take proactive measures to secure their data and maintain high-quality standards. Implementing comprehensive tools such as access controls, lineage tracking, and discovery will ensure that companies meet the necessary security requirements while staying compliant with government regulations and leading to accurate results backed by reliable information.
Data Integration
Combining data from various sources and in different formats can be arduous. However, with the right preparation strategy, making sense of what would otherwise seem like chaos is possible. Cleaning and preparing the data for analysis can require significant time and effort.
Organizations can leverage Azure Data Factory and Databricks for cleansing & transformation to ensure the collected data is consistent, ready for analysis and optimally utilized. In addition, Databricks and Azure Synapse solutions enable corporations to explore their in-house trove of information with comprehensive data catalogue features that facilitate quick search capabilities allowing seamless content understanding and structure visibility!
Data Silos
Data lakes are a great source of organizational data, but they also present the risk of creating remote repositories that inhibit collaboration and waste resources. In addition, without visibility across departments, redundant effort can occur while crucial information remains in silos and ultimately diminishing the impactful potential of all corporate data. This can lead to duplication of effort and a lack of visibility into the available data across the organization.
Organizations can overcome data silos using BimlFlex to automate Databricks and Azure Synapse solutions creating a centralized data lakehouse. This single source creates an integrated and unified view of their data by providing easy access to different sources and departments. Additionally, it enables organizations to combine disparate datasets into one cohesive unit, allowing for more informed decisions based on actionable insights derived from accurate information. By implementing a data automation solution with BimlFlex, they can leverage valuable intelligence within their systems while achieving greater efficiency throughout operations due to improved collaboration among stakeholders in business-critical activities.
Complexity
Data lake implementation can be a formidable undertaking for organizations with limited personnel and budget. This can require specialized skills and resources, which can challenge some organizations. Employing automation with BimlFlex can cut costs drastically. Managed services like Databricks and Azure Synapse present a Lakehouse solution that simplifies implementation while minimizing associated overhead and leading to maximum savings without compromising performance!
Conclusion
A Data Lakehouse is a powerful data management platform that can help organizations store, process, and analyze large amounts of data in a scalable, secure, and efficient manner. Combining this with BimlFlex data solution automation, a Lakehouse for processing using Databricks or Azure Synapse can improve efficiency and scalability. If you are interested in automating your Lakehouse solution, we can help. Our expert team has extensive experience with the platform and can offer guidance on how to automate your data management processes best. Contact us today to learn more.
Contact us to take the next step. Request Demo or simply email sales@varigence.com
Automating Change Data Capture on Azure Data Factory: Streamline Your Data Integration with BimlFlex
Overview
BimlFlex is a metadata-driven framework that enables customers to automate data integration solutions. One of the key areas where it can provide significant value is automating Microsoft SQL Server Change Data Capture (CDC) on Azure Data Factory (ADF). By using BimlFlex, customers can create and deploy efficient, scalable, and reusable CDC solutions in ADF with significantly less to no manual effort, reducing errors and improving the overall efficiency of the process. In this blog post, we will discuss how BimlFlex can be used to automate CDC on ADF, the benefits of doing so, and provide a step-by-step guide for implementing CDC on ADF using BimlFlex.

Supported Target Platforms
BimlFlex offers robust support for various target platforms. The platform currently supports a range of target platforms that enable customers to automate data integration solutions, including Azure Synapse Analytics, Snowflake, Databricks, Azure SQL Database, Azure SQL Managed Instance, and Microsoft SQL Server. BimlFlex generates all the necessary artifacts required for optimal CDC data integration, including data pipelines, data transformations, stored procedure and notebooks.
In addition to providing reliable and efficient CDC automation, BimlFlex integrates seamlessly with popular source control solutions like GitHub and Azure DevOps. This integration makes it easy for customers to manage and track changes to their artifacts, ensuring smooth collaboration and minimizing errors.
By providing support for multiple target platforms, BimlFlex offers customers the flexibility to choose the platform that best fits their needs, and to integrate with other services, like ADF, to create more comprehensive and efficient solutions. Whether you are using Azure Synapse Analytics for large-scale data warehousing or Microsoft SQL Server for on-premise applications, BimlFlex provides a powerful and versatile framework that streamlines CDC automation, making data integration more efficient and reliable.
Requirements to Automate CDC on ADF
When implementing automation with BimlFlex for CDC on ADF, there are several things to consider to ensure the success of your data integration solution.
Full Initial Load
When implementing Change Data Capture (CDC) on Azure Data Factory (ADF), it's important to consider the initial load of data from non-CDC tables. This involves capturing the Log Sequence Number (LSN) as a high watermark for the following delta or change data capture loads. The LSN is a unique identifier that SQL Server uses to track changes made to the database, making it crucial to capture accurately. By ensuring a successful initial load and accurate capture of LSN, you can improve the effectiveness and reliability of your CDC process.
Overcoming Challenges with In-built CDC Functions
One of the most common issues with built-in CDC functions is the potential failure of the cdc.fn_cdc_get_all_changes_<capture_instance> function when it returns no rows within the given from_lsn and to_lsn range. Instead of simply producing no rows, this can cause the entire pipeline to fail. To avoid this, it's important to check for any changes in the process before proceeding. If there are no changes, the pipeline can be exited, and if there are changes, the main activity can be called to ingest and process the delta. Once this is done, the last LSN should be captured and saved as the high watermark for the next load, ensuring a successful and reliable CDC process.
Restarting CDC
In certain cases, you may need to restart CDC, such as when you need to compare and reload all data against your current dataset, which may occur when restoring your database or reinitializing change data capture on the source. To facilitate this process, BimlFlex offers the PsaDeltaUseHashDiff setting, which adds a RowHashDiff column that enables a full comparison when reinitializing CDC from the source. This feature can greatly simplify the restart process and ensure the accuracy and completeness of your data integration solutions.
How BimlFlex Automate CDC for ADF
To handle the requirements of potential full reloads and the limitations of CDC functions in handling queries for no data returned, we separated the parameters (GetParameter) from the main activity (Main Activity). This separation ensures that the correct process - Initial Load, Delta Load or Full Reload - is determined based on the captured parameters, streamlining the process and avoiding potential errors. By doing so, the CDC automation process using BimlFlex becomes more efficient and reliable, resulting in greater productivity and accuracy.
The following graphic illustrates the implementation of the GetParameter activity that handles all the logic to set the __from_lsn, __to_lsn and IsFullLoad variables.
 Parameter Management")
Lookup (Lkp__from_lsn)
This activity retrieves the previous load's high watermark value (__from_lsn) from the BimlCatalog or sets a default value '0x00000000000000000001' on IsInitialLoad.
SetVariable (Set__from_lsn)
This activity sets the value of the __from_lsn variable to the value retrieved Lkp__from_lsn activity.
@activity('Lkp__from_lsn').output.firstRow.VariableValue
SetVariable (SetIsFullLoad)
The activity sets the value of the IsFullLoad variable. The expression evaluates if the IsInitialLoad parameter is set to true or if the high watermark value ( __from_lsn) variable is equal to '0x00000000000000000001' the default value.
@if(or(pipeline().parameters.IsInitialLoad, equals(variables('__from_lsn'), '0x00000000000000000001')), true, false)
Script (Lkp__min_lsn)
This activity retrieves the minimum LSN value of <capture_instance> by running the sys.fn_cdc_get_min_lsn function. The default value of __min_lsn is 0x00000000000000000001.
SELECT ISNULL(CONVERT(NVARCHAR(256), sys.fn_cdc_get_min_lsn ('<capture_instance>'), 1), '0x00000000000000000001') AS [__min_lsn]
SetVariable (Set__min_lsn)
This activity sets the value of the __min_lsn variable to the value retrieved in the Lkp__min_lsn Script activity.
@activity('Lkp__min_lsn').output.resultSets[0].rows[0].__min_lsn
Script (Lkp__max_lsn)
This activity executes and retrieves the maximum value of __max_lsn by running the sys.fn_cdc_get_max_lsn function. The default value of __max_lsn is '0x00000000000000000001'.
SELECT ISNULL(CONVERT(NVARCHAR(256), sys.fn_cdc_get_max_lsn(), 1), '0x00000000000000000001') AS [__max_lsn]
SetVariable (Set__max_lsn)
This activity sets the value of the __max_lsn variable to the value retrieved in the Lkp__max_lsn Script activity.
@activity('Lkp__max_lsn').output.resultSets[0].rows[0].__max_lsn
Script (Lkp__to_lsn)
This activity retrieves the value of __to_lsn by running the sys.fn_cdc_map_time_to_lsn function. The value of __to_lsn is determined by the pipeline parameter BatchStartTime and a default value of '0x00000000000000000001'.
@concat('SELECT ISNULL(CONVERT(NVARCHAR(256), sys.fn_cdc_map_time_to_lsn(''largest less than or equal'', ''', formatDateTime(pipeline().parameters.BatchStartTime, 'yyyy-MM-dd HH:mm:ss.fff'), '''), 1), ''0x00000000000000000001'') AS [__to_lsn]')
SetVariable (Set__to_lsn)
This activity sets the value of the __to_lsn or next load high watermark. There is quite a lot going on, and it depends on the SetIsFullLoad, Set__min_lsn, Set__max_lsn and Lkp__to_lsn activities. This expression first checks whether the IsFullLoad variable is true and, if so, returns the value of the __max_lsn variable. If IsFullLoad is false, the expression evaluates if the __to_lsn value is '0x00000000000000000001', the expression returns the value of the __min_lsn variable. Otherwise, it returns the __to_lsn value.
@if(variables('IsFullLoad'), variables('__max_lsn'), if(equals(activity('Lkp__to_lsn').output.resultSets[0].rows[0].__to_lsn, '0x00000000000000000001'), variables('__min_lsn'), activity('Lkp__to_lsn').output.resultSets[0].rows[0].__to_lsn))
```
SetVariable (Reset__from_lsn):
This activity sets the value of the __from_lsn variable if the current high watermark value __from_lsn is smaller than the low endpoint, __min_lsn of the capture instance variables.
@if(less(activity('Lkp__from_lsn').output.firstRow.VariableValue, variables('__min_lsn')), variables('__min_lsn'), activity('Lkp__from_lsn').output.firstRow.VariableValue)
Conclusion
The blog post discusses the benefits of using BimlFlex for automating CDC on ADF, which can save time, reduce errors and improve the overall efficiency of the process. It also outlines key considerations for implementing automation with BimlFlex for CDC on ADF, including full load or initial load, overcoming challenges with in-built CDC functions, and restarting CDC. The post also gives you a behind the scenes look at the generated output and explains how the GetParameter and Main Activity can be separated to ensure the correct process is being executed.
BimlFlex provides a powerful metadata-driven framework that simplifies the implementation of CDC on ADF, enabling customers to create scalable and reusable solutions. It also provides a step-by-step guide for implementing CDC on ADF using BimlFlex, ensuring a seamless and reliable process.
We encourage customers to try BimlFlex for themselves and take advantage of the benefits it provides. Additional resources are available for further learning, including the BimlFlex documentation, webinars, and tutorials.
Contact us to take the next step. Request Demo or simply email sales@varigence.com
Combining DBT with BimlFlex
During our travels, we are regularly asked how BimlFlex compares against DBT. Our BimlFlex data solution automation framework would be compared against all our competitors, of course, but DBT is the odd one out in this case. It is worth covering this in detail.
This is because BimlFlex and DBT are not really competing. In fact, they can complement each other.
DBT stands for ‘Data Build Tool’ and is an effective approach for organizing data pipelines using simple configuration files and a Command Line Interface.
At a high level, DBT works by defining a project that contains ‘models’. Models contain SQL files that are saved to a designated directory where DBT can find them. A project itself references a ‘profile’ which contains connectivity information, and DBT will look after deployment. Models can be referenced to each other to construct a data logistics pipeline with separate steps, which can be visualized as a data logistics lineage graph.
The fact that everything (i.e. configuration files, model files) are stored in plain text (i.e. not as binaries) means that it’s a good match for data solution automation framework – which BimlFlex provides.
As a software for managing orchestration and deployment for data logistics processes, DBT does not provide a framework or patterns out of the box. It comes with templating engine support (Jinja) that allows users to define their own SQL templates, but users would have to provide the patterns themselves as well as the framework to design and manage the metadata that would power those templates.
In short, it does not provide a data solution automation framework, and this is where BimlFlex comes in.
BimlFlex contains production-ready templates for common architectures as well as a Graphical User Interface (GUI) to manage the models and metadata. BimlFlex compiles this design metadata into executable artifacts for various target platforms – including the Microsoft Database family, Synapse, Snowflake and Databricks. BimlFlex can natively generate fully-fledged Execute Pipelines and Mapping Data Flows, but it can also generate SQL Stored Procedures.
If BimlFlex would be combined with DBT, data teams would be able to leverage DBT’s strengths but not have to invent or manage their own automation framework and metadata management solution.
With some configuration you can configure BimlFlex to generate data logistics processes to a directory that is configured for DBT and manage orchestration there.
Options for using BimlFlex with DBT
Even though BimlFlex’s automation framework is a good fit for DBT, there are a few approaches you can take which may require some customization of the BimlFlex output.
Because DBT’s workflow uses Create Table As Select (CTAS) statements in queries or common table expressions (CTEs) to define tables, it does not directly support table using Data Definition Language (DDL) statements. For the same reason, Stored Procedures are usually not part of the DBT workflow either. In DBT, this is managed through SQL SELECT statements.
A possible approach is to use DBT to execute the BimlFlex-generated Stored Procedures as Macros. This means that the procedure requires a wrapper such as in this example:
{% macro output_message(return code) %}
<Stored Procedure>
call output_message();
{% endmacro %}
In BimlFlex, this can be done using the Extension Points for the Stored Procedures.
Using more advanced use of Extension Points and Bimlscript, it is also an option to modify the procedure into one or more SQL statements or common table expressions. This will remove the procedure headers and use C# or Visual Basic to spool the results into DBT model files.
Data sources can be emitted using the same techniques to represent the DBT source Yaml files, for example:
sources:
- name: AdventureWorksLT
tables:
    - name: address
    - name: customer
Of course, it is also possible to combine the strengths of BimlFlex and DBT in different ways. You can use the standard BimlFlex features to generate Execute Pipelines, SSIS Packages or Mapping Data Flows to connect to the data sources, and load these into a staging layer from where DBT can pick up the data logistics using BimlFlex generate SQL statements.
If you want to know more, please reach out to the BimlFlex team to see how you can combine the power of BimlFlex’ code generation with DBTs orchestration and lineage capabilities.
Dev Diary - Initial Extension Points added to Mapping Data Flows
Work on expanding our support for Mapping Data Flows is progressing, and the latest additions introduce the first Extension Points to our generated Mapping Data Flow output.
Extension Points allow BimlFlex users to 'inject' bespoke logic into the standard templates that are generated out of the box. Using Extension Points, it is possible to add, remove or modify the way the templates operate to cater for circumstances that are unique to specific projects.
In principle, the complete .Net framework is available by using BimlScript, but in most cases it will be sufficient to add one or more transformations, or to direct data to go down a different path in the processing.
Extension Points are available for various templates and support different technologies, but for Mapping Data Flows this was previously not yet available - until now!
The first (three) Extension Points for Mapping Data Flows have now been added for our 'source-to-staging' templates:
- Post Copy
- Post Derived Column
- Add Sink
The following diagram shows where these tie into the regular template:

This feature allows for various new scenarios to be supported using Mapping Data Flows.
For example, you can add a Sink and connect it to any transformation in the data flow. Or, you can add custom columns to be added to the data flow at various spots in the process.
These new Extension Points can be added as always using BimlStudio. Because we mean to add many more, we have created a new Mapping Data Flows category for this:

More Extension Points will be added over time, but for now these extension points will be available as part of our BimlFlex 2022 R2 (May 2022) release.
Dev Diary - Embracing the new Azure Data Factory Script Activity
Earlier this month, the Azure Data Factory (ADF) team at Microsoft release a new way to execute SQL statements in a pipeline: the Script Activity.
The Script Activity allows you to execute common SQL statements to modify structures (DDL) and store, retrieve, delete or otherwise modify data (DML). For example, you can call Stored Procedures, run INSERT statements or perform lookups using queries and capture the result. It complements existing ADF functionality such as the Lookup and Stored Procedure pipeline activities.
In some cases though, the Lookup and Stored Procedure activities have limitations that the new Script Activity does not have. Most importantly, the Script Activity also supports Snowflake and Oracle.
This means that additional customizations to call Stored Procedures on Snowflake (and lookups, to an extent) are no longer necessary. You can simply use the Script Activity.
Varigence has been quick to adopt this new feature, which will be available in the upcoming 2022 R2 release (available early April). As part of 2022 R2, the Script Activity is supported in BimlScript, and the BimlFlex patterns have been updated to take advantage of this new ADF functionality.
A major benefit is that a single approach can be used for all lookup and procedure calls. And, specifically for Snowflake targets, it is no longer necessary to use the Azure Function Bridge that is provided by BimlFlex to run procedures and queries on Snowflake. Even though the Azure Function Bridge has been effective -and is still in use for certain features that ADF does not yet support directly - we prefer to use native ADF functionality whenever possible because this offers the most flexibility and ease of maintenance for our users.
Below is an example of the changes in the patterns that you can expect to see in the upcoming 2022 R2 release. In this example, the Azure Function call has been replaced by a direct script call to Snowflake.

Dev Diary - Pushing down data extraction logic to the operational system environment
In some scenarios, when a 'source' operational system shares the technical environment with the data solution, it can be efficient to make sure all processing occurs on this environment. This way, the data does not have to 'leave' the environment to be processed.
In most cases, operational systems are hosted on different environments than the one(s) that host the data solution, which means that data first needs to be brought into the data solution for further processing.
If, however, the environment of an operational system is the same as that of the data solution, this initial 'landing' or 'staging' step does not require the data to be processed via an external route. In other words, it becomes possible to 'push down' data staging logic to this shared environment. This way, the delta detection and integration of the resulting data delta into the data solution all occurs in the environment, and not by using separate data transformations in for example SQL Server integration Services (SSIS) or Azure Data Factory (ADF).
Pushdown is sometimes referred to as 'ELT', (Extract, Load and then Transform) as opposed to the 'ETL' (Extract, Transform and then Load) paradigm. While these terms may not always be clear or helpful, generally speaking ELT / pushdown means that most code is directly running on the native environment whereas ETL signals most code is running as part of a separate transformation engine not directly related to the environment.
Currently in BimlFlex, the source-to-staging processes that follow the ELT paradigm always use either a SSIS or an ADF Copy activity to move the data onto the data solution environment before the processing can start. In the scenario outlined above, when the operational system is hosted on the same environment as the data solution, this landing step can be skipped.
With the 2022 R2 release, it will now be possible to use the new Pushdown Extraction feature to deliver this outcome, and make sure the integration of data in the solution can be achieved without requiring the additional landing step or Copy Activity.
Enabling Pushdown Extraction at Project level will direct BimlFlex to generate Stored Procedures that replace the initial landing of data using SSIS and/or ADF.
Upcoming Business Modeling webinars

We believe Business Modeling is a feature that is core to delivering lasting and manageable data solutions. To promote, explain and discuss this feature -and the planned improvements- we have organized a number of webinars.
If this is of interest, please register now for the first two webinars. These presentations will focus on the benefits of creating a business model, the structured approach to do so, how to map data to the business model, and much more.
Each webinar has US (EST) and EU/AUS (CET) time slots. The sessions will be presented live and recordings will also be made available afterwards.
More details here.
Dev Diary - Customizing file paths for Delta Lake
The Delta Lake storage layer offers interesting opportunities to use your Azure Data Lake Gen2 storage account in ways that are similar to using a database. One of the drivers for BimlFlex to support Azure Data Factory (ADF) Mapping Data Flows ('data flows') is to be able to offer a 'lakehouse' style architecture for your data solution, using Delta Lake.
BimlFlex supports delivery a Delta Lake based solution by using the 'Mapping Data Flows' integration template (currently in preview). This integration template directs the BimlFlex engine to deliver the output of the design metadata as native data flows. These can then be directly deployed to Azure Data Factory.
In BimlFlex, configuring the solution design for Delta Lake works the same way as using any other supported connection. The difference is that the connection maps to an Azure Data Lake Gen2 Linked Service. The container specified in the connection refers to the root blob container in the data lake resource.
Recently, we have added additional flexibility to configure exactly where the files are placed inside this container. This is important, because directories/folders act as 'tables' in Delta Lake if you were to compare it to a database.
So, even though you may still configure different connections at a logical level in BimlFlex (e.g. to indicate separate layers in the design), they can now point to the same container, using separate directories to keep the data apart. You can have your Staging Area and Persistent Staging Area in the same container, in different directories. Or you can place these in the same container and directory using prefixes to identify each layer. And you can now add your Data Vault and Dimensional Model to the same container as well.
This way, it is now supported to define where your 'tables' are created in your Delta Lake lakehouse design, using BimlFlex.
Dev Diary - Configuring load windows and filters for Mapping Data Flows
When developing a data solution, it is often a requirement to be able to select data differentials ('deltas') when receiving data from the operational systems that act as the data 'source'.
This way, not all data is loaded every time a given source object (table, or file etc.) is processed. Instead, data can be selected from a certain pointer, or value, onwards. The highest value that is identified in the resulting data set selection can be maintained in the data logistics control framework. It is saved in the repository, so that the next time the data logistics process starts, the data can be selected from this value onwards again.
This is sometimes referred to as a high water mark for data selection. Every time a new data differential is loaded based on the previously known high water mark, a new (higher) water mark is recorded. This assumes there is any data available for the selection, otherwise the high water mark remains as it was. The process is up-to-date in this case. There is nothing to do until new data changes arrive.
The range between the most recent high water mark and the highest value of the incoming data set can be referred to as the load window. The load window, as combination of a from- and to value, is used to filter the source data set.
To implement this mechanism, the data logistics process first retrieves the most recent high water mark from the repository (the 'from' value). Then, the data source is queried to retrieve the current highest possible value (the 'to' value). The 'from' and 'to' values define the load window, and are added to the selection logic that connects to the data source.
If the 'from' and 'to' values are the same, there is no new data to process. The selection can be skipped. In this scenario, there also is no need to update the high water mark for the next run. If the data retrieval was to be executed, it would not return data anyway.
When the 'to' value is different, this is updated in the repository.
Configuring load windows in BimlFlex
In BimlFlex, this mechanism can be implemented using parameters. Parameters are essentially filters that can be used to limit the data selection for the object that they apply to.
A parameter can have a 'from' and a 'to' component, or only a 'from' one. If both a specified, BimlFlex will treat this as a load window. If only the 'from' part is specified it will be treated as a filter condition.
In the example below, the Salesforce 'Account' object has a parameter defined for the 'LastModifiedDate' column. The 'from' name of this value is 'Last_modified', and the 'to' name is 'Next_modified'.

Because Salesforce is an unsupported data source in Mapping Data Flows ('data flows'), the data logistics that is generated from this design metadata will include a Copy Activity to first 'land' the data. Because this is the earliest opportunity to apply the load window filter, this is done here. Driven by the parameter configuration, the query that will retrieve the data will include a WHERE predicate.
In addition, BimlFlex will generate 'lookup' procedures that retrieve, and set, the high water mark value using the naming specified in the parameter.

Direct filtering in Mapping Data Flows
In regular loading processes, where the data flow can directly connect to the data source, the Copy Activity is not generated. In this case, the filtering is applied as early as possible in the data flow process. When this can be done depends on the involved technologies.
For example, using a database source it is possible to apply this to the SQL SELECT statement. When using inline processing for Delta Lake or file-based sources this is done using a Filter activity.
For example, as displayed in this screenshot:
 .
.
True to the concepts outlined in earlier blog posts, the BimlFlex parameters are themselves defined as Mapping Data Flow parameters to allow for maximum flexibility. The executing ADF pipeline will provide these to the data flow. The parameter values are passed down into the data flow.
Next steps
At the time of writing, database sources have not been optimized to push the selection to the data source as a WHERE clause. So, the SELECT statement is not yet created for database sources to accommodate filtering here - which is conceptually the most performant outcome. However, the filtering as per the above screenshot already works so, functionally, the output is the same.
It is equally possible to now define load windows on file-based data sources, and this is also an area to investigate further. Using data flows, the BimlFlex parameter concept for generating load windows is not restricted to database sources any longer.
Dev Diary - Connecting to unsupported data sources using Mapping Data Flows and BimlFlex
When configuring BimlFlex to use Mapping Data Flows ('data flows'), the generated data flow will in principle directly connect to the configured Source Connection and process the data according to further configurations and settings.
For example, to initially 'stage' data into the data solution patterns such as the ones below can be generated:
In both these cases, however, this relies on data flows to actually be able to directly connect to the data source. But, this is not always supported. The following link to the Microsoft documentation shows which technology is supported by the various areas of Azure Data Factory (ADF).
As Varigence, we still want to be able to enable our users to mix-and-match the BimlFlex project configuration using our supported data sources - even though this may not (yet) be supported directly by the ADF technology in question.
For example, BimlFlex supports using Salesforce REST APIs as data source, and this can be used to generate ADF pipelines that stage and process data further. If you would want to use data flows to implement complex transformations -for example using derived columns- for a Salesforce data source that would be an issue.
To make sure our users can still use data flows for data sources that are not (yet) natively supported, the BimlFlex engine has been updated to detect this. If this is the case, the generated output will include additional processing steps to first 'land' the data into a data lake or blob storage, and then process the data from here using data flows.
In practice, this means that an additional Copy Data activity will be added to the ADF pipeline that starts the data flow. The ADF pipeline acts as 'wrapper' for the data flow and already includes the interfaces to the runtime control framework (BimlCatalog).
To summarize if a BimlFlex is configured to use data flows and - contains a source connection that is supported, then a direct connection will be generated - contains a source connection that is not support, then an additional landing step will be generated
Consider the following project configuration:

In this example, a Salesforce connection is configured as source. A staging connection is also defined and ultimately the data will be integrated into a Data Vault model. No persistent staging area connection is configured for this project. Note that the integration stage is set to Mapping Data Flows. Because Salesforce connections are not natively supported for data flows, a landing step will be added by BimlFlex.
To direct BimlFlex where to land the data, the source connection will need to be configured with a landing connection. This is shown in the screen shot below.

The result in the generated output will appear as per the screenshot below. The Copy Data activity will land the data before the data flow will process these to the staging area.

Dev Diary - Adding Transformations to Mapping Data Flows
The Mapping Data Flows ('data flows') feature of Azure Data Factory (ADF) provides a visual editor to define complex data logistics and integration processes. Data flows provides a variety of components to direct the way the data should be manipulated, including a visual expression editor that supports a large number of functions.
Work is now nearing completion to make sure BimlFlex can incorporate bespoke logic using this expression language, and generate the corresponding Mapping Data Flows.
For every object in every layer of the designed solution architecture, it is possible to add derived columns. Derived columns are columns that are not part of the 'source' selection in a source-to-target data logistics context. Instead, they are derived in data logistics process itself.
This is done using Derived Column Transformations in Mapping Data Flows, in a way that is very similar to how this works in SQL Server Integration Services (SSIS).
In BimlFlex, you can define complex transformation logic this way using the data flow expression syntax. The resulting code will be added to the selected Mapping Data Flow patterns, and visible as Derived Column Transformations. You can also define dependencies between derived columns, for example that the output of a calculation is used as input for the next one.
Consider the screenshot below.

The column 'MyDerivedColumn' is defined as part of the 'Account' object. The 'IsDerived' checkbox is checked, and the 'Dataflow Expression' is provided. This metadata configuration will generate a Derived Column Transformation with this column name, and the expression.
The resulting column is added to the output dataset.

In the first screenshot, the 'solve order' property was also set - with a value of 0.
The solve order directs BimlFlex in generating the logic in a certain (incremental) order. So a lower solve order will be created as an earlier Derived Colum Transformation, and a higher solve order later. The exact numbers do not matter, only that some are higher or lower than others.
If multiple derived columns are defined with the same solve order, they will be generated in the same Derived Column Transformation. This makes it possible to break apart complex logic in separate steps, and use them for different purposes.
This is one way to allow potentially complex logic to be defined in the metadata, and use this to generate consistent output that meets the requirements.
Delivering data from a Data Vault
As part of our recent 2022 R1 release there have been countless updates to our reference documentation. In the background, much of this is generated from our BimlFlex code and is also available now as tooltips and descriptions that are available when working with BimlFlex day-to-day.
Improvements have been made across the board for our documentation websites, and certain elements have been highlights in this blog. For example our updated documentation on Extension Points.
There are two areas worth mentioning specifically around Data Vault implementation, and delivering results using the 'Business' Data Vault concept and into Dimensional Models.
Have a look at our updated Data Vault section, and specifically how to implement the following using BimlFlex:
BimlFlex 2022 R1 is available!
We are super excited to announce the newest version of BimlFlex!!!
The 2022 R1 release introduces the Business Modeling feature, adds support for many new source systems, and improvements of the overall experience with various bug fixes.
See what has been done here in our release notes.
This release is the culmination of many months of hard work by the team, and it is a major step forward in making the BimlFlex approach as easy and encompassing as it can be.
Supporting the release, many documentation upgrades have been done in our reference documentation sits as well - so check it out!
Dev Diary – Generating a Mapping Data Flow Staging process without a Persistent Staging Area
A few weeks ago, we covered the generation of a Mapping Data Flows Staging process for Azure Data Factory (ADF), using BimlFlex. This process uses a Persistent Staging Area (PSA) to assert if incoming data is new or changed by implementing a lookup and comparison.
There are some obvious limitations to this particular pattern. For example, this pattern does not support detecting records that have been physically deleted from the data source (a ‘logical’ delete), which may happen for certain data sources. The lookup to the PSA is the equivalent of a Left Outer Join in this sense.
And, generally speaking, not everyone needs or wants to implement a PSA in the first place.
This initial Staging pattern is just one of many patterns that are added to the Mapping Data Flows feature, because being able to use multiple patterns is necessary to develop and manage a real-world data solution.
It is not uncommon for a data solution to require various different Staging patterns to meaningfully connect to the source data across potentially many applications. Sometimes, multiple Staging patterns are needed even for a single data source.
This is because individual data sets may require to be accessed and staged in specific ways, such as for example the ability to detect the deleted records that were mentioned earlier. Some source data sets benefit from this ability, where others may explicitly not want this logic in place because this may result in a performance penalty without any functional gains.
Using BimlFlex, the design and configuration of the data solution directs what patterns will be used and where they are applied. In other words, different configurations result in different patterns being generated.
An example of how modifying the design in BimlFlex will change the Staging pattern is simply removing the PSA Connection from the Project.

If there is a PSA Connection in place, the Mapping Data Flow will be generated with the PSA lookup and target (sink). Once you remove this Connection, the pattern that will be used is more of a straightforward data copy.

The team at Varigence is working through these and other configuration to make sure the necessary patterns are covered, including delete detection, landing data in blob storage and much more.
Creating custom column-level transformations in BimlFlex
In the real world, many data solutions require a high degree of flexibility so that they can cater to unique scenarios.
This can be necessary because of specific systems that require integration, or simply because certain data needs bespoke logic to be interpreted correctly. BimlFlex offers ways to specify specific transformations at column level - using Custom Configurations. This is one of various features that allow a high level of customization for designing a data solution.
Out of the box, BimlFlex already provides a number of configurations already. These are found in the 'Configurations' screen in the BimlFlex App:

These standard configurations can be combined with the override framework so that they apply to certain projects, tables (objects), batches, or only to certain stages in the architecture. This standard way of defining data logistics behavior already covers most typical use-cases, but if additional customization is required Custom Configurations can be added as well.
A Custom Configuration works the same way as the standard configuration; it can be applied to certain scenarios using overrides and by definition itself. It is also possible for users to add their expression logic in the native syntax (e.g. SSIS, SQL, Mapping Data Flows). BimlFlex will interpret the configurations, and add these as columns in the data logistics process with the specified expression.
So, for example, if you want to add a column that performs a specific calculation, or captures runtime information, you can add a Custom Configuration and apply this to the area you want this column to be added to.
This is implemented in the screenshot below.
A configuration with the name of 'RandomNumber' is defined, with the Configuration Value of 'RandomValue'. It is configurated to apply only to Staging Area processes without further exceptions or overrides (it is 'derived' as a staging attribute). Because it is set as 'derived', the ADF DataFlow Expression 'random(10)' will be used.
Defining a Custom Configuration like this will result in the generation of an additional column called 'RandomValue' to the data set, and with a transformation defined as 'random(10)'. If the workflow is run, a random number value will be created and saved with the data.
This is a simple example, but having the ability to add native logic to a Custom Configurations allows for any degree of complexity that is required.
Configurations can be used to implement specific column-level logic, so that this can be taken into account when the data logistics processes are generated. Other similar features, that target other areas of the solution are settings and extension points.
Dev Diary - First look at a source-to-staging pattern in Mapping Data Flows
The 2021 BimlFlex release is being finalized, and will be available soon. This release contains a preview version of Mapping Data Flow patterns that can be used to generate this type of output from BimlFlex. The corresponding (and updated) BimlStudio will of course have the support for the full Mapping Data Flow Biml syntax.
The first pattern you will be likely to see is the loading of a data delta from a source into a Staging Area and an optional Persistent Staging Area (PSA). Whether a PSA is added is controlled by adding a PSA connection to the project that sources the data. So, adding a PSA connection will add a PSA to the process, unless overridden elsewhere.
Conceptually, the loading of data into a Staging Area and PSA are two separate data logistics processes. For Mapping Data Flows, these are combined into a single data flow object to limit the overhead and cost involved with starting up, and powering down, the Integration Runtime. Data is loaded once and then written multiple times from the same data flow. This approach is something we'll see in the Data Vault implementation as well.
This means that a source-to-staging loading process has one source, and one or two targets depending if the PSA is enabled. BimlFlex will combine these steps into a single Mapping Data Flow that looks like this:

This is by no means the only way to load data from a data source into the solution. Especially this layer requires various ways to load the data, simply because it can not always be controlled how the data is accessed or received. Potentially many limitations in applications, technology, process and organization apply - and this drives the need for different patterns to cater for different systems and / or scenarios. The staging layer is often the least homogenous in terms of approach for the data solution, and the full BimlFlex solution will see a variety of different patterns driven by settings and configurations.
If we consider this particular pattern, we can see that the PSA is used to check if data is already received. If no PSA is available, the data is just copied from the source into the (Delta Lake) Staging Area.
The validation whether data is already available is done using a Lookup transformation. The lookup compares the incoming record (key) against the most recent record in the PSA. If the incoming key does not exist yet, or it does exist but the checksums are different, then the record is loaded as data delta into the Staging Area and also committed to the PSA. 'Most recent' in this context is the order of arrival of data in the PSA.
At the moment the supported sources and targets for this process are Azure SQL databases and Delta Lake, but the Biml language now supports all connections that are provided by Azure Data Factory and Mapping Data Flows so more will be added over time.
However, using Delta Lake as an inline dataset introduces an interesting twist in that no SQL can be executed against the connection. This means that all logic has to be implemented as transformations inside the data flow. For now, the patterns are created with this in mind although this may change over time.
The most conspicuous consequence of this requirement is that the selection of the most recent PSA record is implemented using a combination of a Window Function and Filter transformation. The Window Function will perform a rank, and the Filter only allows the top rank (most recent) to continue.
Over the next few weeks we'll look into more of these patterns, why they work the way they do and how this is implemented using Biml and BimlFlex.
Dev Diary - Integration with the BimlCatalog
Every data solution benefits from a robust control framework for data logistics. One that manages if, how and when individual data logistics processes should be executed. A control framework also provides essential information to complete the audit trail that tracks how data is processed through the system and is ultimately made available to users.
Working with Biml via either BimlExpress or BimlStudio provides the language, compiler, and development environment to create your own data solution frameworks from scratch, which means the control framework must be defined also.
BimlFlex has the advantage that that the output that is generated is already integrated with the proprietary control framework that is provided as part of the solution: the BimlCatalog. The BimlCatalog is the repository that collects runtime information and manages the registration of individual data logistics processes. It is used to control the execution and provides operational reporting on the overall loading process such as run times and success / failure rates.
The BimlCatalog is available freely and can be integrated with your own custom solution – for example using BimlExpress. However, when using BimlFlex the integration of the patterns with the BimlCatalog is already available out of the box. This is the topic of today’s post.
BimlCatalog integration for Mapping Data Flows
The BimlCatalog classifies data logistics as either an individual process or a batch. A batch is a functional unit of execution that calls one or more individual processes. Processes can either be run individually, or as part of the batch if one is defined. In Azure Data Factory, a batch is essentially an Execute Pipeline that calls other pipelines.
To inform the control framework of this, a flag that labels a process as a batch is passed to the stored procedure that is provided by the BimlCatalog. This procedure, the LogExecutionStart also accepts the execution GUID, the name of the process and the project it belongs to as input parameters.

The LogExecutionStart will run a series of evaluations to determine if a process is allowed to be run, and if so under what conditions. For example, an earlier failure may require a clean-up or it may be that the same process is already running. In this case, the control framework will wait and retry the start to allow the earlier process to complete gracefully. Another scenario is that already successfully completed processes that have been run as part of a batch may be skipped, because they already ran successfully but have to wait until the remaining processes in the batch are also completed without errors.
After all the processes are completed, a similar procedure (LogExecutionEnd) informs the framework that everything is OK.
A similar mechanism applies to each individual process, as is visible in the screenshot below.

In this example, the IsBatch flag is set to 'false' as this is not a process that calls other processes. Similarly, a parent execution ID is provided - the runtime execution ID of the (batch) process that calls this one.
In case something goes wrong
So far, the focus of the control framework integration has been on asserting a process can start and under what conditions. However, it is important to make sure that any failures are handled and reported. This is implemented at the level of each individual process.

Each individual execute pipeline that calls a Mapping Data Flow will report any errors encountered by calling the LogExecutionError procedure. Within the BimlCatalog, this will also cause the parent batch to fail and inform subsequent processes in the same batch to gracefully abort. The batch will preserve the integrity of the data for all processes it encapsulates.
Dev Diary – Orchestrating Mapping Data Flows
Earlier dev diary posts have focused on defining and deploying a Mapping Data Flow using Biml. For example, covering the Biml syntax and adding initial transformations and parameters.
Additional complexity will be added in upcoming posts to ultimately cover a fully functioning set of patterns.
These Mapping Data Flows can be generated from BimlFlex by selecting the ‘Azure Data Flow’ Integration Template for a Project. The Project defines which data sets are in scope for a specific deliver or purpose, and the Integration Template directs the automation engine as to what output is required – Mapping Data Flows in this case.
The settings, overrides and configurations govern how the resulting output will be shaped and what features are included in the resulting Mapping Data Flow.
One of these features covers the orchestration.
In Azure, a Mapping Data Flow itself is not an object that can be executed directly. Instead, it needs to be called from an Execute Pipeline. This pipeline can be run, and in turn it will start the data flow.
This means that a corresponding pipeline will need to be created as part of any Mapping Data Flow, and this is exactly what BimlFlex does out of the box. In addition to this, BimlFlex can use this pipeline to integrate the data logistics into the control framework – the BimlCatalog database. This database captures the runtime details on process execution, so that there is a record of each execution result as well as statistics on volumes processed and more.
An example of the generated output is shown in the screenshot below:

The BimlCatalog will also issue a unique execution runtime point that is passed down from the pipeline to the Mapping Data Flow where it can be added to the data set. This means that a full audit trail can be established; it is always known which process was responsible for any data results throughout the solution.
But BimlFlex will generate more than just the pipeline wrapper for the Mapping Data Flow and integration into the control framework. It will also generate a batch structure in case large amounts of related processes must be executed at the same time – either sequentially or in parallel.
To manage potentially large numbers of pipelines and Mapping Data Flows, BimlFlex automatically generates a ‘sub-batch’ middle layer to manage any limitations in Azure. For example, at the time of writing Azure does not allow more than 40 objects to be defined as part of a single pipeline.
BimlFlex will generate as many sub-batches as necessary to manage limits such as these, and each process will start the next one based on the degree of parallelism defined in metadata.

The next post will cover how to start generating this using Biml.
Dev Diary – Defining Mapping Data Flow Parameters with Biml
The previous post on developing Delta Lake using Azure Data Factory Mapping Data Flows covered how and why we use parameters in our BimlFlex-generated Mapping Data Flow data logistics processes.
As a brief recap, parameters for a Mapping Data Flow can both inherit values from the process that executes it (the Execute Pipeline) as well as hold values that can be used to define the data flow itself.
For BimlFlex this means the Mapping Data Flows can integrate with the BimlCatalog, the data logistics control framework, and provide a central access to important information received from the metadata framework. For example, parameters contain the composition of the Integration Key and the names of standard fields as they have been configured in the BimlFlex App.
Adding Parameters using Biml
The code snippet below uses the example from the previous post on this topic and adds a number of parameters to the Mapping Data Flow. Once defined, these become accessible to the Execute Pipeline that calls the Mapping Data Flow so that information can be passed on.
The first four parameters of this example reflect this behaviour. The start time of the individual process and its batch (if there is one) are passed to the Mapping Data Flow so that these values can be added to the resulting data set.
The other parameters are examples of attributing both the name of custom columns as well as their default values. This is really useful to dynamically add columns to your data flow.
This approach allows any custom or standard configuration to make its way to the generated data logistics process.
As a final thing to note, some parameters are defined as an array of strings by using the string[] data type. Mapping Data Flows has a variety of functionality that allows easy use of an array of values. This is especially helpful when working with areas where combinations of values are required, such as for instance calculation of full row hash values / checksums or managing composite keys. Future posts will go into this concept in more detail.
For now, let's have a look at the syntax for defining parameters in Mapping Data Flows - using the Parameters segment.
<Biml xmlns="http://schemas.varigence.com/biml.xsd">
<DataFactories>
    <DataFactory Name="bfx-dev-deltalake-demo">
        <Dataflows>
            <MappingDataflow Name="HelloWorld">
                <Sources>
                    <InlineAzureSqlDataset
                        Name="HelloWorldExampleSource"
                        LinkedServiceName="ExampleSourceLS"
                        AllowSchemaDrift="false"
                        ValidateSchema="false" />
                </Sources>
                <Sinks>
                    <InlineAzureSqlDataset
                        Name="HelloWorldExampleTarget"
                        LinkedServiceName="ExampleTargetLS"
                        SkipDuplicateInputColumns="true"
                        SkipDuplicateOutputColumns="false"
                        InputStreamName="bla.Output" />
                </Sinks>
                <Parameters>
                    <Parameter Name="BatchExecutionId" DataType="integer">-1</Parameter>
                    <Parameter Name="BatchStartTime" DataType="string">'1900-01-01'</Parameter>
                    <Parameter Name="RowAuditId" DataType="integer">-1</Parameter>
                    <Parameter Name="ProcessStartTime" DataType="string">'1900-01-01'</Parameter>
                    <Parameter Name="EffectiveFromDateAttributeName" DataType="string">'FlexRowEffectiveFromDate'</Parameter>
                    <Parameter Name="RowRecordSourceAttributeName" DataType="string">'FlexRowRecordSource'</Parameter>
                    <Parameter Name="RowHashAttributeName" DataType="string">'FlexRowHash'</Parameter>
                    <Parameter Name="RowSandingValue" DataType="string">'~'</Parameter>
                    <Parameter Name="RowSourceIdAttributeName" DataType="string">'FlexRowSourceId'</Parameter>
                    <Parameter Name="RowRecordSource" DataType="string">'awlt'</Parameter>
                    <Parameter Name="SourceKeyAccount" DataType="string[]">['AccountCodeAlternateKey']</Parameter>
                    <Parameter Name="SourceColumnsAccount" DataType="string[]">['AccountDescription','AccountType','Operator','CustomMembers','ValueType','CustomMemberOptions']</Parameter>
                    <Parameter Name="SchemaNameSource" DataType="string">'dbo'</Parameter>
                    <Parameter Name="TableNameSource" DataType="string">'Account'</Parameter>
                </Parameters>
            </MappingDataflow>
        </Dataflows>
        <LinkedServices>
            <AzureSqlDatabase Name="ExampleSourceLS" ConnectionString="data source=example.com;"></AzureSqlDatabase>
            <AzureSqlDatabase Name="ExampleTargetLS" ConnectionString="data source=example.com;"></AzureSqlDatabase>
        </LinkedServices>
    </DataFactory>
</DataFactories>
</Biml>
Using built-in logging for Biml
When working with Biml in any situation, be it using BimlExpress, BimlStudio or BimlFlex, it can be helpful to peek into what is happening in the background.
Some of you would have developed your own metadata framework that provides information to generate Biml, created a solution in BimlStudio or added extensions for BimlFlex. In all cases, it is possible to add logging to your solution and this is already natively available in BimlScript.
There is no need to create your own logging framework if the Biml logging already meets your needs, and it covers most common scenarios. The standard logging can write to a text buffer, an object such as a list, a file or it can trigger an event.
Working with logging is covered in detail in The Biml Book, and it is worth having a look especially if you are using BimlExpress.
But it is also possible to add logging to BimlStudio right away with just a few lines of code, with the immediate benefit that the log messages appear in the logging pane.
Make sure you enable the logging function in BimlStudio for this. This can be found in the ‘Build & Deploy’ menu.
To get started, add the Varigence Utility Logging reference to you script, and give the below code a try. This simple example creates a List of string values that are meant to be used to generate DataFactory Biml.
For each iteration, a log is written to the logging pane.
<#@ import namespace="Varigence.Utility.Logging" #>
<#
   LoggingManager.TryDefaultLog($"Info", "BimlScript", $"Getting started.");
   List<string> datafactories = new List<string>(new string[] { "MyNewDataFactory", "TheBestDataFactory" });
   LoggingManager.TryDefaultLog($"Info", "BimlScript", "Getting started...");
#>
<Biml xmlns="http://schemas.varigence.com/biml.xsd">
   <DataFactories>
      <#
      foreach (string datafactory in datafactories)
      {
      #>
      <DataFactory Name="<#=datafactory#>">
         <#LoggingManager.TryDefaultLog($"Info", "BimlScript", $"Hey, I just added {datafactory}!");#>
      </DataFactory>
      <#
      }
      #>
   </DataFactories>
</Biml>
The result looks like the screenshot below. Happy logging!

Dev Diary - Using Mapping Data Flow Parameters to dynamically use BimlFlex metadata
When using Mapping Data Flows for Azure Data Factory with inline datasets, the schema can be evaluated at runtime. This also paves the way to use of one of the key features this approach enables, which is support for schema drift.
Schema drift allows to evaluate or infer changes made to the schema (data structure) that is read from or written to. Without going into too much detail on this for now, the key message is that the schema is not required to be known in advance and can even change over time.
This needs to be considered for the new Data Flow Mapping patterns for BimlFlex. The Data Flow Mappings may read from multiple sources of different technology and write to an equal variety of targets (sinks), and some have stronger support for defining the schema than others.
Moreover, various components that may be used in the Data Flow Mapping require a known or defined column to function. This is to say that a column needs to be available to use in many transformations; in many cases this is mandatory.
The approach we are pioneering with BimlFlex is to make sure the generated patterns / Data Flow Mappings are made sufficiently dynamic by design by using Data Flow Mapping Parameters, so that we don't need to strictly define the schema upfront. The BimlFlex generated output for Data Flow Mappings intends to strike a balance between creating fully dynamic patterns that receive their metadata from BimlFlex, and allowing injecting custom logic using Extension Points.
Using Data Flow Mapping Parameters goes a long way in making this possible.
Using parameters, various essential columns can be predefined both in terms of name as well as value. This information can be used in the Data Flow Mapping using the dynamic content features provided.
Consider the following screenshot of one of the generated output that loads new data form file into a Delta Lake staging area:

In our WIP approach, BimlFlex generates the essential metadata as parameters which are visible by clicking anywhere on the Data Flow Mapping canvas outside of the visible components.
As an example, the ‘RowRecordSource’ parameter contains the name of the Record Source value from the BimlFlex metadata. This can be used directly in transformation such as in the Derived Column transformation below:

This means that we can use the names of the necessary columns as placeholders in subsequent transformations and their value will be evaluated at runtime. This can also be used to dynamically set column names, if required.
In the next posts, we’ll look at the Biml syntax behind this approach for the various transformations / components used.
Dev Diary - Deploying Biml-Generated ADF Data Flow Mappings
In the previous post on defining Data Flow Mappings for Azure Data Factory using Biml, we looked at a simple Biml script to define a Data Flow Mapping.
You may have noticed that the solution was 'built' in BimlStudio, at the bottom of the screenshot.

The build process has successfully created the necessary Azure Data Factory artefacts to create the intended Data Flow Mapping on Azure. BimlStudio has placed these in the designated output directory.
Biml and BimlStudio have the capability to generate various artefacts including Data Definition Language (DDL) files but it is the Azure Resource Manager (ARM) templates that we are interested in for now.
BimlStudio creates an arm_template.json file and a corresponding arm_template_parameters.json file that contain everything needed to deploy the solution to Azure. For large solutions, the files will be split into multiple smaller related files to ensure deployments without errors that may happen due to technical (size) limitations. This is done automatically as part of the build process.
Deployment of the ARM templates can be done manually via the Azure portal, but a convenient Powershell script can also be created using the New-AzResourceGroupDeployment cmdlet.
As an example, the following structure can be used using this approach:
$azureSubscriptionId = "<subscription id>"
$azureResourceGroup = "<resource group id>"
$outputBasePath = "D:\VarigenceProjects\DeltaLakePoC\output";
$deploymentLabel = "bfx-dev-deltalake-demo-$(Get-Date -Format "yyyyMMddmmss")"
$armTemplatePath = "$($outputBasePath)\DataFactories\bfx-dev-deltalake-demo\arm_template.json"
$armTemplateParamsPath = "$($outputBasePath)\DataFactories\bfx-dev-deltalake-demo\arm_template_parameters.json"

Set-AzContext -Subscription $azureSubscriptionId
New-AzResourceGroupDeployment -Name $deploymentLabel -ResourceGroupName $azureResourceGroup -TemplateFile $armTemplatePath -TemplateParameterFile $armTemplateParamsPath
Scripts such as these are automatically created using BimlFlex-integrated solutions, because the necessary information is already available here. In this example, the script has been updated manually.
When updated, the script can be run to deploy the solution to Azure. For example using Visual Studio Code:

With the expected result in the target Data Factory:

Dev Diary - Generating ADF Data Flow Mapping using Biml
The work to generate Data Flow Mappings in Azure Data Factory using the BimlFlex automation platform is nearing completion. While there is still more to do, there are also a lot of topics that are worth sharing ahead of this release.
The BimlFlex solution, as a collection of designs, settings, configurations and customizations is provided as Biml patterns that can be accessed from BimlStudio. This means that a dynamic preview of the expected (generated) output is visualized in BimlStudio, along with the supporting Biml code.
At this stage, and if required, BimlStudio allows for further customizations using Extension Points, which support a combination of Biml script, SQL or .Net code. These will become part of the data logistics solution that will be deployed.
The build process in BimlStudio will ‘compile’ the Biml code into native artefacts for the target platform and approach. In the case of this development diary, this will be as Data Flow Mappings for Azure Data Factory.
Using Data Flow Mappings has certain advantages (and disadvantages) compared to moving and transforming data using other Azure Data Factory components such as Copy Activities. Much of the remaining work to complete this feature is about finding the best mix between the available techniques, so that these can be generated from the design metadata.
One of the advantages of using Data Flow Mappings, aside from the visual representation of the data logistics, is the ability to use inline Sources and Sinks (targets). Inline datasets allow direct access to many types of data sources without a dedicated connector object (dataset). They are especially useful when the underlying structure may evolve. Also, and especially in data lake scenarios, they offer a way to manage where the compute takes place without requiring additional compute clusters.
It is an easy and fast way to use a variety of technologies.
In this post, and the subsequent posts as well, we will use this approach as a way of explaining working with Data Flow Mappings in BimlFlex.
Biml Data Flow Mapping syntax
Because the design metadata is provided as Biml script, it makes sense to start explaining the BimlFlex Data Flow Mapping support in BimlStudio because this is the best way to work with the Biml language.
Defining a Data Flow Mapping using Biml is easy. The various features, components and properties available in Data Flow Mappings are supported as Biml XML tags.
A Data Flow Mapping is referred to by using the MappingDataFlow segment. It is part of the Dataflows, which is in turn part of a DataFactory.
Consider the example below:
<Biml xmlns="http://schemas.varigence.com/biml.xsd">
<DataFactories>
    <DataFactory Name="bfx-dev-deltalake-demo">
        <Dataflows>
            <MappingDataflow Name="HelloWorld">
                <Sources>
                    <InlineAzureSqlDataset
                        Name="HelloWorldExampleSource"
                        LinkedServiceName="ExampleSourceLS"
                        AllowSchemaDrift="false"
                        ValidateSchema="false"/>
                </Sources>
                <Sinks>
                    <InlineAzureSqlDataset
                        Name="HelloWorldExampleTarget"
                        LinkedServiceName="ExampleTargetLS"
                        SkipDuplicateInputColumns="true"
                        SkipDuplicateOutputColumns="false"
                        InputStreamName="HelloWorldExampleSource.Output"/>
                </Sinks>
            </MappingDataflow>
        </Dataflows>
        <LinkedServices>
            <AzureSqlDatabase Name="ExampleSourceLS" ConnectionString="data source=example.com;"></AzureSqlDatabase>
            <AzureSqlDatabase Name="ExampleTargetLS" ConnectionString="data source=example.com;"></AzureSqlDatabase>
        </LinkedServices>
    </DataFactory>
</DataFactories>
In this ‘Hello World’ example, a single Data Flow Mapping is created with a single Source and a single Sink. Both the Source and the Sink are defined as inline datasets, which are specific options in Biml to distinguish them from regular datasets.
Inline datasets require a connection (Linked Service) to be assigned, and for a valid result this Linked Service must also be available.
When using BimlStudio to interpret this snippet, these components will be visible in the Logical View:

This skeleton code shows how Biml supports Data Flow Mappings, and inline data sources in particular. In the next post, we will expand this into a larger pattern and then look into how BimlFlex configurations influence this output.
Delta Lake on Azure work in progress – introduction
At Varigence, we work hard to keep up with the latest in technologies so that our customers can apply these for their data solutions, either by reusing their existing designs (metadata) and deploying this in new and different ways or when starting new projects.
A major development focus recently has been to support Delta Lake for our BimlFlex Azure Data Factory patterns.
What is Delta Lake, and why should I care?
Delta Lake is an open-source storage layer that can be used ‘on top off’ Azure Data Lake Gen2, where it provides transaction control (Atomicity, Consistency, Isolation and Durability, or 'ACID') features to the data lake.
This supports a 'Lake House' style architecture, which is gaining traction because it offers opportunities to work with various kinds of data in a single environment. For example, combining semi- and unstructured data or batch- and streaming processing. This means various use-cases can be supported by a single infrastructure.
Microsoft has made Delta Lake connectors available for Azure Data Factory (ADF) pipelines and Mapping Data Flows (or simply ‘Data Flows’). Using these connectors, you can use your data lake to 'act' as a typical relational database for delivering your target models while at the same time use the lake for other use-cases.
Even better, using Data Flows can use integration runtimes for the compute without requiring a separate cluster that hosts Delta Lake. This is the inline feature and makes it possible to configure an Azure Storage Account (Azure Data Lake Gen2) and use the Delta Lake features without any further configuration.
Every time you run a one or more Data Flows, Azure will spin up a cluster for use by the integration runtime in the background.
How can I get started?
Creating a new Delta Lake is easy. There are various ways to implement this, which will be covered in subsequent posts.
For now, the quickest way to have a look at these features is to create a new Azure Storage Account resource of type Azure Data Lake Storage Gen2. For this resource, the ‘Hierarchical Namespace’ option must be enabled. This will enable directory trees/hierarchies on the data lake – a folder structure in other words.
Next, in Azure Data Factory, a Linked Service must be created that connects to the Azure Storage Account.
When creating a new Data Flow in Azure Data Factory, this new connection can be used as an inline data source with the type of ‘Delta’.
For example, as shown in the screenshot below:

This is all that is needed to begin working with data on Delta Lake.
What is Varigence working on now?
The Varigence team has updated the BimlFlex App, its code generation patterns and BimlStudio to facilitate these features. Work is underway to complete the templates and make sure everything works as expected.
In the next post we will investigate how these concepts translate into working with BimlFlex to automate solutions that read from, or write to, a Delta Lake.
Important BimlFlex documentation updates
Having up-to-date documentation is something we work on every day, and recently we have made significant updates in our BimlFlex documentation site.
Our reference documentation will always be up to date, because this is automatically generated from our framework design. Various additional concepts have been explained and added.
For example, a more complete guide to using Extension Points has been added. Extension Points are an important feature to allow our customers to both use the out-of-the-box framework as well as making all kinds of customizations as needed for any specific needs that may arise.
Have a look at the following topics:
- Extensions Points, also with links to updated reference documentation on each Extension Point.
- Delivering an Azure Data Factory solution using BimlFlex.
- An overview of the key BimlFlex mechanisms.
- BimlFlex Settings and Overrides.
Introducing the BimlFlex Community Github Repository
The BimlCatalog Github is now BimlFlex Community
We have rebranded the 'BimlCatalog' public open source repository on Github to BimlFlex Community.
By doing this we hope this provides easier access to some of our code, solutions and scripts that complement working with BimlFlex for our network of BimlFlex practitioners.
Examples of this are common queries on the BimlCatalog database, which contains the runtime (data logistics) information. Another example is the Power BI model that can be used to visualise some of this runtime information.
The BimlFlex App also provides similar reporting capability, but by providing a public repository we believe this makes it easier to add and customize solutions that complement the BimlFlex platform for data solution automation.
The Fastest Snowflake Data Vault
Overview
We sponsored WWDVC along with Snowflake this year, and Kent Graciano from Snowflake did an excellent presentation on using multiple compute warehouses to load your Data Vault in parallel.
He also mentioned that instead of using hash keys, you could use the business key for integration and Dan Linstedt confirmed that this is an approved approach. However, they were both quick to point out that you should verify if this approach is right for you. Before Kent's presentation, he said to me, or more correctly challenge the vendors to see who can add support for this.
Snowflake Parallel Automation
Well, challenge accepted, and we are now the only vendor that offers Snowflake Data Vault automation taking advantage of their unique features. In the webcast, we demonstrate how you can switch between HashKey and BusinessKey implementations and also configure multiple Snowflake compute warehouses for extreme parallel loading.
Watch the Webinar
See it in action
We recommend that you use BimlFlex to do a proof of concept and see the performance benefits for yourself. BimlFlex is also the only Snowflake Data Vault automation solution offered as a monthly subscription so no need for a massive upfront expense.
Contact us to take the next step. Request Demo or simply email sales@bimlflex.com
Snowflake Integration Powered by BimlFlex
Overview
So you have done all your research and have decided that Snowflake is the one to have and hold your data from this day forward, well good on you, great choice.
I'm not going to list all the great features of Snowflake here, because the best place for those is on their own website. Instead, let me address some of the challenges you might face especially if you are used to working with on-premises database systems like Microsoft SQL Server, Oracle, MySql, etc.
We were in the same boat and one of the biggest challenges we faced converting our BimlFlex push down ELT patterns to Snowflake is the limited deployment tools and the lack of stored procedures support, but more on that later. First, let's break down the components required to move data into Snowflake and then integrate that into an enterprise data warehouse.
Snowflake Automation Architecture

Importing Metadata
Before we get into all the cool data integration options the first step is to have a way to use the technical metadata from your source systems and use this to derive your staging layer.
BimlFlex makes this super easy and support all the major source systemns you simply point the app at you system and choose the tables to be integrated.

Ingest Data
Getting your data into Snowflake is actually quite easy to automate using the recommended Snowflake Stage with SnowSql path. Other options using S3, Azure Blob Storage or Azure Data Lake is also available, but that is for another day.
Well actually it turns out that it is not quite that simple because you have to accomodate for change data capture and high watermark source extracts. Luckily we have already solved this for our Azure SQL Data Warehouse templates and it turns out that being able to split the extract into multiple files has measurable performance improvement when loading the data into Snowflake using their COPY command.

Working with one of our early adopters they recommended that we should add a configuration to perform RESUME and scale the WAREHOUSE_SIZE when the workload batch start and then scale it down and SUSPEND, so we did.

Orchestrate
As you know there are a variety of tools out there that support ETL/ELT for Snowflake, but they all basically just push down SQL and let Snowflake do its thing.
We decided to pick the most widely used ETL tool, SQL Server Integration Services, out there and it just so happened that we have the expertise to bridge this gap by creating an SSIS custom component to execute the ELT code within a transaction.
One of the challenges we faced in porting our Azure SQL Data Warehouse templates over to Snowflake was the lack of SQL stored procedures and the ODBC driver only supporting a single statement at a time. Our development team used the Snowflake Connector for .NET as a baseline and create both an SSIS Custom Component and Azure Data Factory Custom Activity that will be available in our next release.

Now that we had a robust interface it was simply a matter of refactoring our ELT code and utilise the best Snowflake features. The refactoring did not take our team to long because of the ANSI SQL compatability of our templates, we just had to refactor the use of TEMPORARY and TRANSIENT table declarations and some of the CTAS statements. The fact that we did not have to accomodate HASH distribution in Snowflake was a relief to our team and it would be greate if other vendors adopt this.
Stage & Persist
Landing the data as flat files is just the start of the data warehouse process. Depending on whether your target is a Data Vault or Dimensional data warehouse you will need to apply some transformation and if required delta processing.
Our staging SQL will detect deltas and perform record condensing and de-duplication if required. If you flipped the switch in BimlFlex to keep a historical (persistent) staging copy of your source data the delta will be saved and persisted. This is very useful when you want to quickly get a source system into Snowflake and keep all the history and do the modelling and reloading into an integrated data warehouse later.
Another benefit of using SSIS was that we could thread the output into multiple files to make full use of the Snowflake COPY command. When we showed this to the Snowflake team they all nodded and I took this as a good thing.
Integrate
Landing your data into Snowflake is not enough to call it a data warehouse. As powerful and scalable as Snowflake is it is "just" a database and all the other integration tasks that make your solution an enterprise solution will still need to be done.

For Data Vault and Data Mart implementations BimlFlex helps you accelerated the modelling and use the associated metadata to generate optimised push down ELT harnessing the Snowflake engine. So to simplify (very) you draw a picture and BimlFlex do all the coding for you, just imagine the time money saved instead of manually writing the code.
See it in action
BimlFlex is a collection of templates, metadata definitions, and tooling that enables you to build an end-to-end data solution without ever writing a single line of code.
Contact us to take the next step. Request Demo or simply email sales@varigence.com
BimlFlex 2018 - Multi-Active Satellites in Data Vault
This BimlFlex webinar looks at Multi-Active Satellites in Data Vault.
This webinar is based on a post by Roelant Vos that is available here: http://roelantvos.com/blog/?p=2175
Overview - What is multi-active
Multi-Activeness follows several different schools of thought:
- Various options and consequences to consider
- Multi-active, 'Multi-variant' or 'Multi-valued'
- Satellites is one of these areas where opinions vary
- Data doesn’t fit the ideal world of your target
- Context doesn’t quite fit the granularity of the Hub
- Satellite has multiple active records for a given business key
Multi-active patterns
Three options for implementing:
Some would argue that multi-active breaks the Satellite pattern. After all, the context is not directly describing the business key anymore.
- Incorporate a multi-active attribute in the Satellite
- The advantage of this is that you limit the number of tables
- The disadvantage is support additional ETL pattern
- Development and interpretation of model more complex
- Context is stored at different level and more complex to query
- Impact on Point in Time queries
Scenario 1: Multi-active attribute in the Satellite
This scenario adds the attribute from the source that defines the multi-activeness as an additional key in the Satellite. This changes the grain of the table and allows multiple values for the same Hub key to be active at the same time. This approach allows for easy storing of multiple values directly attached to a Hub, however also presents challenges for querying the Satellite and adding the contents to a Point In Time construct
BimlFlex Demo
Data Warehousing at the best of times is a complex undertaking and BimlFlex has been specifically designed to simplify the development process and subsequent maintenance.
Scenario 2: Separate Satellite
This scenario adds separate Satellites for each multi-active attribute and works well when there is a distinct, well-defined, static number of attributes. By separating the contextual information across separate Satellites it is possible to easily add them to a Point In Time construct, however should the multi-valued attribute domain change, new Satellites or even a new approach is required
BimlFlex Demo
Data Warehousing at the best of times is a complex undertaking and BimlFlex has been specifically designed to simplify the development process and subsequent maintenance.
Scenario 3: Creating a Keyed Instance Hub
By viewing the multi-activeness as a Data Vault Unit Of Work rather than a set of attributes attached to a single Hub it is possible to create a separate relationship to a separate Hub bearing the attributes in a separate Satellite. This applies the original grain to the original Hub, and a Link relationship to a new Hub on the same grain as the previously multi-active attributes. This approach views the multi-activeness as a relationship in its own right and allows the Data Vault constructs store the data without multi-active Satellites
BimlFlex Demo
Data Warehousing at the best of times is a complex undertaking and BimlFlex has been specifically designed to simplify the development process and subsequent maintenance.
Which approach should I pick?
Roelant Vos
Scenario 1:
The approach to follow largely depends on your personal preferences and (almost philosophical) views.
Peter Avenant
Scenario 3:
Multi-active functionality (i.e. the 'scenario 1') will be hidden by default in a future release of BimlFlex (still supported however).
It does appear that the traditional multi-active concept comes with certain challenges for many people. It's a recurring topic in the trainings I host, and I have seen it go wrong in various projects.
The reason seems to be that in these cases the selected multi-active key wasn’t as immutable as first thought, which can lead to overloading complexity when querying data from the Data Vault.
Watch the Webinar
BimlFlex 2018 - Business Keys and Relationships
This BimlFlex webinar looks at Business Keys and Relationships in BimlFlex.
Business Keys are a core concept in Data Vault modelling and allows the modeler to focus on defining entities and relationships based on the business process focused keys rather than the technical keys from the source system. This allows easier cross-system integration in the Data Vault.
The video starts with a short overview of the Business Key concept and introduces the more pragmatic Integration Key concept as an alternative. Enterprise Wide Business Keys that uniquely and distinctly identifies an entity or process are rare in real world scenarios. Focusing on defining keys that are suitable for the Data Warehouse enables an agile implementation approach.
The BimlFlex development workflow allows the modeler to import metadata from a source system and automatically derive Business Keys and relationships. Once these are defined and any other required metadata manipulations are defined it is possible to use BimlStudio to build the code required for the Data Warehouse implementation.
Business Key or Integration Key
While the Enterprise Wide Business Key is the design goal for a Data Vault based model it is rare to directly find these directly available in existing source systems. For an agile, pragmatic approach it is possible to focus on defining integration keys. These keys allow cross system integration into the Data Vault. They allow modelling to ensure that no false positive matches are created between systems and allow a later matching process using Same-As Links (SAL).
Once these keys are defined and available it is possible to match entities using rules or Master Data Management.
Practical example of Business Key matching or collisions
When different sources use the same keys or codes that have the same values but different meaning they are not possible to directly use as Business Keys since that will implicitly match records that don't match the same business entity. BimlFlex allow the modeler to add the connection record source code to the key so that they uniquely identify the entity. This is done using the BimlFlex function FlexToBk() where BimlFlex automatically builds a concatenated string representation of the business key from source fields and codes. In the case of a source having a ProductID key, the expression FlexToBk(@@rs, ProductID) will build a unique key for the Data Vault.
BimlFlex implements a single key modeling approach. Any Business Key in the Data Warehouse is a single string representation of any source attribute. For keys with multiple parts they are concatenated using the configurable concatenator character using the FlexToBk() function. This allows any source system using any configuration to populate the Core Business Concept with values. As this is the only way to guarantee future integration with unknown sources it is enforced throughout BimlFlex. All attributes that are used to build the Business Key are also by default stored in their source formats in the default Satellites.
Object Relationships and Metadata References
References are used by BimlFlex to accelerate and build Links for Data Vault. They allow relationships to be defined in metadata. A column defined in the metadata can reference another objects Primary Key. These are used by BimlFlex to accelerate and build Links for Data Vault implementations.
A reference can only refer to another tables Primary Key. The Data Vault accelerator only builds a Data Vault based on the Business Keys. In BimlFlex this means that the metadata uses the Business Key column as both the Primary Key definition and the Business Key definition for an Object.
The Import Metadata dialog is able to create Business Keys and redefine the source relationships to Business Keys relationships automatically. It is also possible to create and define them manually using the Create Business Key function and the Reference Table and Reference Column Name fields.
Preview and Accelerate Data Vault
Once the Business Keys and relationships are defined in the metadata for the source system it is possible to use the Data Vault Accelerator in BimlFlex to preview and build the Data Vault.
Define the Accelerator options and preview the Data Vault to review the resulting model. refine the metadata and update the preview for any required tweaks and publish the metadata once it matches the required destination logical model.
Watch the Webinar
BimlFlex now support Snowflake Source to Staging
In this webinar we look at how to easy it is to use BimlFlex to bring data into a Snowflake Data Warehouse.
We focus on extracting data from a source and moving it to Snowflake Stage and then loading it into staging and persistent tables.
Snowflake
Snowflake is a SQL data warehouse built from the ground up for the cloud.
- Centralized, scale-out storage that expands and contracts automatically
- Independent compute clusters can read/write at the same time and resize instantly
- Automated backup across multiple availability zones & regions
Introduction
Most data consolidation and Data Warehouse projects start with getting the data from disparate source systems into a central, available location. Snowflake is an excellent database, but to be able to query the data it needs to be loaded to the server. BimlFlex makes this a breeze with its data automagication features. BimlFlex allows metadata import from sources, straightforward modelling of the meta data and rapid building of load artefacts so that the data can be extracted from the source and uploaded to the Snowflake environment.
The modeler and developer workflow starts by pointing the metadata import tool to the source and extract information into the BimlFlex metadata repository. Once in the repository it is possible to model the metadata and apply business rules, transformations and accelerate out a Data Vault model. This webinar focuses on the process of loading the data from the source system to the Snowflake environment. Other webinars go through the metadata modelling scenarios and acceleration in more detail and upcoming webinars will focus on implementing a Data Vault layer in Snowflake on top of the Staging layer described here.
Snowflake is one possible destination for the data warehouse loads, BimlFlex supports other approaches, including loading to Microsoft SQL Server using ETL or ELT as well as loading to Microsoft Azure SQL Data Warehouse using ELT.
BimlFlex Snowflake templates
The BimlFlex Snowflake template extracts source data and creates optimized flat files that are uploaded to Snowflake stage. The architect can choose parallelism and threading to make sure that the extraction process is as efficient as possible.
Once uploaded and available in Snowflake Stage, the data is loaded and persisted into a staging and persistent staging area.
BimlStudio allows the modeler to automatically create the table create scripts to rapidly create the required staging and persistent staging tables in the Snowflake system. Once they are created, BimlStudio can build the extract and load packages in SSIS to load the data from the source to the Snowflake system.
The load process follows the standard load patterns in BimlFlex, with configurable parallelism, orchestration, logging and auditing. The files are created and converted to the correct format. Once the files are available locally on the extract side they are compressed and uploaded using the Snowflake SnowSQL command line tool.
Once the files are uploaded and available in the file stage area, BimlFlex uses a custom Snowflake SSIS component to run through the multiple SQL commands required to load the data from the file into the database.
After the load is completed the staged file is removed and the successful completion of the load is logged.
Watch the Webinar
Agile Data Vault Acceleration
Implementing a Data Vault project may seem daunting for many of you, however, if you break it down into smaller more Agile deliverables, it is quite achievable. Agile, is about creating business value through the early and frequent delivery of integrated data while responding to change. BimlFlex accommodates Agile’s emphasis on collaboration and incremental development by introducing Model Groupings to our Data Vault Accelerator.
In this short webinar, we demonstrate how you can use the new ModelGroup attribute to accelerate in scope sections of your model.
Watch the Webinar
Digital Sticky Note templates for Ensemble Logical Modeling
It is my opinion that the first step in building a Data Vault is to start by modelling the target and the best approach that I have used is ELM. For me, the easiest way to get the core logical model defined is to use the easiest "low" tech approach quite often pen and paper or if you are fancy sticky notes and a whiteboard.
Quite often I'm in a meeting with customers and we will just be having a chat. In that time I will just listen for keywords and either write them down or just type them in notepad. The meeting rooms now all seem to have bigger and bigger screens so why not use it to create a logical model as you go. In this webinar, I'm using completely free software to show you how easy it is to create a logical model in minutes without complex software, it really is as simple as writing notes.
Watch the Webinar
Resources referenced in the webinar
Download and Install the latest Visual Studio Code. Visual Studio Code
Download and Install the latest Graphviz - Graph Visualization Software. Graph Visualization Software
Download our starter template. Varigence ELM Templates
Additional Resources
BimlFlex 2018 - Integrating with MDS - Load to MDS
BimlFlex 2018 - Integrating with MDS - Load to MDS
This BimlFlex webinar looks at integrating BimlFlex with Microsoft SQL Server MDS and the load process into MDS.
Preparing the MDS Model
The video starts with a creation of a Master Data Services Model for the Product management. The Model contains a Product Entity that in turn contains attributes. The creation of the Entity also creates an MDS staging table in the MDS database. To read data out of MDS a subscription view is created. This view is also used by the load process to check for existing records.
Creating the BimlFlex metadata.
In BimlFlex, the metadata is managed through a central repository. The management of this metadata is done through an Excel front end. This allows for modelling and management of metadata, source to target mappings and more. The example in the video uses a direct connection from source to destination, loading MDS straight from the AdventureWorks LT source system. A common approach is for the MDS loads to be integrated into the Data warehouse loads. Using either a source view on top of the Data Warehouse or a staging table that is part of a source system load as the source for the MDS load.
For the load to MDS the MDS connection is specified as Master Data Services in the IntegrationStage column.
A Batch for the load process is created. In the example it is named LOAD_AWLT_TO_MDS to also illustrate the direction of data.
A Project for the load process is created. In the example it is named LOAD_AWLT_TO_MDS to also illustrate the direction of data. It uses the AdventureWorks connection as the source and the MDS as target. It uses the created Batch for the batch grouping.
For the objects there are 2 tables specified. The source SalesLT.Product table and the MDS staging, destination table stg.Product_Leaf.
The required columns for the destination model is specified to match the entity in MDS and any required transformation or derivations are added. The source columns are mapped to the destination columns.
Build solution in BimlStudio
Once the model is completed it is time to open the solution in BimlStudio and build out all required artefacts. BimlStudio reads all the metadata from the BimlFlex metadata repository and provides generation of an SSIS Project for the MDS load. Once the builds are completed the solution can be opened and run in Visual Studio or it can be passed to a continuous build, continuous deployment pipeline.
Opening the Project in Visual Studio illustrates the load process. The project includes a batch that calls all individual entity loads, in this case the single Product load process. The Product load process loads from the source, does a lookup to check for existing records and loads the data to the MDS staging table. The package then starts the MDS ingestion process that loads the data from the staging table to the entity.
Once the load is completed the loaded data can be reviewed in the model explorer.
Additional steps
For housekeeping and to manage earlier versions of MDS it is possible to create a preprocessing step to truncate all MDS staging tables. For SQL Server 2016 and later this can be automated through MDS. For earlier versions the tables should be maintained so that they don't get filled up with old data.
As a post process it is possible to start the MDS Model validation process. This validates the model and applies any defined business rules.
The model load is now completed. The model is ready for data steward management and the subscription view is ready to be ingested into the data warehouse as a separate source.
Watch BimlFlex 2018 - Integrating with MDS - Load to MDS
BimlFlex 2018 - Dimensions and Facts
BimlFlex 2018 - Dimensions and Facts
This BimlFlex webinar looks at Dimensional Modelling and the Dimensional data warehouse.
The video starts with a short overview of the Dimensional Modelling approach. This highlights that the dimensional warehouse is targeted for, and optimized for, end user querying. It uses dimensions to provide context and facts and measures to provide analytical measures. The dimensional warehouse is denormalised and optimized for analysis, in contrast to 3NF or Data Vault modelling approaches, who are more optimized towards data warehousing. Most classical BI analysis and reporting tools are geared towards easily reading the data from a dimensional model.
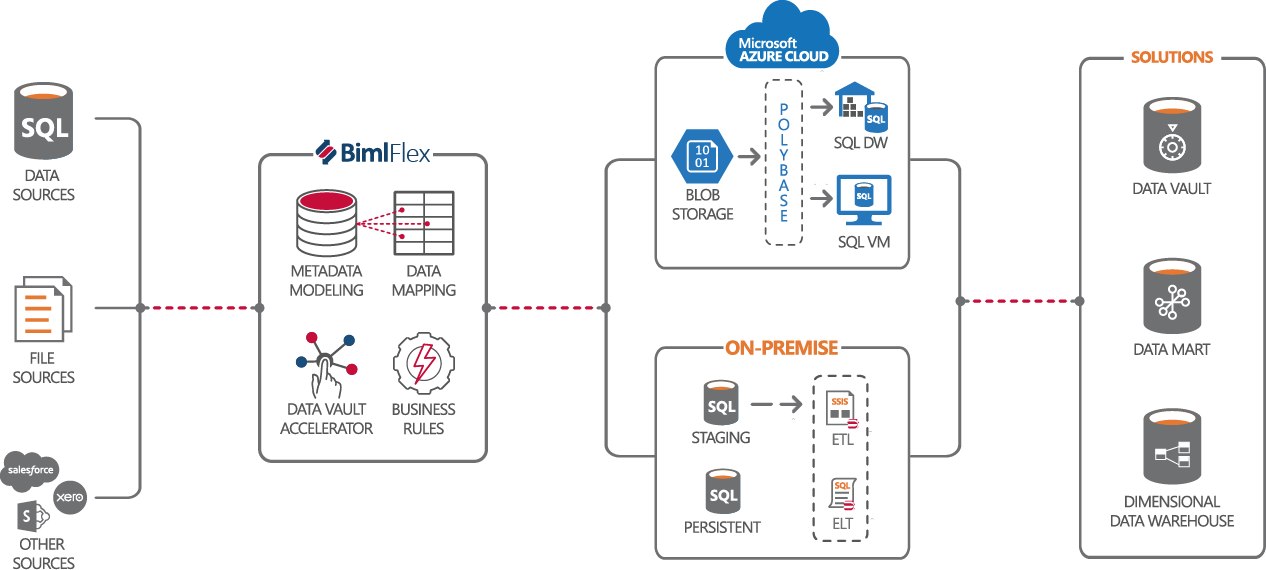
Choosing the architecture
In the BimlFlex architecture it is possible to chose between using Microsoft Azure cloud based data warehousing or on-premises data warehousing for SQL Server. The Microsoft Azure Cloud based approach uses Polybase and blob storage of files as the ingestion mechanism for loads. This uses an ELT approach to load the data into the data warehouse. The data can be extracted using SSIS from traditional source. The data warehousing solution ban be either Azure SQL Data Warehouse or SQL Server 2016 and newer, commonly running in a VM in Azure. The on-premises approach uses either traditional loads through an SSIS based ETL process or a ELT based process into a classical installation of SQL Server.
Regardless of the ultimate destination, the BimlFlex modelling approach and the required metadata is the same and it is possible to easily migrate a solution from an on-premises approach to a cloud based approach. For organizations reviewing the cloud as the future platform for data warehousing this means it is possible to use the on-premises approach today and move to the cloud down the line without having to recreate the data warehousing solution.
In BimlFlex, the metadata is managed through a central repository. The management of this metadata is done through an Excel front end. This allows for modelling and management of metadata, source to target mappings and more.
Importing source metadata
The dimensional model approach uses a direct source to target load model. It connects to and reads the data from a source or a prepared layer out of a data warehouse to populate the facts and dimensions. In this demo we connect to and read the metadata out of a set of views that has been prepared in the WideWorldImporters source system to represent the source for the dimensional data warehouse.
Model the dimensional data warehouse
For imported metadata objects, it is possible to use the BimlFlex cloning function to create the destination dimension and facts. For identity-based surrogate keys in the data warehouse the cloning mechanism can add a column to use so that the end result directly follow the classical dimensional model. The cloning creates the full target structure as well as the source to target mappings for all source columns.
Once the metadata is imported and all destinations are created it is time to define the relationships between the Facts and Dimensions. These references allows BimlFlex to create the lookups from the fact load to the connected dimensions.
For dimensional attributes it is also possible to define the change types. each dimensional attribute column can be defined as either Type 1 or Type 2. This allows BimlFlex to create either pure Type 1 dimensions, pure type 2 dimensions or mixed, type 6, dimensions.
Build solution in BimlStudio
Once the model is completed it is time to open the solution in BimlStudio and build out all required artefacts. BimlStudio reads all the metadata from the BimlFlex metadata repository and provides generation of all SQL scripts as well as SSIS and SSDT Project generation for all parts of the data warehousing solution. Once the builds are completed the solution can be opened and run in Visual Studio or it can be passed to a continuous build, continuous deployment pipeline.
Using On-premises SQL Server
For an on-premises solution the generated artefacts will be SQL table scripts and projects for the database and SSIS Projects with data flows for loading the data from the source database views to the data warehouse.
Using Cloud based Azure SQL Data Warehouse
To repoint the data warehouse to use an Azure SQL Data Warehouse, the only change needed is:
- Update the
ConnectionStringto point to the Azure SQL Data Warehouse - Update the Connection Type to
OLEDB SQL Based ELTrather than the on-premises use ofOLEDB - Update the System Type to
Azure SQLDW.
For Azure SQL Data Warehouse there are additional features available, such as splitting and compressing the export files for optimized load across the chosen data warehouse configuration.
Once the changes are done, the BimlStudio project will provide all required artefacts for implementing the data warehouse on Azure SQL Data warehouse. This includes packages for extracting data from the source database into flat file, the mechanism to move them to Azure Blob Storage, the External Table definitions to expose the data from the files to the data warehouse and the ELT load Stored Procedures that loads the facts and dimensions with the data from the files. For convenience and orchestration help there are also an SSIS project with a package that calls all the load Stored Procedures in the right order.
Watch BimlFlex 2018 - Dimensions and Facts
BimlFlex 2018 - Data Vault End Dating
BimlFlex 2018 - Data Vault End Dating
When it comes to applying end dates in Data Vault there are a number blogs, books, and discussions on LinkedIn forums. Standards about dates and time have evolved for Data Vault and because there is no centrally managed, open forum to monitor Data Vault standards, you will have to buy books from various authors to try and stitch together the rules.
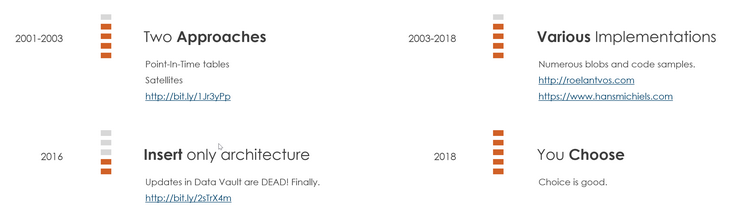
During my research into end dating and various discussions with Roelant Vos, I decided not to write another article about the pros and cons of adding end dates. Instead, I recorded a webcast that looks at why and how you can selectively configure this using BimlFlex.
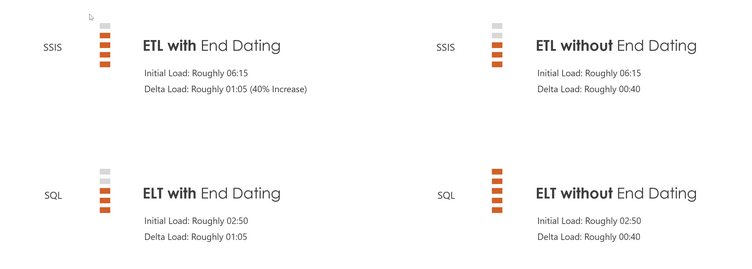
In this webcast, we configure ETL and ELT templates running initial and delta loads. We look at the performance differences in both these approaches with and without end dating. Spoiler alert it is all about choice and the choice is yours because everybody's requirements are different.
Watch Data Vault End Dating Part1
Watch Data Vault End Dating Part2
Referenced Links
Links referenced in videos above
tdan.com Dan Linstedt Data Vault Series 3 – End Dates and Basic Joins
Roelant Vos http://roelantvos.com
Hans Michiels https://www.hansmichiels.com/
http://danlinstedt.com Dan Linstedt Updates in Data Vault are DEAD! Finally
Azure Data Factory v2 Automation with BimlStudio 2018
The upcoming version of BimlStudio will include full support for Azure Data Factory v2, including new first-class Biml elements to create Gateways, Linked Services, Datasets, Pipelines, and Triggers. In this webinar, we will give you a comprehensive tour of the new functionality in the context of an end-to-end solution. In just a couple hundred lines of Biml code, we will show how to read a source schema from an on-premises system, generate an Azure Data Factory that loads the source data into an Azure Data Lake, and create a PowerShell script to automate the build and deployment process. All of the code will be made available for use in your projects.
Webinar Recording
BimlFlex Data Warehouse Automation,
BimlFlex data warehouse automation, especially when combined with Azure SQL Data Warehousing, is worth investigating if you are about to embark on a modern data warehouse project.
If you have any queries or would like to discuss how BimlFlex Data Warehouse Automation can benefit your project please please email us at sales@varigence.com.
The Biml Report: Azure Edition
Welcome to the November issue of "The Biml Report", a newsletter for Biml Users like you. I'm Peter Avenant (@peteravenant), a senior geek at Varigence focused on technology and customer engagement.
Featured
New Biml for Azure Data Factory unveiled at PASS Summit 2017
Wednesday was the first full day of the conference and a huge day for Biml. Things kicked off with Rohan Kumar’s keynote “SQL Server 2017 and Azure Data Services – The Ultimate Hybrid Data Platform (http://www.pass.org/summit/2017/Sessions/Keynotes.aspx) ”, during which I was honored to demonstrate the upcoming Biml support for Azure Data Factory. Read more... (https://www.varigence.com/Blog/Post/75) You can watch the keynote here (https://youtu.be/NGbk9XGWTHI?t=3580) .
The Biml Book: Business Intelligence and Data Warehouse Automation is now available
The book guides you through the basics of getting your environment configured, the Biml syntax and scripting essentials for building a data warehouse automation framework. Andy Leonard (@AndyLeonard) has done an excellent of bringing a talented group of Bimlers together to co-author the book. You can order the book from Amazon (https://www.amazon.com/Biml-Book-Intelligence-Warehouse-Automation/dp/1484231341) and Apress (http://www.apress.com/gp/book/9781484231340)
Customer review on Amazon. "If this is your first exposure to a Biml framework these chapters will blow your mind. This is game changing stuff."
Webinars
Azure Data Factory v2 Automation with BimlStudio
The upcoming version of BimlStudio will include full support for Azure Data Factory v2, including new first-class Biml elements to create Gateways, Linked Services, Datasets, Pipelines, and Triggers. In this webinar, we will give you a comprehensive tour of the new functionality in the context of an end-to-end solution. Register for the webinar. (https://www.eventbrite.com.au/e/azure-data-factory-v2-automation-with-bimlstudio-tickets-40083678361)
Using Azure Data Lake for Persistent Staging
Persistent Staging (PSA) is a record, or archive, of all data deltas that can reload a Data Warehouse. Traditional approaches to creating a PSA requires a BIG database that stores all unique records loaded. In this webinar, we will show you how BimlFlex with Azure Data Lake allows for data reloads and management with minimal configuration. Register for the webinar. (https://www.eventbrite.com.au/e/using-azure-data-lake-for-persistent-staging-tickets-40084814760)
Recordings
BimlFlex Data Mart Automation using Polybase and Azure SQL Data Warehouse
Investing in designing and implementing a substantial Data Warehouse creates a foundation for a successful Data Platform architecture. Using a configurable Data Warehouse Automation solution that supports all the best bits of Azure SQL Data Warehouse as standard is essential. Watch the webinar. (https://www.varigence.com/Blog/Post/73)
Azure Data Warehouse Automation with BimlFlex
In this day and age, data warehouses simply have to be future proofed for cloud technologies. Populating this modern data warehouse should benefit from the latest innovation in ETL and data integration with near self-service data preparation. You need a data warehouse automation (DWA) solution built from the ground up specifically to empower Microsoft Data Platform users with the ability to switch between on-premises and Azure deployments. Watch the webinar. (https://www.varigence.com/Blog/Post/69)
What's new in BimlExpress 2017? by Cathrine Wilhelmsen
BimlExpress 2017 is finally here! In this session, Cathrine will take you through the exciting new features, like expanded Biml preview, global include files, and support for SSIS annotations.
She also covers some of the most important changes to the Biml API, like the updated CallBimlScript, the new MakeSsisSafe extension method for strings and the flat file extension method for generating table columns from flat file columns. Watch the webinar. (https://www.varigence.com/Blog/Post/70)
Training
We recently presented the Advance Biml Training training in Amsterdam and Copenhagen for Biml developers looking to take their skills to the next level. During this hands on training we will build a real-world data warehouse automation framework with all the source code to accelerate projects. We have requested the codes from Apress and will send attendees a complimentary copy of The Biml Book just in time for some holiday reading. We are planning training in collaboration with Roelant Vos. The plan is two days of Biml training and then three days Data Vault Implementation training. Although the training is complimentary, we will segment it into three. Varigence will present Day 1 Biml Fundamentals, Day 2 Biml Frameworks and Roelant will present Day 3-4 Data Vault Implementation. We are planning two sessions in April, one in Amsterdam and the other in the UK.
Feedback
Any feedback on content send me a mail at media@varigence.com. For the latest community content, please head on over to http://bimlscript.com/ (http://bimlscript.com/ )
Biml for Azure Data Factory unveiled at PASS Summit 2017
PASS Summit 2017 was an awesome conference for Varigence and Biml, both with fun traditions and some exciting firsts.
Wednesday was the first full day of the conference and a huge day for Biml. Things kicked off with Rohan Kumar’s keynote SQL Server 2017 and Azure Data Services – The Ultimate Hybrid Data Platform , during which I was honored to demonstrate the upcoming Biml support for Azure Data Factory. In just a few minutes, I showed a how a couple hundred lines of Biml code could be used to automatically read an on-premises source schema, generate an Azure Data Factory that loads the source data into an Azure Data Lake, creates SSIS packages that implement logic to scrub address fields (which would then run in the cloud using the Azure SSIS Integration Runtime), and generates PowerShell scripts to deploy it all. This can all be executed from a DevOps automation workflow to rebuild your scrubbed data lake nightly, hourly, or even on a near-realtime basis.
Wednesday afternoon, I was pleased to present BimlCatalog: Your Open Source Runtime and Orchestration Solution for Biml Projects. At Varigence, we have been working on our data warehouse automation product BimlFlex for a few years. An essential part of any automation framework, in addition to design patterns and metadata entry/management tools, is a runtime framework to manage logging, data auditing, restartability, rollback, and more. We have decided to make this runtime framework freely available and open source on GitHub as the BimlCatalog project. In my session, I gave everyone a tour of BimlCatalog capabilities, showed them how to use it in their own projects and demonstrated a few places where they might be able to extend or customize the framework.
Biml over Beers on Thursday night was a great time to reconnect with friends from the Biml community and to provide new Biml users with the opportunity to discuss usage with folks who have already implemented Biml successfully. We had about 50 Biml users over the course of the evening, and I think a good time was had by all. On Friday,
I was able to spend some time with the Azure Data Factory team to ensure that our support for ADF would be everything you’ve come to expect from Biml. While I was there, Andy Leonard gave a great session Use Biml to Automate SSIS Design Patterns which was targeted at those who are relatively new to Biml and would like to build their own reusable patterns and practices for their data automation projects.
Throughout the week, I was able to meet onsite with a few of our Seattle-based Biml users. Spending time with customers is always a great experience, and these visits didn’t disappoint. Thanks to all of you!
PASS Summit 2017 was a great conference, and I’m very much looking forward to next year.
My thoughts on the Global Data Summit
Recently we attended and sponsored the Global Data Summit. I can honestly say that it was the most diverse set of speakers and attendees that I’ve ever had the privilege to meet. I’d like to share with you some of my experiences both as an attendee and as a sponsor of the event.
As a sponsor, I wasn’t able to attend as many sessions as I'd have liked to. I was able to meet individually with most of the speakers and listen to their 5 x 5 presentations, which were a real hit at the conference. Just listening to these 5-minute sessions, I was struck by the diversity of the speakers and their knowledge of data solutions.
Mike Ferguson demonstrated how to derive structure from unstructured data using machine learning combined with text mining techniques to provide sentiment analysis. I’m no expert in text analytics, but it was really interesting to get a perspective from somebody that is clearly an expert in his field.
Dirk Lerner and his presentation on bitemporal modeling at first gave me a brain freeze. However, his explanation of using a Data Vault satellite to track changes over time and collapsing the changes into a dimension for analytics was not only a requirement for financial reporting in Germany but also quite ingenious.
The next session that resonated with me was John Myers’ discussion about metadata and its importance within the data world. It was refreshing to listen to an expert like John discussing the challenges in the big data space, and how metadata is even more important when using "unstructured" data. This is similar to some of the work we have done using metadata within BimlFlex to perform the schema on read in a persistent staging layer and to this excellent post by Roelant Vos: Embrace your Persistent Staging Area for Eventual Consistency
Rick van der Lans’ session about data virtualization with double flexibility and agility was very informative, and the audience really liked his double and triple Oreo analogy. I saw many parallels between Rick’s insights and what we have implemented in BimlFlex for Azure SQL Data Warehouse deployments. His logical data warehouse architecture was also a great example of the type of metadata driven solution that John advocated in his session.
The session by Ralph Hughes about Agile2020 was of particular interest to me and was also the only full session that I was able to attend due to the busy schedule at our sponsor booth. Ralph highlighted the need for a better way of managing data warehouse projects, and he and his team has developed among the best methodologies I’ve seen. His presentation was clear in explaining the gap between requirements, development, and testing. I’ve taken numerous ideas from his presentation, especially around automated testing. We’re looking at ways of incorporating the tools he recommended with BimlFlex. We are also working towards implementing this methodology as our standard project delivery approach, which I think of as “supercharged” agile for data warehousing. We will also be recommending that our customers either contact Ralph or consult one of his many great books when embarking on a data warehouse project.
Claudia Imhoff’s session, "How to lie with statistics" was amusing and highlighted the different ways the same data can be represented with wildly different narratives and conclusions. It was the first time that I saw a presentation from somebody as knowledgeable and experienced as Claudia showing how an analyst could "cheat" with data. The tongue-in-cheek made it all the more fun and engaging. One of her slide bullet points stood out the most to me: "Hide your sources at all cost, which stops anyone from verifying or disproving your facts." Having worked with data for more years than I'd like to count, I have seen too often that reports cannot be verified against a single source of truth like an enterprise data warehouse.
Damian Towler, our guest, presented a session on the selection process CUA undertook in evaluating and choosing a metadata-driven data warehouse automation solution. It was very well received because we, as the vendor, decided it best that our potential customers talk to an existing customer without us in the room to influence the conversation. Damian took them through his selection criteria and independent scoring process. He then showed them their single customer view solution and how they were able to implement it within CUA in only a couple of weeks. We have incorporated their evaluation criteria into our existing spreadsheet that you can download here. Please let us know if you have any criteria you would like us to add.
Len Silverston had a session on the Universal Data Model. I was somewhat skeptical at first about the concept of a Universal Data Model, thinking that it might be a one-size-fits-all approach. However, the more I listened, the more it made sense. I also thought about some of our customers and how much time they spend figuring out the "right" target model which is what Len has done for you. Later during the summit (or more correctly as we were packing up), Damian facilitated a discussion with Len and Hans. Hans announced earlier in the day that he and Len were collaborating on converting the Universal Data Models to Data Vault models. Damian shared that identifying the core business concepts using a pre-fabricated core of Hubs and Links (backbone) would have significantly reduced their project timeline. This lead to us to trying to see if the BimlFlex can be used to accelerate his 3NF Universal Data Models to a Data Vault model. It all makes sense. Imagine you’re in the insurance industry or health industry and could use a predefined target model as a starting point, saving you weeks or months on your project. We hope to bring you more information about our collaboration soon.
There were many other great sessions at the Global Data Summit, and I’ve only highlighted ones that resonated the most with me. Many attendees and speakers were discussing Big Data, machine learning, and even blockchain at the event. As a sponsor of the event, we had many interesting discussions with so many attendees and received extremely positive feedback for BimlFlex and our roadmap for the future.
In summary, the Global Data Summit was one of the most enjoyable and diverse data events I have attended. A big thank you to all the sponsors, attendees, speakers and organizers for a fantastic time. I especially would like to thank Hans and Patti Hultgren for making us feel welcome in Genesee.
If you have any queries or would like to discuss how BimlFlex Data Warehouse Automation can benefit your project please email us at sales@varigence.com.
PS:
We created a banner for the event that the attendees found very humorous. We promise nobody was injured in creating this video. Only watch if you have a sense of humor
BimlFlex Data Mart Automation using Polybase and Azure SQL Data Warehouse
Investing into designing and implementing a substantial Data Warehouse creates a foundation for a successful Data Platform architecture. Using a configurable Data Warehouse Automation solution that support all the best bits of Azure SQL Data Warehouse as standard is essential. For more information on why we use this approach please also read this blog post by Roelant Vos Embrace your Persistent Staging Area for Eventual Consistency.
Azure SQL Data Warehousing
Leverage metadata-driven data warehouse automation and data transformation optimized specifically for all Microsoft Azure SQL Data Warehouse options. The ability to extract, compress and prepare data at source is critical to delivering an optimized solution. Using Polybase with parallel files you can improve the data warehouse loads well over ten times from traditional SSIS packages.
We demonstrate extracting data from a source system that can be staged or presisted into tables or loaded directly into type 1, 2 or 6 dimensions and facts.
Webinar
In the previous webinar, we touched on data warehousing using Azure SQL Data Warehouse and will go into detail showing the parallelism and transformation using Polybase. Traditionally most of the project time is spent on connecting to the source systems configuring CDC and parameters to extract data. We will look at how easy BimlFlex implements scaling out your data ingest by creating parallel threads and multiple files. This approach is vital for optimal performance as explained by James Serra in the following blog post. James Serra. PolyBase explained.
BimlFlex data warehouse automation, especially when combined with Azure SQL Data Warehousing, is worth investigating if you are about to embark on a modern data warehouse project.
If you have any queries or would like to discuss how BimlFlex Data Warehouse Automation can benefit your project please please email us at sales@varigence.com.
Unleash the power of BimlBundles with BimlStudio 2017
In this webinar recording, we show you BimlBundles and Extension Points that provide you the ability to precompile your Biml code in a distributable bundle.
In building BimlFlex we looked at the competition, and the one thing they don't do or do very poorly is the ability to extend upon their solution when your requirements do not fit their solution. Watch the webinar and see how you can also offer our customers unprecedented customization and flexibility.
If you want to see all our webinars you can follow our Youtube channel.
Watch Recording
What's new in BimlExpress 2017? by Cathrine Wilhelmsen
BimlExpress 2017 is finally here! In this session, Cathrine will take you through the exciting new features, like expanded Biml preview, global include files, and support for SSIS annotations.
She also covers some of the most important changes to the Biml API, like the updated CallBimlScript, the new MakeSsisSafe extension method for strings and the flat file extension method for generating table columns from flat file columns.
About Cathrine
Cathrine work as a consultant, technical architect, and developer, focusing on Data Warehouse and Business Intelligence projects. Outside of work I’m active in the Biml and SQL Server communities as a Microsoft Data Platform MVP, BimlHero, speaker, and blogger. I’m also a past board member of Microsoft Data Platform User Group Norway and past main organizer of SQLSaturday Oslo.
You can follow me on twitter: @cathrinew Read more of Cathrine's Biml blogs: http://cathrinew.net
Azure Data Warehouse Automation with BimlFlex
In this day and age, data warehouses simply have to be future proofed for cloud technologies. Populating this modern data warehouse should benefit from the latest innovation in ETL and data integration with near self-service data preparation. You need a data warehouse automation (DWA) solution built from the ground up specifically to empower Microsoft BI Stack users with the ability to switch between on-premise and Azure deployments.
Azure Data Warehousing
Leverage metadata-driven DWA and data transformation optimized specifically for all Azure Data Warehousing options. For one of our BimlFlex customers in Australia, we integrated data from a distributed network point of sale systems. The ability to extract, compress and prepare data at source was critical to delivering an optimized solution.
Data Warehousing at the best of times is a complex undertaking and BimlFlex has been specifically designed to simplify the development process and subsequent maintenance. The ability to switch your DWA generated code between Azure compatible and on premise is unique to our solution.
Benefits
Our customers benefit from having a Data Vault Accelerator that accelerate the design, creation, population, and maintenance of their model. Building Point in Time and Bridge tables is simply a metadata configuration providing a virtual data mart option. Make full use of Azure SQL Data Warehouse parallel processing power with support for Hash Distribution Keys.
The real value of BimlFlex is how efficiently it delivers business value and how easily it can be implemented, operated, and maintained. We have seen consistently with our customers their ability to be self-sufficient, especially if they have a Microsoft BI team, reducing the need for external development services.
Webinar
In this webinar recording, we work through a real world customer use case discussing the various strategies and challenges during the project. We segment the webinar with an executive overview first and then do a more detailed deep dive showing how we do this.
BimlFlex data warehouse automation, especially when combined with Azure Data Warehousing, is worth investigating if you are about to embark on a modern data warehouse project.
If you would like more information please email us at sales@varigence.com
Big Things Happening Today
It's an exciting time for Varigence and Biml users around the world. Today we have made our largest coordinated release in company history. We will be sharing much more over the coming weeks about all of the great new functionality in the Biml product suite. For now, here is a very brief overview:
Varigence.com
We've rewritten our product pages, added new and improved documentation, and made improvements to the store and quoting process. Perhaps most exciting, though are the changes to our account page. In minutes, you can create your own self-activating keys for BimlStudio and BimlExpress offline scenarios that last for up to 6 months. Even better, when your offline key is nearing expiration, we'll send you an email with a conventient renewal link.
Mist is Now BimlStudio!
The new version of Mist is called BimlStudio 2017 and offers a ton of great features, including overhauled source control, tabular model support, global include files, Biml bundles, and so much more. The most noticeable change, though, is the new name and styling. BimlStudio does a far better job of conveying the purpose of the tool. We hope you love the improvements as much as we do.
BimlExpress 2017
BimlExpress 2017 is the latest in our free SSDT add-in. Enjoy performance improvements, bug fixes, global includes, an expanded Biml preview window, and more! Plust, we now use a VSIX installer for BimlExpress, so it will work perfectly with all of your individual and enterprise deployment scenarios.
Introducing BimlFlex
For years, customers have enjoyed the ability to use Biml to create their own customer data development frameworks. Many users wondered if it might make more sense for them to buy a framework someoneone else had already written rather than building their own. BimlFlex answers that question. Use our metadata model to rapidly build staging, ODS, data vault, dimensional warehouses, data marts, cubes, tabular models, or any subset of those capabilities.
Check out out everything we shipped today and stay tuned for more details soon!
Introducing BimlExpress
![]()
BimlExpress is a new Visual Studio add-in that includes everything that is currently available in the BIDS Helper Biml subset. In addition, it has a code editor that is similar in functionality to the BimlOnline code editor. Over time, we will be adding additional functionality to BimlExpress. BimlExpress is free just like BIDS Helper, we only require a valid email address to send a license key to.
Why did we create BimlExpress?
Biml in BIDS Helper has been a great combination. However sometimes we are ready to ship a new version of the Biml Engine but the next version of BIDSHelper isn't ready. Sometimes BIDSHelper wants to ship their new version and our Engine isn't ready. Those times occasionally line up, but usually don’t. Now both Varigence and BIDSHelper will be able to ship new versions soon as they're ready, allowing our Biml users to get the latest and greatest of everything as soon as possible.
Will Biml still be available in BIDSHelper?
Yes you can still use Biml with BIDSHelper. Each time BIDSHelper ships, we will ship it with whatever the newest Biml Engine happens to be. If users want the very latest functionality and additional features like the code editor, then BimlExpress will be there for them. This is all about giving away more functionality for free to Biml users.
Learn more about BimlExpress here.
BimlOnline Beta Release

We are excited to announce the release of BimlOnline Beta, the first web-based IDE for Biml. There are a few pretty cool features that we want to tell you about before you dive into using BimlOnline.
-
Editor – This editor make it easy to author and edit Biml directly from the browser window. With full intellisense, you can increase your speed of development. Want to build a project? Just install the BimlOnline browser plug-in and you now have the ability to build a project that you’ve been working on.
-
Package Importer – Ever wanted to take you SSIS packages and convert them to Biml? Now with the package importer you can do just that! Upload your ISPAC, DTProj, DTSX, Conmgr, Params, or .zip files and receive your generated Biml files back in your selected format.
-
Documentation – With this feature you can view information about your project. Documentation is fully customizable and is updated in real-time as you make changes.
The best thing about BimlOnline is that you don’t have to download or install any software on your computer, and it’s free while in beta. With just an internet connection you can log in and begin developing your business intelligence or data solution.
Become a Biml Hero Certified Expert!

As the Biml ecosystem has continued to grow, several customers, partners, and community members have asked if we could create a formal certification program for Biml. In response to this demand, we have created the Biml Hero Certified Expert Program. Biml Heroes will be certified as experts by the creator of Biml Scott Currie.
The program has been designed to ensure that Biml Heroes can effectively use Biml to create real-world, production quality business intelligence and data warehousing solutions. Unlike some certification programs, you won't earn a certification by just sitting in a class for a few hours. In order to become a Biml Hero, you'll need to attend eight hours of advanced training. Then you'll then have to pass a comprehensive test on Biml as well as submit a production quality code sample and case study detailing how you implemented a data solution with Biml. The code sample and case study will be reviewed in depth by the Biml product team at Varigence. Even those whose solutions are approved will receive detailed one-on-one feedback about how to write even better Biml code and and further improve your skills in the future.
Earning the Biml Hero certification will not be easy; however, it will be well worth the effort. Below are just a few of the many benefits of being a Biml Hero:
- Biml Heroes will receive exclusive training as part of the certification process.
- Varigence will refer Biml Heroes to organizations that request assistance with Biml or are looking to hire someone who is proficient in Biml.
- Biml Heroes will be featured on both the Bimlscript.com and Varigence.com websites. They can add a picture, a short bio, and links to their social networking pages.
- Biml Heroes can display the Biml Hero badge and Biml Hero Certified expert logo for professional use on their blogs, business cards, social networking sites and other marketing material.
- Varigence will provide access to online Biml content and communities created exclusively for Biml Heroes.
- Upon initial certification you will receive a complimentary Biml Hero t-shirt, polo, and jacket.
To learn more about becoming a Biml Hero please download the Biml Hero program guide.
To register and enroll in the Biml Hero training program please contact training@varigence.com.
Mist 4.0 Released

Varigence is pleased to announce the release of Mist 4.0. Now Biml users and Business Intelligence professionals around the world can develop and automate BI solutions faster than ever before. Read below to see the top ten game changing features of Mist 4.0. Then download a free trial of Mist 4.0 and see for yourself why there is no better IDE in the world for building BI solutions than Mist.
Top Ten New Features of Mist 4.0
-
Metadata modeling - Makes the use and management of metadata a reality by providing a general purpose mechanism for creating metadata models, enforcing validation rules, and providing metadata entry user interfaces (UIs) for non-technical Subject Matter Experts (SMEs) or Business Analysts (BAs). Mist autogenerates a metadata entry interface for non-technical users based on your metadata model.
-
Offline schemas - Development teams can develop BI assets in a disconnected state.
-
Full support for SQL Server 2014 - You can build and deploy your BI solution to SQL Server 2014. SQL Server 2012 and 2014 now also produce ISPAC output files for ease of deployment automation.
-
SSIS Importer - Improved with support for importing entire projects, ISPAC files, deployed projects from SQL Server, or individual packages. The importer can now be called programmatically which enables automated import, transformation, and re-emission of existing SSIS projects.
-
True Multi-Display Interface (MDI) – Multiple editing windows can be opened at one time.
-
Redesigned Ribbon – Improved layout and design for easier access to most used features.
-
Logical View - Groupings by Relational, SSIS, SSAS, Metadata, Library, Broken or Live BimlScripts. Improved management of transformers, frameworks, and build configurations.
-
Improved connection designers – no more connection string authoring frustration.
-
Biml Code Editor - Improved and expanded intelliprompt completion lists.
-
Code Support – Ability to author C# and VB code files that are included with your BimlScript builds. Extension methods, helper classes, you name it!
Varigence Australia Announces New Consulting Partner - Hilmax Solutions
Sydney, Australia - October 9, 2014 - Varigence is pleased to announce a consulting partnership with Hilmax Solutions.
As partners Varigence and Hilmax Solutions are committed to working together to extend the power of existing metadata frameworks which will deliver better business intelligence solutions faster and far more affordably.
Varigence will assist Hilmax in providing training, consulting, implementation services, and support to the Biml and Mist community.
Varigence and Rehfeld Announce Strategic Partnership to Integrate Mist and Effektor

Press Release
Greenville, SC, USA and Copenhagen, Denmark – June 2, 2014 - Varigence, the creator of the rapidly growing Biml ecosystem, and Rehfeld, the leading provider of Business Intelligence and Data Warehousing professional services in Scandinavia, are pleased to announce a long-term strategic partnership to bring premier tools for Business Intelligence and Data Warehouse development to the Global market. Under the agreement Varigence’s Mist Integrated Development Environment (IDE) will be used to extend the power and capabilities of Rehfeld’s Self-Service Data Warehousing Platform, Effektor.
“Integrating Mist with Effektor is another great addition to the rapidly growing Biml/Mist ecosystem. By combining the power of Mist with Effektor’s data warehousing capabilities Rehfeld can now offer one of the most advanced BI solutions ever created,” said Scott Currie, Varigence CEO.
Mist is an integrated development environment (IDE) for authoring Business Intelligence Markup Language (Biml) code and data assets. Mist leverages visual design capabilities and debugging features to provide a unified experience for managing entire business intelligence solutions, including relational modeling, data transformation packages, and OLAP cubes. Mist also incorporates modern programming IDE features, including text editors with syntax highlighting, Intelliprompt and quick-info displays, source control integration, and multi-monitor support. Combined with the capabilities of Biml to automatically generate huge amounts of data assets from metadata, reuse code, enforce patterns and best practices, Mist changes the economics of building business intelligence and data warehouse solutions.
Effektor is a meta-data driven platform for DW/BI-solutions supporting all relevant needs in BI from importing source system data over data warehousing and Master Data Management to reporting both on relationel data and OLAP cubes. The platform is built around the concepts of ease of use and self service: working with your data warehouse changes to structure and/or data should not require deep technical expertise and as many tasks as possible should be done by data stewards and end users, not IT pros. Effektor also offers self service functionality on row based security settings and Master data management.
“Since its initial release our customers have been implementing cutting edge BI solutions using Effektor in a fraction of the time and cost of hand build solutions but with a high quality data warehouse architecture. Now with the integration of Mist, our Effektor customers can gain even more insight into their data enabling them to make more profitable data driven decisions for their company,” said Ditlev Moltke, COO of Rehfeld Partners.
Rehfeld has successfully completed the TAP-program for the integration of Mist with Effektor. Version 6.2 of Effektor will ship on November 1, 2014 and include Mist integration and extended data warehousing features.
For press inquiries, please contact media@varigence.com or media@rfeld.com. For customer inquiries, please contact sales@varigence.com or sales@rfeld.com.
Biml Scandinavian Tour

Due to the rapid adoption of Biml and Mist throughout Scandinavia, Rehfeld and Varigence are proud to present a 10 day speaking tour on Biml. From May 5 until May 15th the tour will travel through six cities in four different countries. The highlight of the tour is four full day Biml Master Classes in Copenhagen, Stockholm, Oslo, and Helsinki. The Master classes will be taught by the creator of Biml Scott Currie and Rehfeld Principal BI Architect Peter Hansen. Scott and Peter will work together to take your Biml skills to the next level. Click on the individual events below to reserve your spot today.
Denmark
- Biml Techie Meetup, Aarhus, May 5, 7-9pm
- Biml and Breakfast, Copenhagen, May 6, 9-11am
- Biml Afternoon Tea, Copenhagen, May 6, 4-6pm
- Biml Techie Meetup, Copenhagen, May 6, 7-9pm
- Biml Master Class, Copenhagen, May 7, 9-5pm
Sweden
- SQL Server user group meeting, Malmö, May 7, 6-9pm
- Biml and Breakfast, Stockholm, May 8, 9-11am
- Biml Afternoon Tea, Stockholm, May 8, 4-6pm
- SQL Server User Group Meeting, Stockholm, May 8, 6-9pm
- Biml Master Class, Stockholm, May 9, 9-5pm
Norway
- Biml and Breakfast, Oslo, May 12, 9-11am
- Biml Afternoon Tea, Oslo, May 12, 4-6pm
- Biml Techie Meetup, Oslo, May 12, 7-9pm
- Biml Master Class, Oslo, May 13, 9-5pm
Finland
- Biml and Breakfast, Helsinki, May 14, 9-11am
- Biml Afternoon Tea, Helsinki, May 14, 4-6pm
- Biml Techie Meetup, Helsinki, May 14, 7-9pm
- Biml Master Class, Helsinki, May 15, 9-5pm
If you have any questions about the tour please email Finn Simonsen at fas@rehfeld.dk or call +45 3170 1059.
Varigence Australia Launches

Press Release
Greenville, SC, USA and Sydney, Australia – March 31, 2014 - Varigence Inc, developers of the leading business intelligence tools Biml and Mist are pleased to announce the formation of Varigence Australia. The Varigence suite of products are changing the economics for Microsoft BI development as it provides powerful tools to reduce BI delivery costs and better leverage a business’s metadata.
Adoption of the Varigence technologies has been rapidly expanding in the US and Europe and now through the formation of Varigence Australia, these premier tools for business intelligence and data warehouse development are far more accessible to businesses in Australia and New Zealand.
“Australia and New Zealand have been among our fastest growing markets over the past year. Varigence Australia will enable us to better serve our current partners and customers, while helping to continue the growth that the Biml ecosystem has enjoyed in Oceania.” Scott Currie, CEO, Varigence.
Varigence Australia will provide sales, support and marketing services for all Varigence customers and partners in Australia and New Zealand. By working with partners and independent consultants they will be providing implementation training and first line support to assist other BI professional services to create more value for their clients. Biml and Mist bring the level of innovation to business intelligence that the tablet brought to the PC through end-user accessibility and more cost effective and faster BI delivery.
“We believe that Varigence Australia’s BI tools will deliver better business intelligence faster and far more affordable than ever before to Australian and New Zealand businesses. Mist and Biml will provide access to a higher level of business intelligence with greater agility for businesses in our region, at a time when competitive edge means everything” Paul Schmidt, General Manager – Varigence Australia
To celebrate their launch Varigence Australia is a platinum sponsor of the PASS SQL Saturday in Melbourne on 5th April 2014.
About Varigence Australia
Varigence Australia will provide sales, support and marketing services for all Varigence customers and partners in Australia and New Zealand. They will partner with BI professional services and independent consultants to introduce Varigences suite of products. Varigence Australia will provide implementation training and first line support for Mist, Biml and all other Varigence BI tools.
The management team consist of Paul Schmidt (General Manager) and Peter Avenant (Director of Technology) formerly from Avelytics Pty Ltd. www.varigence.com.au
About Varigence
Varigence brings the best innovations in business intelligence architecture to market through application development and by delivering enterprise business intelligence faster, easier and in a much more economical framework. They are the creator of Business Intelligence Markup Language (Biml) and have been building business intelligence accelerator tools since 2008. Through innovative easy to use tools, Varigence products offer an unprecedented level of business intelligence accessibility to the end-user and have delivered state-of-the-art business intelligence solutions to companies of all sizes, from internet start-ups through to Fortune 100 companies.
About Scott Currie
Scott Currie is the founder and CEO of Varigence, Inc. Scott is also the creator of Business Intelligence Markup Language (Biml). Prior to founding Varigence, Scott worked for 7 years at the Microsoft Corporation.
About Biml/Mist
Mist is an integrated development environment (IDE) for authoring Business Intelligence Mark-up Language (Biml) code and data assets. Mist leverages visual design capabilities and debugging features to provide a unified experience for managing entire business intelligence solutions, including relational modelling, data transformation packages, and OLAP cubes. Mist also incorporates modern programming IDE features, including text editors with syntax highlighting, Intelliprompt and quick-info displays, source control integration, and multi-monitor support. Combined with the capabilities of Biml to automatically generate huge amounts of data assets from metadata, reuse code, enforce patterns and best practices, Mist changes the economics of building business intelligence and data warehouse
solutions.
About Pass SQL Saturday
SQLSaturday is a training event for SQL Server professionals and those wanting to learn about SQL Server. Sessions will be presented by some of the best SQL Server trainers, consultants and professionals in the region. The Professional Association for SQL Server (PASS) was co-founded by CA Technologies and Microsoft Corporation in 1999 to promote and educate SQL Server users around the world. Since its founding, PASS has expanded globally and diversified its membership to embrace professionals using any Microsoft data technology. With a growing membership of more than 100K, PASS supports data professionals throughout the world who use the Microsoft data platform.
http://sqlsaturday.com/296/eventhome.aspx
For press inquiries, please contact media@varigence.com.au
or media@varigence.com
For partnership inquiries, please contact partners@varigence.com.au
For customer inquiries, please contact sales@varigence.com.au
Varigence and Rehfeld Announce Strategic Partnership
.jpg "Varigence + Rehfeld")
We are pleased to announce a long-term strategic partnership with Rehfeld, the leading provider of Business Intelligence and Data Warehousing professional services in Scandinavia, to bring the premier tools for Business Intelligence and Data Warehouse development to the Scandinavian market.
Under the terms of the partnership Rehfeld will be the exclusive reseller of Varigence’s Mist IDE in Denmark, Finland, Iceland, Norway and Sweden. Rehfeld will also provide training, consulting, implementation, and first line support for Biml and Mist customers in the region. Rehfeld is also committed to working with other professional services firms throughout Scandinavia to assist them in creating more value for their clients with Biml and Mist.
“By combining our cutting edge business intelligence technologies with the implementation and consulting expertise of Rehfeld we will be able to provide unparalleled value and service to data professionals throughout Scandinavia,” said Scott Currie, Varigence CEO.
Mist is an integrated development environment (IDE) for authoring Business Intelligence Markup Language (Biml) code and data assets. Mist leverages visual design capabilities and debugging features to provide a unified experience for managing entire business intelligence solutions, including relational modeling, data transformation packages, and OLAP cubes. Mist also incorporates modern programming IDE features, including text editors with syntax highlighting, Intelliprompt and quick-info displays, source control integration, and multi-monitor support. Combined with the capabilities of Biml to automatically generate huge amounts of data assets from metadata, reuse code, enforce patterns and best practices, Mist changes the economics of building business intelligence and data warehouse solutions.
“At Rehfeld, we’ve already been using Biml and Mist in our client engagements with fantastic results. These tools are truly must-have for any firm who relies on data to make better decisions. By adopting Mist in our projects we can offer our customers greater agility, higher quality and increased productivity. We’re very excited to help lead even greater adoption throughout Scandinavia,” said Ditlev Moltke, COO of Rehfeld Partners.
For press inquiries, please contact media@varigence.com or media@rfeld.com.
For partnership inquiries, please contact partners@varigence.com.
For customer inquiries, please contact sales@varigence.com or sales@rfeld.com.
Biml at PASS Summit 2013
Biml had a great showing and according to this blogger was a star of PASS Summit 2013.
On Tuesday, October 15th, Varigence and Linchpin People presented the first ever full day Biml training event. The Workshop was held at the Wake Forest University Charlotte Center and sold out with 50 plus people in attendance. Presenters included Andy Leonard and Tim Mitchell as well as the creator of Biml Scott Currie.

At the Summit itself, Biml was an integral part of at least six presentations. These presentations included:
- Automate Your ETL Infrastructure with SSIS and PowerShell - Allen White - This presentation is available on PASS TV.
- Building a Supportable ETL Framework - David Darden
- Data Cleansing in SSIS - Tim Mitchell
- Designing an SSIS Framework - Andy Leonard
- Reduce, Reuse, Recycle: Automating Your BI Framework - Stacia Misner
- Type More, Click Less: Programmatically Build SSIS Packages - Bill Fellows

Mist 3.4 Released

Varigence is pleased to announce the release of Mist 3.4, Mist is the only IDE made specifically for Business Intelligence Markup Language (Biml). Released less than two months after Mist 3.3, Mist 3.4 is another successful short release cycle that delivers powerful new features. Get a free 14 day trial of Mist at http://www.varigence.com/Products/FreeTrial.
Mist 3.4 New Features
-
Mist UI Changes
- Added a forward/back button in the quick access toolbar. Forward and back can also be accessed with Alt-Left/Alt-Right, mouse buttons, or touch gestures. History is maintained for 15 items
by default. - Added a search box to Project View which enables search/filtering by file name
- Fix for missing root folders on project load
- Added context menu commands for new sql generation extension methods (see below)
- Copy Biml context menu item now on all objects. This will give you the raw Biml for any object, even if it is live scripted.
- Changed the default on logical view to remove empty folders/groups when a search is active
- Fixed a Mist crash when broken transformers are run from context menu.
- Improvements to licensing and activation – especially in offline scenarios.
- Added “View in BimlScript designer” to all logical view root items, which enables you to more easily see expanded Biml for live scripted objects
- Added a forward/back button in the quick access toolbar. Forward and back can also be accessed with Alt-Left/Alt-Right, mouse buttons, or touch gestures. History is maintained for 15 items
-
Package Editor
- Entirely new Compact Mode that can be toggled with a new ribbon button and which is saved as a project setting.
- ~20% performance improvement in Package Editor load time for big packages.
-
BimlEditor Changes
- Added highlighting of matching delimiters (XML tags, code nuggets, multiline comments, braces, parentheses, etc.)-
- Added highlighting of other instances of the currently selected text
- Fixed intelliprompt to work better with code in included files
- Added indentation guides, which are on by default.
-
Language and Compiler Changes
- Added SurrogateKey as an option for table column ScdType.
- File group modeling is now available on databases. Tables and indexes can be assigned to file groups explicitly
- FilterPredicate has been added to AstIndexNode to support filtered indexes
- Added DefaultConstraintName to AstTableColumnBaseNode to support naming the default constraint. This is especially useful for source controlled DBs
- Added new properties for Package emission (VersionMajor, VersionMinor, VersionBuild, CreatorName, CreatorComputerName, CreatedDate).
- Added support for DataflowOverrides, which provide functionality for changing much of the default options that the compiler sets on output paths and columns.
- Fix to enable Text and NText in FlatFileFormats
- Fixed custom component emitter bug reported in forums.
- Fixed bug with custom log provider emission
-
Extension Methods
- Added extension methods to string for XmlEscape and XmlUnescape
- Added GetColumnCompareList and GetColumnAssignmentList methods on table for easier construction of complex sql queries
- New extension methods to get CreateAndDropDdl for relational object types
- New extension methods to get SELECT, INSERT, UPDATE, and DELETE query templates for tables
-
Package Importer
- Importer enhanced to use DataflowOverrides
- Added support to importer to disable import of SSIS descriptions as annotations. These are now on by default.
- Lookup parameterized queries now import only if cache mode != full
Upcoming Biml Presentations
There will be several Biml presentations between now and the end of 2013. If you have a presentation focusing on Biml that's not listed, please let us know on the comments below or post it at the Biml User Group on Linkedin.

Mist 3.3 Released

NEW BACKSTAGE SPLASH SCREEN
Varigence is pleased to announce the release of Mist 3.3. Mist is the only IDE made specifically for Business Intelligence Markup Language (Biml). Mist 3.3 has several major improvements including a backstage splash screen, improved build performance, and Attunity Oracle connection support. To see the full release notes for Mist 3.3 please click here.
Mist allows you to model and generate SSIS packages, SSAS cubes, and then leverage Mist designers for creating and modifying your BI assets. You can also import already made SSIS packages into Mist, allowing you to continue their development directly with Biml.
Further, Mist incorporates BimlScript, which lets you codify Biml creation with reusable templates and transformers. BimlScript makes it trivial to apply changes across several BI assets and enforce design patterns.
Mist is available with a perpetual or subscription license. Subscription licenses are renewed every 30 days with no commitment required. Free 14 day trials are available at Varigence.com
Stairway to Biml

Due to Biml's growing popularity among BI professionals, SQL ServerCentral.com has launched a stairway series on Biml. Andy Leonard from Linchpin People and and Paul Waters from Varigence will be writing the "Stairway to Biml" articles.
SQL Server Central's Stairways are designed to get a beginner up and running on SQL Server based technologies. Each Stairway is a SQL tutorial series focused on a single topic and is arranged into no more than a dozen easily-navigable tutorials. Each level is the length of a typical magazine tutorial, and emphasizes practical, hands-on learning, with just enough background theory to help you understand the topic at a deeper level.
Level One of the staircase entitled, "What is Biml" was released earlier today and has already been read over 8000 times. Levels Two through Four of the Stairway are scheduled to be released as follows:
- Level 2 - Wednesday, July 31, 2013
- Level 3 - Wednesday, August 7, 2013
- Level 4 - Wednesday, August 14, 2013
Levels five through twelve will be released over the remainder 2013.
Biml Workshop 2013
On Tuesday, October 15th in Charlotte, NC, Varigence and Linchpin People will be presenting a full day Biml workshop. This workshop will be held at the Wake Forest School of Business located in Uptown Charlotte just two blocks from the Charlotte Convention Center. The Wake Forest Center has state of the art classrooms with large display screens as well as full wi-fi access and power outlets for all attendees.


The workshop will have fully catered meals throughout the day. There will be a hot breakfast bar, Carolina style BBQ lunch and refreshments and snacks served throughout the day. All attendees will also receive a Biml workshop t-shirt .


Registration is only $69. Register before July 15th, and receive the early bird price of just $49. Click here to register.
More information and speaker announcements will be released on Twitter and the Biml Users Group on Linkedin. To learn more about Biml go to BimlScript.com.

All New Varigence.com
Varigence is proud to announce the relaunch of Varigence.com. Along with a new user friendly design, Varigence.com has added tons of new product information, documentation and videos.
Some of our new features include:
- FAQ - Find answers to commonly asked questions about Biml, Mist and Vivid.
- Forums - Have improved code block formatting posting Biml
- Product - New product pages highlighting the capabilities and features of Biml, Mist and Vivid.
- Search - Enhanced search functionality throughout the website.
- Support - All Biml language documentation, product user guides and samples fully updated.
- Training - New training pages highlighting our accelerator courses
- Videos - New product and feature videos throughout the website
To see more of the all new Varigence.com click below:

Mist 3.2 Released

IMPROVED PACKAGE DESIGNER
Varigence is pleased to announce Mist 3.2. This release has a modernized user interface and improved package designer.
With Mist you can model and generate SSIS packages, SSAS cubes, and other BI assets using Business Intelligence Markup Language (Biml). Or leverage Mist designers for creating and modifying your BI assets. You can also import already made SSIS packages into Mist, allowing you to continue their development directly with Biml.
Further, Mist incorporates BimlScript, which lets you codify Biml creation with reusable templates and transformers. BimlScript makes it trivial to apply changes across several BI assets and enforce design patterns.
Mist is available with a perpetual or subscription license. Subscription licenses are renewed every 30 days with no commitment required.
New features in Mist 3.2 include:
-
UI Improvements
-
Modernized User Interface
- Package Designer Details
- Modernized Package Designer UI
- Improved package dashboard
- Package surface can scroll during drag and drop
- When adding a task to the designer, vertical padding is added beneath it
- Added visual notification to the Windows task bar when a build finishes
- Added context menus to the Configuration designer
- Project View multi-select works with shift+click
-
Modernized User Interface
-
SSIS 2012
- Fixed emission issues with package and project parameters
- Fixed emission issues with log events
- Proper emission of project connections with the Execute Package task
- Native support for Expression task
- Added protection level to package projects
- Added package parameters to Expression Builder
-
Package Import
- Import without IDs is now the default behavior
-
The following now import correctly
- Log Events in SSIS 2012
- Output paths for packages with script components
- Packages with package parameters
- Packages with connection names containing a backslash
- Script tasks and components that use VB
-
Logical View
- Execute Transformers context menu now sorts transformers alphabetically
- Execute Transformers context menu now displays transformers that start with an underscore
- Fixed duplication error when duplicating a package that references a script task or component
-
Project Designer
- Use Project Deployment is only enabled when targeting SSIS 2012
-
Biml
- Added ValidationReporter.Report(IFrameworkItem, Severity, Message, Recommendation) overload
- Several improvements to error and validation reporting
-
Setup
- Streamlined installer
- Eliminated the SQL Server prerequisites from Mist installations
For more details on Mist, please visit:
Download a 14-day free trial of Mist 3.1 at:
http://www.varigence.com/FreeTrial
For information on Mist pricing and licenses, please visit:
Varigence featured in Greenville Business Magazine
Varigence is featured in the February issue of Greenville Business Magazine. The article is on page 61 and can be viewed on the magazine's online edition.

Varigence’s Steven and Scott Currie
Mist 3.1 Released

IMPROVED USER EXPERIENCE
Varigence is pleased to announce Mist 3.1, a release focused on improving user experience within our IDE for Business Intelligence development.
Use Mist to model and generate SSIS packages, SSAS cubes, and other BI assets using Business Intelligence Markup Language (Biml). Or leverage Mist designers for creating and modifying your BI assets. You can also import already made SSIS packages into Mist, allowing you to continue their development directly with Biml.
Further, Mist incorporates BimlScript, which lets you codify Biml creation with reusable templates and transformers. BimlScript makes it trivial to apply changes across several BI assets and enforce design patterns.
New features in Mist 3.1 include:
- Comprehensive context menus throughout the UI
- New connection string builder that allows for the easy creation of connection strings within Mist
- Ability to execute BimlScript transformers directly from context menus
- The ability to customize your toolbox to your individual preferences
Remember, Mist is now available with a perpetual or subscription license. Subscription licenses are renewed every 30 days with no commitment required.
For more details on Mist, please visit:
Download a 14-day free trial of Mist 3.1 at:
http://www.varigence.com/FreeTrial
For information on Mist pricing and licenses, please visit:
Introducing Mist 3.0

Now With Zero-Commitment
Monthly Subscriptions!
Varigence is proud to announce Mist 3.0, a major update to our IDE for Business Intelligence development.
Use Mist to model and generate SSIS packages, SSAS cubes, and other BI assets using Business Intelligence Markup Language Language (Biml). Alternatively, you can leverage Mist designers for creating and modifying your BI assets. Further, Mist can import already made SSIS packages, allowing you to continue their development directly with Biml.
Mist also incorporates BimlScript, which lets you codify Biml creation with reusable templates and transformers. BimlScript makes it trivial to apply changes across several BI assets and enforce design patterns.
New features in Mist 3.0 include:
- Full support for SSIS 2012.
- A redesigned Project View that will be familiar to Visual Studio and BIDS users.
- Biml assets are now built with MSBuild, enabling custom build scenarios.
- You can now purchase a perpetual or subscription license. Subscription licenses are renewed every 30 days with no long term commitment required.
For more details on Mist, please visit:
Download a 14-day free trial of Mist 3.0 at:
http://www.varigence.com/free-trial
For information on Mist pricing and licenses, please visit
Biml is on Wikipedia
Biml's popularity is continuing to grow with more business intelligence professionals using it everyday. Due to Biml being increasingly mentioned in technical books and blogs it has garnered its own article on Wikipedia. Check it out at Wikipedia - Biml Article.

Varigence Sponsors SQL Saturday #174
On Saturday, October 27th, Varigence sponsored SQL Saturday #174 in Charlotte. This SQL Saturday was a BI Edition and had several Microsoft MVPs and industry experts speaking on various Business Intelligence topics.
Paul Waters and Steven Currie gave demonstrations of Biml and Mist to attendees throughout the day. Paul also gave an hour long presentation on Biml entitled, "Automating SSIS Development with Biml." Once again Paul presented to a standing room only crowd that loved learning about Biml.
Varigence enjoyed sponsoring SQL Saturday #174 and thanks all the attendees, sponsors, speakers and organizers for this great event.

Steven Currie and Paul Waters at Varigence Booth.

Paul Waters presenting, "Automating SSIS Development with Biml."
SQL Saturday #163 - Biml Presentation Standing Room Only
On Saturday, October 13th, Paul Waters presented, "Automating SSIS Development with Biml" at SQl Saturday #163 in Dallas, Texas. The presentation was standing room only and the audience loved learning about Biml.
This SQL Saturday was a BI Edition and had several Microsoft MVPs and industry experts speaking on various Business Intelligence topics.

Photo courtesy of Ryan Adams
Biml Presentations At Two SQL Saturdays in October
Biml Presentations At Two SQL Saturdays in October
In these presentations Paul Waters will start by showing how Biml can be used to solve common BI problems. Then after discussing the basics of BimlScript he will finish by covering practical examples using the BIDS Helper add-in to automate SSIS development.
Both of these SQL Saturdays are focused on BI and will have several Microsoft MVPs and industry experts speaking on various Business Intelligence topics. SQL Saturday #163 is on October 13th and SQL Saturday #174 is on October 27th. To learn more about these events follow the links below:


BimlScript.com Launches
Due to the increased worldwide use of the Business Intelligence Markup Language (BIML). A new website was launched last week for users of Biml. BimlScript.com is a community based website that allows users to contribute code snippets, walkthroughs and videos on Biml. The site already has several contributors and dozens of content posts that Biml users can reference to find solutions to common Business Intelligence problems.
Anyone who wants to learn how to code in Biml, ask questions on a hard to solve problem or just get see what other Biml users are doing should check it out.

Great New SSIS Book talks about BIML
Varigence just received a copy of SQL Server 2012 Integration Services Design Patterns.
This book was written by SSIS gurus Andy Leonard, Matt Masson, Tim Mitchell, Jessica Moss and Michelle Ulford.
Design Patterns devotes an entire chapter to the revolutionary Business Intelligence Markup Language (Biml), which was created by Varigence. Biml has allowed BI developers worldwide to eliminate the repetition in generating SSIS packages, and do in hours what previously took days.
This book is a terrific resource for learning Biml. The Biml chapter begins with a brief history and then explains step by step, with several screen shots, how to:
- Build your first Biml file inside of BIDS Helper
- Build a pattern for Basic Incremental Load in a SSIS package
- Use Biml as a SSIS Design Patterns Engine
In addition to the Biml chapter, Design Patterns covers 19 additional topics related to SQL Server 2012 that will help take your SSIS skills to the next level. SQL Server 2012 Integration Services Design Patterns is available through Amazon or Apress.

Varigence Is Golden At SQLBits X
Varigence is excited to announce that we will be a Gold Sponsor of SQLBits X.
SQLBits X consists of 3 days of amazing SQL Server content and serves as the official UK Technical Launch for SQL Server 2012. SQLBits will be taking place at Novotel West in London from March 29th until March 31st.
Varigence will be exhibiting on site at SQLBits, so stop by our booth and say hello. We’ll be giving away mini-footballs and having a raffle for an IPad 2. In addition, our CEO Scott Currie will be giving two lunch time presentations. On Friday, Scott will discuss how to accelerate your BI projects with Varigence tools and frameworks. On Saturday, he’ll show how you can use a free solution with Business Intelligence Markup Language (BIML) and BIDS Helper to achieve unparalleled performance and usability from SSIS.
Register for SQL Bits now at 
If you’d like talk with someone from Varigence before SQLBits to discuss your organization’s business intelligence needs, we’d love to meet with you. We’ll be available to demonstrate our products and services to anyone in the London area on March 27, 28 and 29th. Contact us now to set up an individualized consultation for your organization.
Cheers,
Varigence
Results of the $10,000 Biml Challenge

The $10,000 Biml Challenge took place over the last two days (10/12 & 10/13) on the Exhibition Hall floor at SQL PASS Summit 2011.
After compiling the results and conducting the drawing, we now have the winners.
The winners of the $500 drawing are:
Michael Wells & Jandee Richards
The Winner of The $10,000 Biml Challenge - taking home the $10,000 prize is:
David Darden
David Darden blazed through the Challenge in a mere 6 minutes and 39 seconds. Congratulations to David, Michael, and Jandee!
While the $10,000 Biml Challenge is now over you can always download Mist and Biml at http://www.varigence.com/Products/Home/FreeTrial.
Shortly we'll post the actual contest instructions so you can see what users did during the Biml Challenge.
A (SSAS) Maestro Among Us
Microsoft has recently started a new program called SSAS Maestros. An extremely deep technical training course on Analysis Services, which includes labs and even a take home exam project.
There were hundreds of applicants and eighty-one attendees. From that pool Microsoft recently announced their first class of 11 SSAS Maestros, and I'm happy to congratulate my colleague John Welch for being part of this elite group!
I work with John, so I can honestly say I'm not surprised to hear about this, but nevertheless it's a great honor for him. Way to go John, and congrats to the other ten Maestros!
Biml: A Primer for the $10,000 Biml Challenge
This is the first blog entry focused on helping users prepare for the $10,000 Biml Challenge. This will get you a basic understanding of the BI markup language, Biml.
Biml is an XML-based language for specifying the full set of assets in a BI and/or DW project. With Biml you can design everything from relational databases, to data integration and transformation packages, and OLAP cubes. The Biml language is fully specified online. The rest of the blog entry will give a more informal look into how to use Biml.
Biml works in a way consistent with other XML-based languages. If you want to define something in Biml, specify the element for that item. For example,
<Package Name="SamplePackage">
...
</Package>
This creates a new package with the name SamplePackage. If you want to add something to this package, for example a dataflow task, you just add it to that element. This again is consistent with typical XML-based languages. For example,
<Package Name="SamplePackage">
   <Tasks>
      <Dataflow Name="SampleDataflow">
...
      </Dataflow>
   </Tasks>
</Package>
Notice that since there can be many tasks in a package, there is a "Tasks" element that acts as a container where we can place multiple tasks.
Using XML attributes you can specify characteristics for the elements. For example, if you're specifying a Lookup element in Biml, you can use attributes on the Lookup to specify things like the connection and the cache mode:
<Lookup Name="Lookup Transformation" OleDbConnectionName="SportsData"
NoMatchBehavior="IgnoreFailure" CacheMode="Partial">
There is a Biml snippets library online where you can see short illustrative snippets for creating different types of BI assets -- everything from OLEDB connections to the Pivot transformation. Biml by itself is very powerful and useful, but there is a feature called BimlScript that allows users to automatically script and generate Biml code. BimlScript will be covered in more detail in a future contest blog entry.
To execute your Biml code you must compile it. The compiler for Biml is Hadron.exe. The output of the compiler varies depending on what your Biml code represents, but for the contest, we'll be focused on Packages, which will compile to SSIS DTSX packages. In practice, you'll rarely use Hadron.exe directly, but rather will build your packages with Mist, the graphical IDE for Biml.
In our next blog entry we'll learn about and use Mist, and walkthrough the process of building a very simple DTSX package.
The $10,000 Biml Challenge at PASS Summit 2011
When you have a technology that drastically increases the productivity of BI and Data Warehouse developers and architects, it can be difficult to convey just how groundbreaking it is. We believe Mist & Biml are such products. Once you have the chance to use them, you'll never want to go back to the old way of building your data solutions.
This year at PASS Summit (October 2011, Seattle, WA), we're putting our money where our mouth is by sponsoring the $10,000 Biml Challenge during the exhibition.
The contestant who solves a typical BI/DW task assigned in the competition the fastest will win $10,000 cash. This task would normally require hours or longer with traditional approaches, but with Biml and Mist, the time limit will be a generous 15 minutes.
So what do you need to do to win the $10,000?
- Register and attend PASS Summit 2011. This is where the challenge will be held. You must be an attendee or exhibitor to participate.
- Visit our website and reserve your slot in the competition today! We'll provide a workstation in a quiet area, so space is limited.
- Read this blog. As the PASS Summit approaches, we'll post a variety of resources that will help you prepare, including a practice challenge.
- Download Mist/Biml. Get familiar with the tools today. In the near future we will announce and release the official "Challenge" version of Mist/Biml, so you can practice with the exact bits that will be used in the Challenge. But until then the current version is very similar to the official Challenge version.
- Read the official rules.
- Read The $10,000 Biml Challenge page for the latest information about the challenge. Be sure to reserve your slot in the competition today! Spaces are limited. You've probably never had a better opportunity to walk away with $10,000 at a conference before -- and at the same time you can raise your professional IQ by becoming (more) acquainted with some breakthrough technology. And, just to make things more interesting, everyone who completes the competition, or the online practice challenge, will be entered in a drawing to win one of two $500 prizes. No purchase necessary. Void where prohibited. See official rules for details.
How To - Tasks and Transformations: FTP Task
It’s been a little while since my previous post as we’ve been heads down on our next Mist and Hadron releases. However, I’m back today to begin discussing the several Data Preparation SSIS tasks. I’ve already authored a post on the SSIS File System task and I’m continuing today with a discussion of the FTP task.
Background:
The SSIS FTP task allows you to perform various FTP operations in your package. The task implements eight different operations, although three are duplicated by the File System task:
Operation Description Duplicated by File System task Send files Sends a file from the local computer to the specified FTP server Receive files Downloads a file from a FTP server to the local computer Create local directory Creates a folder on the local computer X Create remote directory Creates a folder on a FTP server Remove local directory Deletes a folder on the local computer X Remove remote directory Deletes a folder on a FTP server Delete local files Deletes a file on the local computer X Delete remote files Deletes a file on a FTP server The FTP task can be useful in any workflow that needs to apply transformations to data, before or after moving the data to a different location. In this post, I’ll walkthrough using the SSIS FTP task in two examples. I’ll then demonstrate the same examples in Mist.
Using BIDS:
To get started with the FTP task, first find it in the Toolbox tool window.

Next, drag and drop the task onto the package’s design surface.

The red X icon indicates the task has errors. The Error List displays the following:

From the error list, it’s clear the task requires a connection. This makes sense considering the task needs to know how to connect to the FTP server.
To solve that problem, right click in the Connection Managers area and select New Connection… in the context menu.

This opens the Add SSIS Connection Manager dialog. Select the FTP connection from the list and press Add… to open another dialog for the FTP Connection Manager editor.

This is where you enter your FTP server settings, including the server name and port. Regarding credentials, the FTP connection manager supports anonymous authentication and basic authentication, but not Windows authentication.
Once you’ve filled in the dialog, be sure to test your connection to confirm it works. Then press OK to dismiss the dialog.
Next, double click on the FTP task to open its editor dialog.

In the General tab, there’s a conspicuous blank to the right of the FtpConnection property. Selecting the FtpConnection property displays a dropdown button. Click on the dropdown button to select the just created FTP Connection Manager.

Beneath the FtpConnection property is the StopOnFailure property. Its value indicates if the FTP task stops if an FTP operation fails.
Switching to the File Transfer group, the default operation for the task is Send Files. The send files operation transmits files from your local disk to the specified FTP server.

The Local Parameters group provides two properties for controlling the local file. The LocalPath property contains a string of the file name being sent. The path string can be entered manually, or obtained by creating a File Connection manager in the property’s dropdown list.
The IsLocalPathVariable indicates whether the LocalPath is set in a variable, as opposed to a string. If it’s set to true, the LocalPath property name changes to LocalVariable and its value is set by a variable list dropdown.
In the Remote Parameters group, there are three properties for controlling how the file is received on the FTP server. IsRemotePathVariable functions just like IsLocalPathVariable. If it’s set to false, the RemotePath property holds a string whose value is a path on the FTP server where the files are to be sent. If it’s true, then RemotePath points to a variable that holds the value. The OverwriteFileAtDest property indicates whether a file with the same name as a sent file can be overwritten in the RemotePath directory.
Along with the Operation property, the Operation group contains the IsTransferAscii property. This property controls whether a FTP transfer should occur in ASCII mode.
For the other FTP operations, you’ll see that Local Parameters properties appear for local operations (e.g. create local directory) and Remote Parameters properties appear for remote operations (e.g. delete remote files). However, their meanings remain the same.
A simple, and generally low risk, test for the FTP task is to create a remote directory at the root of your FTP server. To do this, select the Operation property, causing a dropdown button to appear. In the dropdown list, select Create remote directory.

This changes the parameters in the dialog box as follows:

Next, select the Remote Path property and click on the ellipses button.

This opens a directory browser dialog, allowing you to navigate to the desired directory, with the dialog generating the appropriate directory path.


After pressing OK, the selected location is stored in the RemotePath variable.

To create a directory beneath documentation, type /testDir after the end of the path.

Finally, press OK in the FTP Task Editor dialog to store the changes made to the FTP task.
Notice that now, the Error List is empty. If you press F5 to run the task, the directory will be added on your FTP server.
Now that the testDir directory is present, let’s send a file to it. First, open the FTP task again and set Stop on Failure to false.

If the directory already exists, we’ll continue to the next task.
Second, add an additional FTP task and link the tasks with a precedence constraint.

Third, double click on the Precedence Constraint to open the Precedence Constraint editor. Inside, switch the Evaluation Value from Success to Completion. Then press OK to save the changes.

Fourth, double click on FTP Task 1 to open its editor dialog. In the General group, set the FtpConnection to the previously created FTP Connection Manager.
Then switch to the File Transfer group. For the RemotePath property, use the same directory path that was created in the first FTP task. The notion is that the initial task creates the directory, if necessary, so the second task can copy files to it. Notice that I also set OverwriteFileAtDest to true, so newer versions of the file overwrite older ones.

In the Local Parameters group, select the LocalPath property, open its dropdown, and select New Connection…

This opens the File Connection Manager dialog, where you can browse to find the file to be sent, or type its path directly in the File textbox.

Once entered, press OK to dismiss the dialog.
Once complete, the dialog properties are set as follows:

Press OK to store your changes and then press F5 to run your package. This time, the directory will be created if it’s missing and then, the file will be sent to the directory on your FTP server.
If you’re wondering about sending multiple files, it can be done. In fact, you would use the same approach as when using the File System task to copy multiple files; use the For Each File enumerator to enumerate across files in a directory. See the Foreach File loop post for a demonstration.
Receiving multiple files from your FTP server doesn’t require a container task since the FTP task will send all files in the specified remote path to your specified local path.
It’s also worth noting that the FTP task supports the * and ? wildcard characters in paths. However, they can only be used in filenames. For instance, C:documentation*.txt won’t work but C:documentation.txt will.
Using Mist:
Now, let’s create the same FTP tasks in Mist.
To start, you’ll need to create a package. If you’re unfamiliar with how to create a package in Mist, you can follow the first two steps in the Mist User Guide’s Creating a Package topic.
Once your package is open, navigate to the Toolbox tool window.

Select and then drag the File System task onto the Package’s design surface.

The task has a red X icon, just like in BIDS, since it has errors.
Look below the package designer and select the Package Details tab to bring the Package Details tool window to the front. Within the Package Details tool window, you can edit the FTP task’s properties. The non-modal nature of the tool window allows you to make other changes in your package or project without having to cancel out of dialogs first.

In the BIDS sample, I started by creating a FTP task that creates a remote directory. To do that in Mist, open the Operation dropdown and select Create Remote Directory.

Of course, this task requires a connection to the FTP server. If you click on the FTP Connection dropdown in the Package Details pane, you’ll see that it only lists (No Selection). Thus, you’ll need to create a FTP connection. You can follow the steps in the Mist User Guide’s Creating New Connection section to create a connection, although you’ll want to make a FTP connection instead of an Ole Db connection.
The designer for the FTP connection has one red bordered field, clearly indicating that you need to provide a server name.

Matching the FTP Connection Manager editor dialog from the BIDS sample, provide an appropriate server name, along with any required authentication values.
Now, reopen the package and select the FTP task to view its details. In the FTP Connection combo box, you can now select the FTP connection.

The next step is to enter the remote directory path inside the Remote Path text box. The Method dropdown is set to Direct to indicate that the remote path value is being entered as text, as opposed to being provided via a variable.
To match the BIDS sample, also uncheck the Stop on Operation Failure checkbox.

Next, you need to create the second FTP task, which will send a file to the FTP server. To begin, drag and drop another FTP task onto the package design surface.

Then, drag a line from FTP Task 1’s bottom node to FTP Task 2’s top node. This will create a precedence constraint.


Notice that when the precedence constraint is created, a green line appears with an S. The letter S and the green color indicate that the precedence constraint’s evaluation value is success. To change that, click on the precedence constraint to select it. The package details area will change, displaying a data grid that lists the constraint, as you’re now seeing the precedence constraint’s details.

Double click on the Evaluation Value cell to display its combo box. Open the combo box and select Completion to change the constraint’s evaluation value.

Once done, the precedence constraint will become blue and its label’s letter will switch to C.

Then, click on FTP Task 2. This updates the Package Details window with the task’s settings. You can begin by selecting FtpConnection1 in task’s FTP Connection dropdown.

Also, enter the same remote path, as FTP Task 1, in the Remote Path text box.

Next, you will need to create a File connection, to specify the file being sent. You can follow the steps in the Mist User Guide for Creating a Connection but remember to make a File connection.
The designer for the File connection has one red bordered field, clearly indicating that you need to provide a file path.

Click on the ellipses button, to the right of the red border, to display an Open File dialog to help you find your file.
Matching the BIDS sample, provide an appropriate file path for your file connection. Also, feel free to rename the connection so it’s easy to identify.

Now, reopen the package and select FTP Task 2 and view its details again. In the Local Path’s File Connection combo box, you can now select FtpFileConnection.

With that, you’re now ready to build your project and open the generated assets in BIDS to run the package.
Next Time:
I’ll be continuing with the theme of Data Preparation tasks.
Links:
FTP documentation for the BIML language
FTP task - MSDN
-Craig
How To - Tasks and Transformations: Message Queue Task
My previous post returned to the theme of workflow tasks by discussing the SSIS Execute Package task, along with what Mist brings to the table. It’s now time to finish off the workflow tasks with the Message Queue task.
Background:
Microsoft Message Queuing (MSMQ) is a message queue implementation that’s existed in Windows operating systems for over 15 years. Its intent is to allow applications running on separate servers to communicate in a failsafe manner. From Wikipedia: “MSMQ is responsible for reliably delivering messages between applications inside and outside the enterprise. MSMQ ensures reliable delivery by placing messages that fail to reach their intended destination in a queue and then resending them once the destination is reachable.”
In terms of packages, MSMQ can be useful when two independent packages need to communicate with one another. For instance, if the outcome of one package’s execution needs to be communicated to another package. Of course, it’s possible to write to a message queue from any windows application; synchronization is not limited to just between packages.
In this post’s example, I’m going to walk through using the MSMQ task in BIDS and Mist to receive messages from the message queue. The scenario I’m picturing is that you have some application that performs required processing before your package should run. Thus, your package must wait to receive a message that processing is finished before executing.
Installing MSMQ:
To work through this sample, the computer where you run it must have MSMQ installed. If you’re unsure if MSMQ is installed, you can check by right clicking on My Computer and selecting Manage.

This opens the Computer Management console. Expand the Services and Applications node and check if a Message Queuing item is present. If it’s present, then MSMQ is installed. Otherwise, you need to install it.
At the end of this article, I've included a link to instructions for installing message queuing on Windows 7 and Server 2008 R2. Additionally, you can search online for installation instructions for other Windows operating systems.
Getting Started:
Because this sample involves messaging, and messages require a sender and receiver, I’ve written a very simple C# application that sends a message to a message queue. I’ve built the sample using Visual Studio 2010 although it can be run in .NET 2.0 or later.
The message generator application uses a hard-coded string for a message queue name, following the pattern of serverNameprivate$queueName. serverName is set to “.” to indicate the local server. The queue name is arbitrarily set to MsmqSample.
The message being sent is a simple text message of “My Msmq Sample”. The message also needs its label to be set so the MSMQ task can determine if the message matches one of its message types. In this case, the message’s Label property is set to “String Message.” See this MSDN forum post for more details.
When running, the application first checks if the message queue exists. If it does, it will send a message. If the queue doesn’t exist, it’s created and then the message is sent.
To confirm the application works, right click on My Computer and select Manage in the context menu. This opens the Computer Management console. Notice that under Services and Applications, there’s a Message Queuing directory.
Now, run the message generator application to send a message. To confirm the message was sent, right click on Private Queues and select Refresh. A new queue named msmqsample should appear. Expand its node to reveal its child items and select the Queue messages item.

Notice that in the center list, there is a single message. If you right click on the message and select Properties, a Properties dialog appears with detailed information about the message. If you select the Body tab, you’ll see the message’s body, confirming the intended message was sent.

With that working, it’s now time to discuss receiving the message within a package.
Using BIDS:
To get started with the Message Queue task, first find it in the Toolbox tool window.

Next, drag and drop the task onto the package’s design surface.

The red X icon indicates the task has errors. The Error List displays the following:

From the error list, it’s clear that the task requires a connection, which makes sense since it needs to be notified when a message is added to the message queue.
Double clicking on the Message Queue task brings up its properties dialog.

If you click inside the MSMQConnection field, you’ll see a down arrow button. Click on it to open a dropdown that invites you to create a new connection.

Click on “New connection” to open the MSMQ Connection Manager Editor.

The Path property needs to match the message queue path used in our message generator application, since this package will receive messages sent by the application. Enter the path in the Path text field.

The Test button verifies that the path is valid. Once a path is correctly entered, press OK to dismiss the dialog.
Next, in the Message property’s field, click on its value to open a popup. Switch the message’s type to Receive message.

As a result, in the dialog’s left list box, you can now click on the Receive item, which replaced the Send item.

The Receive page has several properties:
RemoveFromMessageQueue indicates whether to remove the message from the queue once it’s received. I suggest setting this to true to avoid having to remove messages manually.
TimeoutAfter lets you set a timeout, in seconds, for how long the task will wait if no message is received. The related ErrorIfMessageTimeOut property indicates whether an error message is displayed if timeout is reached.
The MessageType property indicates the message format that’s expected. You can choose from:
Format Description Data file message The message is in a data file Variable message The message is stored in a package variable String message The message is a string in the queue String message to variable The message is a string that will be saved to a variable The Compare property is set to None by default. However, you can set Compare to: Exact match, Ignore case, or Containing. These compare types indicate that the string message must meet the compare criteria for the Message Queue task to process them. Otherwise, the message is ignored.
With task set-up complete, press OK to dismiss the Message Queue Task editor dialog box. Build and Run the package in BIDS and, while it’s running, run the Message Generator application. The application will send a message to the queue. Your task should respond by turning green, as it successfully processes the message.
Using Mist:
To start, you’ll need to create a package. If you’re unfamiliar with how to create and open a package, you can follow the first couple steps in the Mist User Guide’s Creating a Package topic.
Once you’ve opened the package, navigate to the Toolbox tool window and find the Message Queue task.

Note that in the past, you’d have to search the treeview for the task you’re looking for. However, in an upcoming release, the Toolbox tool window has a search box so it’s easy to find the task you want.
Select and drag the Message Queue task onto the Package’s design surface.

The task has a red X icon indicating that it has errors.

The errors explain that Mist requires you to provide a MsmqConnection in the Message Queue task. To accomplish that, return to the logical view tool window, right click on the Connections group, and add a MSMQ connection.

Double click on the connection to open the connections editor.

In the Path field, enter the message queue path.

Then, reopen the package and select the Message Queue task. Click on the Package Details tab to see the properties for the task.

Looking at the details tool window, you can see that Mist mirrors the properties available in BIDS. Additionally, there are separate areas for both Send Message and Receive Message.
To assign the connection to the Message Queue task, open the MSMQ Connection dropdown and select MsmqConnection1.

To indicate that a received message should be removed from the queue, simply check the Remove from Queue checkbox.
Finally, right click on the package in the Logical View and select Build & Open in BIDS. That command will build your package and then open it in BIDS. You can then run the Message Generator and see that the task succeeds.
Samples:
The BIDS and Mist examples demonstrated above, along with the Message Generator application, can be downloaded here.
Links:
Message Queue documentation for the Biml language
Message Queue task - MSDN
Install Message Queuing on Windows 7 and Windows Server 2008 R2
Craig
How To – Tasks and Transformations: Execute Package Task
In my last post, I demonstrated the SSIS Foreach File loop container task in conjunction with the File System task. This week, however, I want to return to the theme of workflow tasks and discuss the Execute Package task.
Background:
The Execute Package task has a straightforward purpose; allow a package to run other packages in its workflow. This enables packages to be reusable, modular components that can be shared among workflows. The package being run by the Execute Package task is usually referred to as the child package; the package running the Execute Package task is the parent.
The scenario I’m going to demonstrate is an archiving situation where one package archives files while another monitors available disk space on the archive drive, informing someone if free space falls below some threshold.
Using BIDS:
I’m going to start by creating the package that monitors free space. This will be the child package that’s run by the Execute Package task. To monitor free disk space, I’m going to use a WMI Event Watcher task. If the watcher indicates that free space has fallen below a specified threshold, a Send Mail task will notify someone.
The main thing I want to address here is using a variable to control the free space threshold. As mentioned above, an advantage to using the Execute Package task is reusability. By parameterizing the threshold value, multiple packages can reuse this child package, each with their own free space minimums. The variable is going to be embedded in the WMI Event Watcher’s WQL query.
Note that if you’re looking for in-depth discussion on creating the tasks for this package, please review my past posts on the WMI Event Watcher and Send Mail tasks.
The first step is to create the variable. To do that, right click on the package designer’s background to open a context menu.

In the context menu, select Variables, which opens the Variables tool window.

Next, press the Add Variable button to create a variable.

Notice that the variable’s scope is DiskSpaceWatcher, which is the name of my package.
I recommend renaming the variable to something clearer, like FreeSpaceThreshold.

In my original post on the WMI Event Watcher task, I authored the WQL query using the Direct input source type. This time, I’m going to use an expression so I can include the FreeSpaceThreshold variable in it.
After adding a WMI Event Watcher task, double click on it to open its editor dialog, and select the Expressions item on the left side.

Click on the Expressions expander to expose an Expressions property. Click inside the Expressions field to display an ellipses button.

Click on the ellipses button to open the Property Expressions Editor dialog box.

This dialog allows you to map a task property to an expression. Clicking in the Property cell exposes a combo box; clicking a second time opens the combo box.

Select the WqlQuerySource property in the drop down.

Notice that the Expression cell has an ellipses button. Click on it to open the Expression Builder dialog.

One advantage/disadvantage of the BIDS Expression Builder dialog is that it dutifully informs you if the expression you entered can be processed.

While certainly helpful to know that during design, it’s simultaneously annoying since you’re not allowed to save the Expression text until you fix it. I’ll show you later how Mist improves on this.
The next screenshot shows the expression you should enter for this example.

Some key things to notice in the expression are:
It’s surrounded with quotes The quotes, around Win32_LogicalDisk and C:, are escaped with a backslash The FreeSpaceThreshold variable is appended to the expression using the + concatenation operator The variable is cast to DT_WSTR. After entering a valid expression, you can use the Evaluate Expression button to see the evaluated value. Notice that the FreeSpaceThreshold variable appears as 0 in the Evaluated value text.
You can now dismiss the dialog, and save the expression text, by pressing OK. You’ll be returned to the WMI Event Watcher Task editor. Interestingly, the WqlQuerySource property is still blank, despite setting an expression. Furthermore, trying to close this dialog will display an error that the WQL query is missing.

To solve this, you can enter some text into the WqlQuerySource field. I entered select. Afterwards, you can dismiss the dialog. If you reopen it, you’ll see that the WqlQuerySource field is populated with the evaluated WQL query expression.
The final workflow for this package looks like:

If the WMI Event Watcher task succeeds, indicating the threshold has been exceeded, the Send Mail task runs, notifying the appropriate person that I’m running out of archiving disk space. If the task times out, it will be treated as a failure and the package will stop executing.
With the child package laid out, it’s time to implement the parent package. To start, find the Execute Package task in the Toolbox.

Next, drag and drop the task onto the package’s design surface.

The red X icon indicates the task has errors.

Double clicking on the Execute Package task brings up its dialog. Clicking on the Package menu item in the left ListBox shows the properties specific to this task.

The Execute Package task needs to know where the package to-be-executed is. You can choose between a package that resizes in a SQL Server msdb database or a package anywhere in the file system. For this sample, it makes sense to choose the file system. To do that, click inside the Location field and open the dropdown to select File system.

Once File system is selected, the PackageName field beneath it becomes the PackageNameReadOnly field, and is disabled. In the File system case, BIDS determines the package name once you select the package in the file system. IF you use a SQL Server page, then you’d need to provide the package name explicitly.
The next step is to click inside the Connection field. In the dropdown, select the New connection.

Selecting the new connection brings up the File Connection Manager Editor dialog, where you can setup the connection.

If you click on the Usage type dropdown, you’ll notice that your only choice is existing file.
Clicking on the Browse button provides a dialog to find your package on disk. Once selected, its full path is entered in the File textbox.

Click OK to finish creating the connection to the package file.
The next property is the Password property. This lets you enter a password for a password protected child package. As this sample doesn’t call for a password, you can skip it.
ExecuteOutOfProcess is the final property. If set to true, then the child process will run in a separate process from the parent package. When deciding whether to run the parent and child packages in the same process, there are some important considerations:
Memory Having a child package run in its own process requires more memory. Depending on your available hardware, that may be a factor. Impact on Child Package failure When a child package runs in its own process, it can fail without impacting the parent process. If you want the child and parent packages to fail together, then the child package should be run in the same process as the parent. For this sample, you can leave ExecuteOutOfProcess set to false.

With that, the Execute Package task is ready to execute another package.
As to the archiving workflow, you can use a Foreach Loop Container whose folder path is the directory of files to be archived. The File System task can use a move file operation to move each file from the directory to the archive location. You can review my previous posts on the ForEach File Loop and File System tasks for more details.
The final workflow for the parent package should look like:

However, there’s still one thing missing; I haven’t shown how to pass the free space threshold value to the child package. That can be done using a Package Configuration.
The first step is to create a variable on the Execute Package task. This variable’s Data Type needs to match the variable on the child package. I’ve chosen to give this variable the same name as the child package’s variable to show the connection between the two, although that’s not required.

Notice that the Data Type is Int64 and the Value field is 104,857,600. This is my free space threshold in bytes, which equals 100 MB.
Next, open the child package, right click in the package designer’s background, and select Package Configurations in the context menu.

This opens the Package Configurations Organizer dialog. Check the Enable package configurations checkbox so you can add a configuration.

Next, click Add to open the Package Configuration wizard.

Press Next to advance to the Configuration Type selection screen.
The first part of configuration creation is selecting the configuration type. The configuration type dropdown lets you choose from several options. You will be using the parent package’s variable so select Parent package variable in the Configuration type combo box.

After selecting the parent package variable configuration type, the name for the textbox beneath the dropdown changes to Parent variable.

This is where you specify the name of the parent variable to read from.

Clicking Next brings you to the next configuration screen, which asks you to select the property whose values will be set by the configuration. In this case, it’s the Value property on the child package’s FreeSpaceThreshold variable.

To set the property, navigate the Objects tree view to the child package’s Variables folder and expand the FreeSpaceThreshold’s Properties list to select the Value property.
Click Next to bring you to the final screen, that confirms the configuration settings.

Click Finish to store the configuration.
With the package configuration complete, you can build and run your project.
Using Mist:
To start, you’ll need to create parent and child packages. If you’re unfamiliar with how to create a package, you can follow the first couple steps in the Mist User Guide’s Creating a Package topic.
Similar to the BIDS sample, I want to focus on variable creation, creating a WQL query in an expression, and setting up the package configuration. If you want more details on the WMI Event Watcher and Send Mail tasks, you can consult my previous blog posts.
For creating the free space threshold variable, open the child package. Click inside the design background to select the package and, in the Packages tab, click on the Variable button.

This creates a variable and brings the Variables tool window to the front.

You can double click on each cell to change the variable’s name and type, and set its value.

For the WQL query, you must first add a WMI Event Watcher task to the package. You’ll also need to add a Send Mail task and a precedence constraint to complete the workflow.

Notice that in the green line for the precedence constraint, there’s also an S character. The S character stands for success; Mist uses both colors and letters to identify the evaluation value for the constraint.
To add an expression, select the WMI Event Watcher task and click on the Expression button in the ribbon.

This opens the Expressions tool window, adding a new expression to the task.

Double clicking on the Property cell opens a combo box that lists all the properties for the task.

As in the BIDS sample, you should select the WqlQuerySource property. Next, you can double click in the Expression cell to access a text field where you can enter your expression.

Alternatively, you’re likely better off clicking on the ellipses button to open Mist’s Expression Builder dialog.

In the Expression Builder, enter the same expression as in the BIDS sample. If you press the Evaluate button, you will see the same result as in BIDS, along with a confirmation that the expression is of type DT_WSTR.

If you enter an invalid expression, the Evaluate will fail but you can still press OK to store the expression. This is really nice if you want to save your progress and fix it later.

After pressing OK to dismiss the dialog, you can now fill in the remaining fields for the WMI Event Watcher and Send Mail tasks. The tasks’ details editors appear as follows:


For the parent package, you will also need to create the same workflow as in the BIDS sample. To start, find the Execute Package task in the Toolbox.

Now, drag and drop it onto the designer surface. You will also need to add a Foreach File Loop task and a File System task.

After selecting the Execute Package task, take a look at the Package Details tool window. The main properties for the Execute Package task match the properties displayed in BIDS.

However, one key difference is that many more input methods are available. While you can choose a File connection or SqlServer connection, you can also select a table, package, or package emit target. Since both packages are in the same project for this sample, it makes sense to choose Package in the dropdown. In the Package dropdown beneath it, you can select the child package.

As a quick review, this is the Package Details tool window for the Foreach File Loop container. Here, we are iterating over all files in C:Orders and its subdirectories. Each file path is stored in a ForeachFilePath variable during the iteration.

In the Package Details tool window for the File System task, the source for the Move File operation is the ForeachFilePath variable. The destination uses a File connection named ArchiveConnection.

Finally, for the Execute Package task, you need to a variable of the same data type as FreeSpaceThreshold on the child package. You can repeat the earlier steps to add a variable to the package.
For setting up the parameter passing, using a variable, you can do something very different, and far easier, than BIDS. Returning to the child package, open the Variables tool window and select its FreeSpaceThreshold variable. In the variable’s Parent Package Config textbox, enter User::FreeSpaceThreshold (or whatever name you assigned the parent package’s variable).

That’s it! No configuration wizard or dialog boxes.
Links:
Execute Package task – MSDN
Execute Package documentation for Biml
Craig
Defining the Data Flow in Biml
This post is part 5 of a series on using Biml in BIDS Helper. This post builds on some of the information and the sample from the previous posts.
In the previous post in the series, I talked about controlling the order of execution in the control flow. In this post, the focus will be on the dataflow, and controlling how the data in the pipeline flows from one component to the next. This post uses a new table as the target of the data flow, so you may want to review Part 2: Creating Tables using Biml and BimlScript to see how to create the table locally. The Biml below describes the table. You can create it in the database of your choice – I used a database named Target.
<Biml xmlns="http://schemas.varigence.com/biml.xsd">
    <Connections>
        <OleDbConnection Name="Source" ConnectionString="Provider=SQLNCLI10;Server=.;Initial Catalog=AdventureWorksDW2008R2;Integrated Security=SSPI;"/>
        <OleDbConnection Name="Target" ConnectionString="Provider=SQLNCLI10;Server=.;Initial Catalog=Target;Integrated Security=SSPI;"/>
    </Connections>
    <Tables>
        <Table Name="DimAccount_Test" ConnectionName="Target">
            <Columns>
                <Column Name="AccountKey" />
                <Column Name="ParentAccountKey" IsNullable="true" />
                <Column Name="AccountCodeAlternateKey" IsNullable="true" />
                <Column Name="ParentAccountCodeAlternateKey" IsNullable="true" />
                <Column Name="AccountDescription" DataType="String" Length="50" IsNullable="true" />
                <Column Name="AccountType" DataType="String" Length="50" IsNullable="true" />
                <Column Name="Operator" DataType="String" Length="50" IsNullable="true" />
                <Column Name="CustomMembers" DataType="String" Length="300" IsNullable="true" />
                <Column Name="ValueType" DataType="String" Length="50" IsNullable="true" />
                <Column Name="CustomMemberOptions" DataType="String" Length="200" IsNullable="true" />
            </Columns>
        </Table>
    </Tables>
</Biml>
With the table created, we can move on to the interesting part – transforming the data. In a simple, straightforward data flow, the Biml compiler will do most of the work for you. Take this data flow as an example:
<Dataflow Name="Dataflow 1">
    <Transformations>
        <OleDbSource Name="Source" ConnectionName="Source">
            <DirectInput>SELECT * FROM dbo.DimAccount</DirectInput>
        </OleDbSource>
        <OleDbDestination Name="Target" ConnectionName="Target">
            <ExternalTableOutput Table="dbo.DimAccount_Test"/>
        </OleDbDestination>
    </Transformations>
</Dataflow>
In this case, you don’t have to specify any data paths. The Biml compiler will infer that the OleDbSource’s output should be connected to the input of the OleDbDestination.

The compiler is able to do this by using default outputs. In Biml, most components have a default output defined. In the absence of other information, the compiler will automatically connect the default output of a transformation to the input of the next component defined in the Biml. So, if we use a slightly more complex data flow, like this:
<Dataflow Name="Dataflow 2">
    <Transformations>
        <OleDbSource Name="Source" ConnectionName="Source">
            <DirectInput>SELECT * FROM dbo.DimAccount</DirectInput>
        </OleDbSource>
        <Lookup Name="Check For Existing" OleDbConnectionName="Target" NoMatchBehavior="RedirectRowsToNoMatchOutput">
            <DirectInput>SELECT AccountKey FROM dbo.DimAccount</DirectInput>
            <Inputs>
                <Column SourceColumn="AccountKey" TargetColumn="AccountKey"/>
            </Inputs>
        </Lookup>
        <ConditionalSplit Name="Test ID Range">
            <OutputPaths>
                <OutputPath Name="High ID">
                    <Expression>AccountKey >= 100</Expression>
                </OutputPath>
            </OutputPaths>
        </ConditionalSplit>
        <OleDbDestination Name="Target" ConnectionName="Target">
            <ExternalTableOutput Table="dbo.DimAccount_Test"/>
        </OleDbDestination>
    </Transformations>
</Dataflow>
We end up with a data flow that still automatically connects data paths between components. In this case, though, it’s probably not doing exactly what we want, since it’s just connecting the default outputs. The Conditional Split (“Test ID Range”) in this example is connected by the default output, but we want to use the”High ID” output to filter out IDs less than 100. In the case of the Lookup (“Check For Existing”), the default output being used is the “Match” output, but we only want the non-matched records, so that only new rows are inserted.

I explicitly choose the option BIDS to display the path Source Names for this screenshot – by default, they aren’t displayed in the generated package. You can change the setting in BIDS by selecting the path, opening the Properties tool window, and changing the PathAnnotation property to SourceName.
So how would we change the Biml to get the desired results? If we add an InputPath element to the appropriate components, we can control which output is tied to the component’s input. In this case, we need to add explicit InputPath instructions to the Conditional Split (that will reference the Lookup’s NoMatch output) and to the OleDbDestination (which will reference the ConditionalSplit’s High ID output).
<Dataflow Name="Dataflow 3">
    <Transformations>
        <OleDbSource Name="Source" ConnectionName="Source">
            <DirectInput>SELECT * FROM dbo.DimAccount</DirectInput>
        </OleDbSource>
        <Lookup Name="Check For Existing" OleDbConnectionName="Target" NoMatchBehavior="RedirectRowsToNoMatchOutput">
            <DirectInput>SELECT AccountKey FROM dbo.DimAccount</DirectInput>
            <Inputs>
                <Column SourceColumn="AccountKey" TargetColumn="AccountKey"/>
            </Inputs>
        </Lookup>
        <ConditionalSplit Name="Test ID Range">
            <InputPath OutputPathName="Check For Existing.NoMatch"/>
            <OutputPaths>
                <OutputPath Name="High ID">
                    <Expression>AccountKey >= 100</Expression>
                </OutputPath>
            </OutputPaths>
        </ConditionalSplit>
        <OleDbDestination Name="Target" ConnectionName="Target">
            <InputPath OutputPathName="Test ID Range.High ID"/>
            <ExternalTableOutput Table="dbo.DimAccount_Test"/>
        </OleDbDestination>
    </Transformations>
</Dataflow>
This gives you the following data flow.

That’s a few examples of controlling the data paths in a data flow. There are a few other bits of information that are important to know about data paths in the data flow.
Most components have a default output named “Output”, and a second output named “Error” for the error output (if the component supports errors). The Multicast component has no default output, so you always need to explicitly define the data path mapping from it to the next component. The Union All, Merge, and Merge Join components need to be explicitly mapped, since they support multiple inputs. The Slowly Changing Dimension (SCD) transformation has multiple outputs. The “New” output is the default. There are also outputs named “Unchanged”, “FixedAttribute”, “ChangingAttribute”, “HistoricalAttribute”, and “InferredMember”. The Percentage Sampling and Row Sampling transformations have two output named “Selected” (the default) and “Unselected”. The sample Biml for this post is on my SkyDrive. Please download it and try it out with the latest release of BIDS Helper.
Controlling the Control Flow in Biml
This post is part 4 of a series on using Biml in BIDS Helper. This post builds on some of the information and the sample from the previous posts.
So far, we’ve looked at some relatively simple packages, in terms of their flow. In this post, we’re going to look at how to handle more complex control flow in Biml.
One feature of Biml is the ConstraintMode property that’s part of packages and containers. This property controls how precedence constraints are generated in the control flow. In the simple case, if you want all tasks to be run in sequence, you can set the ConstraintMode to Linear. This causes the package to be produced with all tasks connected sequentially by Success precedence constraints, in the order they were specified in the Biml. So, the following Biml:
<Biml xmlns="http://schemas.varigence.com/biml.xsd">
    <Packages>
        <Package Name="Control Flow Sample 1" AutoCreateConfigurationsType="None" ConstraintMode="Linear">
            <Tasks>
                <Dataflow Name="Task 1"/>
                <Dataflow Name="Task 2"/>
                <Dataflow Name="Task 3"/>
            </Tasks>
        </Package>
    </Packages>
</Biml>
results in a package that looks like this:

This type of linear flow is great in some situations, but sometimes you need more control. In those cases, you can change the ConstraintMode to Parallel. The generated package will not have any automatically created precedence constraints, so it will look like this:

Once a container is in Parallel constraint mode, you can start adding explicit precedence constraints. Let’s use an example to highlight this. Imagine you have a package that needs to run three data flows. (I’m using data flows for the example because they are simple to read in Biml, and I want the focus to be on the constraints, not the tasks.) I want one data flow to execute first – this data flow will be named “Me First”. If “Me First” succeeds, the data flow named “Me Next (Success)” should execute. The third data flow, named “I’m Last (Always)” should always be executed, regardless of the success or failure of the other two tasks. So my package should look like this:

So how do we get this output from Biml? We can use the PrecedenceConstraints collection on each task. At it’s simplest, you just add an Input to the collection, and reference the output of the task that should execute prior to this one. In Biml, all tasks have a built-in output named Output. You can reference it using TaskName.Output (“Me First.Output” in the example below). This will create a regular, Success constraint between the tasks.
<Dataflow Name="Me Next (Success)">
    <PrecedenceConstraints>
        <Inputs>
            <Input OutputPathName="Me First.Output"/>
        </Inputs>
    </PrecedenceConstraints>
</Dataflow>
For the next set of constraints, we want to use the OR logical type, using the LogicalType property, for the constraints, since either of them should cause the third task to run. We also need to explicitly set the evaluation value on these, using the EvaluationValue property.
<Dataflow Name="I'm Last (Always)">
    <PrecedenceConstraints LogicalType="Or">
        <Inputs>
            <Input OutputPathName="Me First.Output" EvaluationValue="Failure"/>
            <Input OutputPathName="Me Next (Success).Output" EvaluationValue="Completion"/>
        </Inputs>
    </PrecedenceConstraints>
</Dataflow>
You can also add expression constraints to the Inputs, to control whether tasks run based on the results on an expression. You use the EvaluationOperation and Expression properties to configure that.
<Package Name="Control Flow Sample 3" AutoCreateConfigurationsType="None" ConstraintMode="Parallel">
    <Variables>
        <Variable Name="Continue" DataType="Int32">0</Variable>
    </Variables>
    <Tasks>
        <Dataflow Name="Task 1"/>
        <Dataflow Name="Task 2">
            <PrecedenceConstraints>
                <Inputs>
                    <Input OutputPathName="Task 1.Output" EvaluationOperation="Expression" Expression="@Continue==1"/>
                </Inputs>
            </PrecedenceConstraints>
        </Dataflow>
    </Tasks>
</Package>
That Biml results in a package that looks like this.

That’s how to control the precedence constraints. I’ve uploaded the Biml from this post to my SkyDrive here, so you can download and experiment with this yourself. In the next post, we’ll look at controlling the data paths in a data flow.
John Welch [cross-posted from http://agilebi.com/jwelch/2011/06/13/controlling-the-control-flow-in-biml/]
Copy Data Dynamically with BimlScript
This post is part 3 of a series on using Biml in BIDS Helper. This post builds on some of the information and the sample from the previous posts.
BimlScript enables some interesting scenarios for generating large numbers of SSIS packages automatically. This can come in handy when you need to copy data most or all of the data in one database to a different one. In this case, you could use something like theTransfer SQL Server Objects task, but it has a few problems. You can roll your own, but that might mean a fair amount of custom scripting. Or you could use the Import / Export Wizard. But in all these cases, you don’t have complete control of how the packages are produced. You could create all the packages by hand, which does give you full control, but then you are stuck doing a lot of repetitive work in SSIS.
BimlScript provides an alternative that lets you fully control the output, while automating the rote work of producing lots of packages that use the same pattern. Let’s take a look at a sample of this, using the scenario above (copying the data from one database to another).
<#@ template hostspecific="true"#>
<#@ import namespace="System.Data" #>

<Biml xmlns="http://schemas.varigence.com/biml.xsd">
      <Connections>
            <OleDbConnection ConnectionString="Provider=SQLNCLI10;Server=.;Initial Catalog=AdventureWorksDW2008R2;Integrated Security=SSPI;"/>
            <OleDbConnection ConnectionString="Provider=SQLNCLI10;Server=.;Initial Catalog=Target;Integrated Security=SSPI;"/>
      </Connections>
      <Packages>
            <#
                string metadataConnectionString = "Provider=SQLNCLI10;Server=.;Initial Catalog=AdventureWorksDW2008R2;Integrated Security=SSPI;";
                DataTable tables = ExternalDataAccess.GetDataTable(metadataConnectionString,
                    "SELECT '[' + s.name + '].[' + t.name + ']' FROM sys.tables t INNER JOIN sys.schemas s on t.schema_id = s.schema_id");
                foreach (DataRow row in tables.Rows)
                { #>
            <Package ConstraintMode="Linear" AutoCreateConfigurationsType="None">
                  <Tasks>
                        <Dataflow>
                              <Transformations>
                                    <OleDbSource ConnectionName="Source">
                                          <DirectInput>SELECT * FROM <#=row[0]#></DirectInput>
                                    </OleDbSource>
                                    <OleDbDestination ConnectionName="Target">
                                          <ExternalTableOutput Table="<#=row[0]#>"/>
                                    </OleDbDestination>
                              </Transformations>
                        </Dataflow>
                  </Tasks>
            </Package>
                <# } #>
      </Packages>
</Biml>
This script is set up to copy all the data in the AdventureWorksDW2008R2 database to a second database named Target (very inventive, I know). One note – the script is not creating the tables in the target database. We could actually automate that portion as well, but it’s beyond the scope of this post. To ensure you are set up properly to run this script, you should create an exact structural copy of your source database under a different name. You can use the Generate Scripts Wizard to do this. Just script the entire database, and then update the generated script to use a different database name (don’t forget to change the USE statement to the new name).
The script will produce a package per table, with a simple data flow that copies all the data using an OLE DB Source and OLE DB Destination. The script leverages the metadata already contained in the database, in the sys.tables view, to drive the loop that creates the packages.
What if you don’t want to select all the rows from each table? Instead, perhaps you want to specify a WHERE clause to use to filter some of the tables. To handle this, we can create a table in the target database that holds our WHERE information.
<Biml xmlns="http://schemas.varigence.com/biml.xsd">
    <Connections>
        <OleDbConnection ConnectionString="Provider=SQLNCLI10;Server=.;Initial Catalog=Target;Integrated Security=SSPI;"/>
    </Connections>
    <Tables>
        <Table ConnectionName="Target">
            <Columns>
                <Column DataType="String" Length="255"/>
                <Column DataType="String" Length="4000"/>
            </Columns>
        </Table>
    </Tables>
</Biml>
You can use the steps shown in Part 2 of this series to create this table in the Target database. Once it’s been created, populate it with some data. Note that since we are using the schema-qualified name of the table, you’ll need to specify that in the table. There’s an example of data for this table that will work with AdventureWorksDW2008R2 below. This will filter the rows down to only sales where the amount is greater than 1000.
TableName   SelectSql
[dbo].[FactInternetSales]
WHERE [SalesAmount] >= 1000
[dbo].[FactResellerSales]
WHERE [SalesAmount] >= 1000
Now we need to alter the script to use the new information in this table. At the beginning of the block of script after the
string targetConnectionString = "Provider=SQLNCLI10;Server=.;Initial Catalog=Target;Integrated Security=SSPI;";
DataTable whereClauses = ExternalDataAccess.GetDataTable(targetConnectionString, "SELECT TableName, WhereSql FROM WhereClause");
This retrieves the WHERE clauses from the WhereClause table, and stores them in the whereClauses variable.
Next, replace the
<#
  var dataRow = whereClauses.Select(string.Format("TableName = '{0}'", row[0]));
  string whereSql = dataRow.Length == 0 ? string.Empty : dataRow[0][1].ToString();
  string sql = string.Format("SELECT * FROM {0} {1}", row[0], whereSql);
#>
<DirectInput><#=sql#></DirectInput>
This code determines whether the whereClauses table has a row for the current table. If it does, it appends it to the end of the SELECT statement. The complete, final script looks like this:
<#@ template hostspecific="true"#>
<#@ import namespace="System.Data" #>

<Biml xmlns="http://schemas.varigence.com/biml.xsd">
      <Connections>
            <OleDbConnection ConnectionString="Provider=SQLNCLI10;Server=.;Initial Catalog=AdventureWorksDW2008R2;Integrated Security=SSPI;"/>
            <OleDbConnection ConnectionString="Provider=SQLNCLI10;Server=.;Initial Catalog=Target;Integrated Security=SSPI;"/>
      </Connections>
      <Packages>
            <#
                string targetConnectionString = "Provider=SQLNCLI10;Server=.;Initial Catalog=Target;Integrated Security=SSPI;";
                DataTable whereClauses = ExternalDataAccess.GetDataTable(targetConnectionString, "SELECT TableName, WhereSql FROM WhereClause");

                string metadataConnectionString = "Provider=SQLNCLI10;Server=.;Initial Catalog=AdventureWorksDW2008R2;Integrated Security=SSPI;";
                DataTable tables = ExternalDataAccess.GetDataTable(metadataConnectionString,
                    "SELECT '[' + s.name + '].[' + t.name + ']' FROM sys.tables t INNER JOIN sys.schemas s on t.schema_id = s.schema_id");
                foreach (DataRow row in tables.Rows)
                { #>
            <Package ConstraintMode="Linear" AutoCreateConfigurationsType="None">
                  <Tasks>
                        <Dataflow>
                              <Transformations>
                                    <OleDbSource ConnectionName="Source">
                                        <#
                                            var dataRow = whereClauses.Select(string.Format("TableName = '{0}'", row[0]));
                                            string whereSql = dataRow.Length == 0 ? string.Empty : dataRow[0][1].ToString();
                                            string sql = string.Format("SELECT * FROM {0} {1}", row[0], whereSql);
                                        #>
                                          <DirectInput><#=sql#></DirectInput>
                                    </OleDbSource>
                                    <OleDbDestination ConnectionName="Target">
                                          <ExternalTableOutput Table="<#=row[0]#>"/>
                                    </OleDbDestination>
                              </Transformations>
                        </Dataflow>
                  </Tasks>
            </Package>
                <# } #>
      </Packages>
</Biml>
You can see the results of this script by right-clicking on the Biml file, and choosing Expand. It may take a minute or two to process, but when it finishes, you should see a package for each table in your source database. The data flows will copy the data from Source to Target, and any WHERE clauses you add to the WhereClause table will be used.
There’s a lot more that could be done with this script (automating the recreation of the tables in the destination, or deleting existing data, for example), but it’s still a good example of what BimlScript can do. Instead of spending your time writing 10s or 100s of repetitive packages, automate it with BimlScript.
[cross-posted from http://agilebi.com/jwelch/2011/05/31/copy-data-dynamically-with-bimlscript/]
Creating Tables using Biml and BimlScript
This post is part 2 of a series on using Biml in BIDS Helper. This post builds on some of the information and the sample from the previous posts.
When I’m creating samples for SSIS, I often find it necessary to create supporting tables to go along with the package sample. One of the things I like about Biml is that you can define both your tables and packages in the language. Here’s an example of defining an OrderHeader and OrderDetail table in Biml:
<Biml xmlns="http://schemas.varigence.com/biml.xsd">
    <Connections>
        <OleDbConnection Name="DbConnection" ConnectionString="Server=.;Initial Catalog=Sandbox;Provider=SQLNCLI10.1;Integrated Security=SSPI;"/>
    </Connections>
    <Tables>
        <Table Name="OrderHeader" ConnectionName="DbConnection">
            <Columns>
                <Column Name="OrderId" DataType="Int32" IdentityIncrement="1" IdentitySeed="1"/>
                <Column Name="SalesDate" DataType="DateTime"/>
                <Column Name="CustomerName" DataType="String" Length="50"/>
            </Columns>
            <Keys>
                <PrimaryKey Name="OrderHeaderPK">
                    <Columns>
                        <Column ColumnName="OrderId"/>
                    </Columns>
                </PrimaryKey>
            </Keys>
        </Table>
        <Table Name="OrderDetail" ConnectionName="DbConnection">
            <Columns>
                <Column Name="OrderDetailId" DataType="Int32" IdentityIncrement="1" IdentitySeed="1"/>
                <TableReference Name="OrderId" TableName="OrderHeader"/>
                <Column Name="ProductName" DataType="String" Length="50"/>
                <Column Name="Qty" DataType="Int16"/>
                <Column Name="UnitPrice" DataType="Currency"/>
            </Columns>
            <Keys>
                <PrimaryKey Name="OrderDetailPK">
                    <Columns>
                        <Column ColumnName="OrderDetailId"/>
                    </Columns>
                </PrimaryKey>
            </Keys>
        </Table>
    </Tables>
</Biml>
Tables are defined in a <Table> tag. They can have columns defined, as well as keys, and even indexes (not shown in the example above). Notice that the OrderId column doesn’t have a DataType attribute. Many of the attributes in Biml have default values, and data type is one of them. If it’s not specified, the column data type will default to Int32. The primary key for the table is defined with a <PrimaryKey> element.
The OrderDetail table includes a <TableReference> column. TableReference columns are a special class of columns, that define that this column should have a foreign key reference to another table. This one is referencing back to the OrderHeader table. It’s not shown, but you can also use a MultipleColumnTableReference, if your foreign key needs to span multiple columns.
Great – now you have your tables defined in Biml, but how do you make use of that? If only there were some way to run this against your database to create the tables… Well, fortunately, there is – by using BimlScript. BimlScript is a scripting layer that automates the production of Biml (similar in concept to the way ASP.NET produces HTML). To set this up, you need to add two Biml files to your project – one to hold the table definitions above, and one to hold the BimlScript.
First, add a new Biml file to the SSIS project (see Part 1 if you need a refresher on this). Copy the Biml above to this file, and rename the file to TableDefinitions.biml.

Second, add an additional Biml file. Name this one CreateTables.biml.

Open the CreateTables.biml file, and replace the contents with the following code:
<#@ template language="C#" hostspecific="True" #>

<Biml xmlns="http://schemas.varigence.com/biml.xsd">
    <Packages>
        <Package Name="Create Tables" AutoCreateConfigurationsType="None" ConstraintMode="Linear">
            <Tasks>
                <# foreach(var table in RootNode.Tables) {#>
                <ExecuteSQL Name="Create <#=table.Name#>" ConnectionName="<#=table.Connection.Name#>">
                    <DirectInput>
                        <#=table.GetTableSql()#>
                    </DirectInput>
                </ExecuteSQL>
                <# } #>
                <# foreach(var table in RootNode.Dimensions) {#>
                <ExecuteSQL Name="Create <#=table.Name#>" ConnectionName="<#=table.Connection.Name#>">
                    <DirectInput>
                        <#=table.GetTableSql()#>
                    </DirectInput>
                </ExecuteSQL>
                <# } #>
                <# foreach(var table in RootNode.Facts) {#>
                <ExecuteSQL Name="Create <#=table.Name#>" ConnectionName="<#=table.Connection.Name#>">
                    <DirectInput>
                        <#=table.GetTableSql()#>
                    </DirectInput>
                </ExecuteSQL>
                <# } #>
            </Tasks>
        </Package>
    </Packages>
</Biml>

This file has a header at the beginning that indicates the script will use C#. The next section defines a package named “Create Tables”. The section inside the Tasks element is the interesting part:

<# foreach(var table in RootNode.Tables) {#>
<ExecuteSQL Name="Create <#=table.Name#>" ConnectionName="<#=table.Connection.Name#>">
    <DirectInput>
        <#=table.GetTableSql()#>
    </DirectInput>
</ExecuteSQL>
<# } #>
This code iterates over the tables that are part of the current model. For each table it finds, it creates an ExecuteSQL task, and embeds the SQL to create the table in the package. The code is repeated to iterate over Dimensions and Facts, which are special classes of tables.
Notice that there are no tables defined in the BimlScript file. The BimlScript can’t operate against objects defined in the same file, which is why we created the TableDefinitions.biml file separately. To produce the package, multi-select both TableDefinitions.biml, and CreateTables.biml, right-click, and choose Expand Biml File.

This will produce a new SSIS package in the project named Create Tables.dtsx. It contains two Execute SQL tasks, one for each table.

Each task includes the appropriate SQL to create the tables. As an example, here’s the OrderHeader SQL from the Execute SQL task.
        SET ANSI_NULLS ON
        SET QUOTED_IDENTIFIER ON
        GO

        -------------------------------------------------------------------
        IF EXISTS (SELECT * from sys.objects WHERE object_id = OBJECT_ID(N'[OrderHeader]') AND type IN (N'U'))
        DROP TABLE [OrderHeader]
        GO

        CREATE TABLE [OrderHeader]
        (
        -- Columns Definition
         [OrderId] int IDENTITY(1,1) NOT NULL
        , [SalesDate] datetime NOT NULL
        , [CustomerName] nvarchar(50) NOT NULL

        -- Constraints
        ,CONSTRAINT [OrderHeaderPK] PRIMARY KEY CLUSTERED
        (
          [OrderId] Asc) WITH(PAD_INDEX = OFF,IGNORE_DUP_KEY = OFF) ON [PRIMARY]

        )
        ON [PRIMARY]
        WITH (DATA_COMPRESSION = NONE)
        GO

        -------------------------------------------------------------------
Note that the tables are ordered in the package in the same order they are defined in the Biml file. If you have tables with dependencies, make sure to order them correctly.
In the next post, we’ll look at some ways to copy data dynamically using BimlScript.
[cross-posted from http://agilebi.com/jwelch/2011/05/26/creating-tables-using-biml-and-bimlscript/]
How To – Tasks and Transformations: Foreach File Loop
I left off last time discussing the SSIS File System task. Although that task does enable convenient bulk file operations, it’s limited due to its lack of wildcard support. Say I need a workflow that routinely copies all of the previous hour’s work orders to another location. By itself, the File System task is only helpful if the work orders are already grouped, which is unlikely. To help handle these more complicated operations, SSIS has a Foreach Loop Container task, which I will explore in this post.
Background:
The Foreach Loop Container task allows you to iterate over a list of items and run additional tasks on each item that’s enumerated. This post is going to focus solely on file enumeration, which is one of several enumeration options offered by the Foreach Loop container. In fact, the Foreach Loop container can enumerate all of the following types:
Enumerator Purpose ADO Enumerate rows in tables ADO.NET Schema Rowset List schema information about a data source, such as the list of tables in a SQL Server database File Enumerate files in a folder From Variable Enumerate the enumerable object that a variable contains. For instance, if a variable contains a DataTable or an array, you can enumerate its values. Item List items in a collection, such as the names of executables in an Execute Process task NodeList List the items in a XPath expression result set SMO Enumerate SMO objects, such as the views in a SQL database
In Biml, each enumerator type is associated with its own task. Thus, instead of using the Foreach Loop Container task, you would use the Foreach File Loop task.
The Foreach Loop Container task enumerates each file in a directory, allowing you to run other tasks on those files. This task also allows you to filter the files you want to enumerate using wildcards, whereas the File System task is limited to either all files in a directory or a particular file. That’s the difference that’s going to enable more flexible file operations.
The scenario I’m going to demonstrate is archiving all .csv files in a directory.
Using BIDS:
To get started, you need to find the Foreach Loop Container in the Toolbox.

Drag and drop the task on the package’s design surface. Notice that this task has some differences from the previous tasks I’ve demonstrated. First, there’s no red X icon; in fact, the error list remains empty after adding the task. Second, this is the first task with a beige area underneath its name. The beige area is where you can add other tasks that reside in the container. When the task enumerates over the list of files, it will execute the workflow within its container for each file.

Double click on the task to open its editor dialog.

Click on the Collection list item on the left side of the dialog to display the Collection settings.

By default, the Foreach Loop task uses a file enumerator, which is what you want. Note that if you click on the Foreach File Enumerator value, you’ll see a down arrow button.

Clicking on the arrow button opens a dropdown that lets you choose a different enumerator.

Beneath the Foreach Loop Editor property grid is the Enumerator configuration group. This is where you specify what files to enumerate.

For this scenario, you first need to specify the directory that contains the .csv files to be archived. To do that, enter the folder path in the Folder text box. Note that you can also use the Browse button to display a folder selector dialog to help retrieve the folder path.

This path indicates that the task will enumerate files within the ForEachContainerFiles directory.
With the folder path identified, you now need to specify the files to enumerate. The default value indicates that all files in the folder path will be listed. However, the goal here is to only archive .csv files, skipping files with other types. To specify just .csv files, type in *.csv to specify that file extension. The star character indicates that zero or more characters are acceptable. Be sure to remove the star on the right size as .csv could unintentionally return files as such bob.csvc.
Note that the Files textbox isn’t limited to specifying file extensions. Say you had files with dates embedded in their file name, like sales03-05-11.csv. You could use the Files text box to just archive files with dates in October or files of a particular year.
Beneath the Files text box is the Retrieve file name group box. This group box lets you specify the format in which each file is returned. There are three formats to choose from:
Format Example Fully qualified C:varigenceSamplesT&T BlogForEach ContainerFilesresults1.csv Name and extension results1.csv Name only results1
Since you will be performing file operations, having the fully qualified path will be useful. Thus, click on the Fully qualified radio button to select that format.
Finally, the Traverse subfolders checkbox lets you decide if the Foreach Loop Container will search subfolders, beneath the folder path, for files that meet your criteria.

With the enumerator setup done, you now need to store the current file path as the enumerator proceeds. This can be done using a variable. To set this up, first click on the Variable Mappings list item on the left side of the dialog.

As no variables have been created yet, you’ll need to add one. Do that by clicking inside the Variable cell.

A dropdown button will appear. Click on the dropdown button to open a list that contains a New Variable item.

Click on the New Variable item to open the Add Variable dialog box.

The first change you need to make is the container. This whole Package doesn’t need to know about this variable; just the ForEach Loop container. To change the variable’s container, click on the Container’s down arrow button to open a pop-up.

Expand the tree view nodes in the pop-up to reach the Foreach Loop container that you created. Click on it to select it and then press OK.
Next, I recommend changing the variable’s Name to something clearer, such as CsvFilePath. The other values can remain unchanged.

Press OK to create the variable and dismiss the dialog.

Notice that the CsvFilePath variable has been mapped to a 0 index. While it turns out that this is correct, it’s worth understanding what this means. For the moment, let’s say that instead of enumerating a list of files, you need to iterate over a row set, where each row has some columns.
Name Street Zip Code
Row 1 Microsoft 1 Microsoft Way 98052 Row 2 Apple 1 Infinite Loop 95014 Row 3 Intel 2200 Mission College Blvd. 95054
In this case, if you wanted to operate on the Street value for a row, as the enumeration occurs, you would create a variable and map it to index 1. You would map to index 1, instead of index 2, since despite Street being the second column, indexes are zero based. For the file enumerator, despite thinking about it as a list of files, it’s internally treated like a table where each row represents an item in the collection and the table has one column for the file path. Thus, BIDS maps the variable to index 0.
Now you can press OK to dismiss the Foreach Loop editor dialog.
The next step is to place the File System task within the Foreach Loop container so it can run as the list of files is enumerated. To do that, find the File System task in the Toolbox window.

Then drag and drop the File System task on top of the container.

You can review my previous blog post on the File System task for step by step instructions on how to set it up. In brief, start by opening the File System Task editor dialog.
First, change the operation type from Copy file to Move file.

Second, set the Source Connection group’s IsSourcePathVariable to true. That will change the SourceConnection property to SourceVariable. In the SourceVariable dropdown, select User::CsvFilePath.
Third, create a Destination Connection, with its usage type set to Existing Folder. The File Connection’s Folder path should be the directory where the files will be archived.

Your File System task editor dialog should now look like:

You can now try to run your package. But if you do, you’re going to get a build error as the File System task has a red X icon. Checking the error list, you’ll see:

This is because no value was entered for the variable. This is counterintuitive since the whole point of this approach is that the enumerator will populate the variable as it runs. However, the validator isn’t that smart so you’ll need to workaround this bug by giving the variable a value that will be overwritten once the workflow runs. To do that, first click on the Foreach Loop Container task to select it.

Then, open the SSIS menu in the BIDS menu bar and select Variables.

This opens the Variables tool window for the Foreach Loop container. Next, double click on the value cell for the CsvFilePath variable.

In the cell, type in anything, such as Placeholder. Then press enter.

This will resolve the error, although the error list may not immediately reflect it. I had to close my package and reopen it to get the error list to update.
Using Mist:
Now it’s time to discuss implementing a Foreach File loop in Mist.
To start, you’ll need to create a package. If you’re unfamiliar with how to create a package, you can follow the first couple steps in the Mist User Guide’s Creating a Package topic.
Once you’ve opened the package, navigate to the Toolbox tool window.

Notice that there’s a Container group in the tree view. The Foreach File Loop container is within the ForEach sub group. Select and drag the Foreach File Loop container onto the Package’s design surface.

Unlike BIDS, there is a red X icon on the Foreach File Loop container since it has errors.

Mist requires you to provide values for the Folder and FileSpecification properties.
Notice that to the right of the red X icon, there’s a magnifying glass icon. I’ll explain that later in this post.
Click on the Package Details tab to see the tool window’s contents.

Matching the BIDS sample, the first step is to enter the Folder and File Specification for the Foreach File Loop container. You can enter the Folder path in the Folder textbox. You can enter the wildcard, for the files you want enumerated, in the File Specification text box.

The Retrieve File Name format defaults to Fully Qualified so that doesn’t need to change. You can check the Process Subfolders checkbox to enable that behavior.

Next up, you need to create a variable mapping. To do that, go into the ribbon and find the Variable Mapping button.

Notice that the button is in a group named Task Specific. As you select different tasks in a package, the buttons in the Task Specific group will change to be appropriate for the selected task. Press the button to create a variable mapping.

The mapping is added in the Foreach File Loop container’s Variable Parameter Mappings data grid. If you double click on the Parameter Name cell in the mapping’s row, you can change the mapping’s name. If you double click on the variable cell, a combo box will appear, indicating that no variable has been selected.

Clicking on the combo box will bring up a listing of the task’s built-in variables.

Of course, you will want to create a new variable. To do that, return to the ribbon and press the Variable button.

The Variables tool window will be brought to the front of the Mist UI, with a new variable created and already selected. You can change the variable’s name by double clicking on the name cell and then typing in the name you want. To match the BIDS sample, I’ve named the variable CsvFilePath.

Next, return to the package details tool window and in the variable mapping, reopen the Variable combo box. You can now select the CsvFilePath variable.

With that, the Foreach File Loop task is set up.

Notice that in the Variable cell, the variable’s scope is included in the name, meaning that you can easily see the variable is in Foreach File Loop 1, which resides in Package1. Also notice that on the errors tab to the left, there are 0 errors, confirming that every required property has been filled in.
With that done, you can add the File System task within the Foreach File Loop container. Find the File System task in the Toolbox tool window.

Then drag and drop it on top of the Foreach File Loop container.

Now I’m ready to talk about the magnifying glass icon in the Foreach File Loop’s header. If you click on the magnifying glass, you’ll see the following:

The magnifying glass makes the entire design surface dedicated to the Foreach File Loop task. Admittedly, you wouldn’t need this feature for this simple scenario. However, it comes in very handy if you’re implementing a complicated workflow within a container. Instead of having to repeatedly resize the container, or scroll within it, you can easily take advantage of your screen real estate. Returning to the package view is also easy; just click on Package1 in the breadcrumb bar.

To finish the sample, you’ll need to populate the File System task with appropriate values. You can refer to my previous blog post for details on using that task. When done, the File System task’s details editor should look as follows:

If you want to play with this sample, you can download it from here.
More Information:
It’s important to note that if you have a Foreach File Loop where you modify the collection during execution, it can have unintended side effects. Microsoft explicitly warns users that unexpected situations may occur due to files being added, deleted, or renamed during execution. If you’re going to implement a workflow where you process a file and then archive it, you might consider using two Foreach File Loop containers. The first processes each file. The second performs the move operations. That way, there’s no risk that files may not be processed as the enumeration changes due to the file moves.
Links:
Foreach File Loop Element - BIML
Foreach Loop Container - MSDN
Foreach Loop Container – Collection Page - MSDN
Craig
Creating a Basic Package Using Biml
This article is going to walk through the process of creating a simple package using Biml and the Biml Package Generator feature in BIDS Helper. To start out, you need to install the latest beta of BIDS Helper from CodePlex. Once that is set up, you should create a new Integration Services project in BIDS. In the project, right-click on the Project in the Solution Explorer. There’s a new item in this menu – Add New Biml File.

Clicking Add New Biml File will add a new file to the Miscellaneous folder in the solution named BimlScript.biml. (The name is automatically generated, so it may be BimlScript1.biml, etc). You can right-click on the file and choose rename to give the file a more specific name. For this example, rename the file “BasicPackage.biml”.
Double-clicking on the file will open the XML editor inside of BIDS. The editor supports Intellisense for Biml, so typing an opening tag (“<”) will give you a list of valid options for tags you can use. (If you aren’t seeing the Intellisense, please check this link for troubleshooting steps.)

For this example, copy and paste the following Biml into the document. Since the code below includes the document root tags (), you’ll want to make sure you replace the entire contents of the Biml file.
<Biml xmlns="http://schemas.varigence.com/biml.xsd">
    <Connections>
        <Connection Name="AdventureWorks" ConnectionString="Server=.;Initial Catalog=AdventureWorks;Integrated Security=SSPI;Provider=SQLNCLI10"/>
    </Connections>
    <Packages>
        <Package Name="Biml Sample" AutoCreateConfigurationsType="None" ConstraintMode="Linear">
            <Tasks>
                <Dataflow Name="Extract Table List">
                    <Transformations>
                        <OleDbSource Name="Get Table List" ConnectionName="AdventureWorks">
                            <DirectInput>SELECT * FROM sys.tables</DirectInput>
                        </OleDbSource>
                        <Multicast Name="Multicast"/>
                    </Transformations>
                </Dataflow>
            </Tasks>
        </Package>
    </Packages>
</Biml>
The first section () of this Biml defines an OleDbConnection that points to the AdventureWorks database. The next section (inside the tag) defines a single package that contains a Dataflow task (the tag). The Dataflow task contains two components, an OleDb Source and an Union All transformation.
The next step is to take this definition of a package, and actually generate the package from it. To do this, right-click on the Biml file, and choose Expand Biml File from the context menu.

A new package will be added to the SSIS Packages folder, named Biml Sample.dtsx. If you review the generated package, you’ll see that it matches up to what was defined in the Biml code.


That’s a quick introduction to the Biml functionality in BIDS Helper. In the next article, we’ll set the stage for some more advanced (read: more interesting) uses of Biml, including some scripting.
[cross posted from http://agilebi.com/jwelch/2011/05/13/creating-a-basic-package-using-biml/]
How To – Tasks and Transformations: File System
For the past several weeks, I’ve been reviewing SSIS Workflow tasks. Today, I want to take a detour and consider how you can handle file system operations, such as copying files. While you could use the Execute Process task to run a batch file that performs file system operations, there’s also a SSIS task for that.
Background:
The SSIS File System task is a straight forward task that lets you perform several, common file system operations directly in your workflow.
The types of supported operations are as follows:
Operation Description Requires Source Requires Destination Special Properties Copy directory Copies a directory from one location to another X X Copy file Copies a file from location to another X X Create directory Creates a folder in the specified location X X Delete directory Deletes a folder in a specified location X Delete directory content Deletes a folder and all of its contents X Delete file Deletes a file at a specified location X Move directory Moves a directory form one location to another X X Move file Moves a file one location to another X X Rename file Renames a file at a specified location X X Set attributes Sets attributes on files and folders. X X
In this post’s examples, I will walk through the properties for all the operation types, including the special properties that are unique to the Create directory and Set attributes operations.
Using BIDS:
To get started with the File System task, first find it in the Toolbox tool window.

Next, drag and drop the task onto the package’s design surface.

The red X icon in the task indicates that there are errors. Consulting the error list, you’ll see the following:

From the errors, it’s clear that the task’s default operation is to copy a file. Naturally, the task expects valid source and destination paths to perform the copy.
Double clicking on the File System task brings up its properties dialog.

If you click inside the Operation field, you’ll see a down arrow appear to the right of Copy File. Clicking on the arrow will list all the operation types you can choose from.

One thing in common with all of these operations is that they all require a source connection. The source connection is the file or folder that’s being changed. In this case, it’s the file being copied. For a delete file operation, it’d be the file being deleted.
The dialog’s Source Connection group lists two properties: IsSourcePathVariable and SourceConnection.

The IsSourcePathVariable is a boolean value that tells the task whether the source file path can be found in a variable or file connection. If you use the property’s dropdown to set the property to true, you’ll see that the SourceConnection property is renamed to the SourceVariable property in the dialog.
For this example, I am going to stick with a connection. If you select the SourceConnection property, you’ll see a down arrow button. Click on it to open a dropdown that lists any existing file connections along with the option to make a new connection.

Since no file connections currently exist, click on to create one in the File Connection Manager editor.

This editor allows you to reference an existing file or folder. Since this task is performing a copy file operation, using Existing file makes sense. In the File text field, you can enter the absolute path to the file you want to copy. You can also press the Browse button to display a Select File dialog.

You can navigate to the file and press Open. The path to the file is then added in the dialog for you.

Once you’ve selected your path, you can press OK to dismiss the dialog.
When using the copy file operation, you also need to specify where the file will be copied to. The properties in the dialog’s Destination Connection group let you set that up.

Similar to the Source Connection group, the Destination Connection group has a IsDestinationPathVariable property and a DestinationConnection property. The IsDestinationPathVariable property lets you specify a variable that holds the destination path. The third property, OverwriteDestination, is another boolean property. Setting it to true causes the task to forcibly place the item you’re copying at the specified path, even if another file or folder is already there.
For the destination, try setting IsDestinationPathVariable to true.

You’ll see that the DestinationConnection property becomes DestinationVariable. If you select the DestinationVariable property, you’ll see a down arrow button. Click on it to open a dropdown that lists any existing variables along with the option to make a new one.

You can click on New variable… to create a new variable. When you do this, the Add Variable dialog will appear.

You can keep most of the defaults. However, I do recommend changing the name to something more helpful. Additionally, you must enter a directory path, where the file will be copied to, in the Value textbox.

Notice that there’s unfortunately no Browse button to help you find your file. Once you’re done, press OK to dismiss the dialog.
With that done, you’re ready to actually copy a file.

If you try to run the task in BIDS, you’ll see that the file is indeed copied from C:DailyDatadata.csv to C:DataStoragedata.csv.
As aforementioned, all of the File System task’s operations require a source and half of them need a destination. The two operations with some variation are Create directory and Set Attributes.
Create directory has a unique property - UseDirectoryIfExists. This property handles the scenario where you attempt to create a directory at a path where a directory already exists. If the property is set to true, the directory that already exists will remain, as if it had been created.

Set Attributes lets you set four attributes on files or folders in the file system.

File attributes are metadata values that are used by the operating system. The attributes you can set are:
Property Description Hidden The file or directory cannot be seen in a directory listing. ReadOnly Applications can read the file, but not write to it or delete it. This attribute is ignored for directories. Archive Typically indicates that a file or folder is used for backup or removal. System A file or directory used by the operating system.
Using Mist:
Now, let’s see how to do the above in Mist.
To start, you’ll need to create a package. If you’re unfamiliar with how to create a package, you can follow the first couple steps in the Mist User Guide’s Creating a Package topic.
Once your package is open, navigate to the Toolbox tool window.

Select and then drag the File System task onto the Package’s design surface.

The task has a red X icon, just like in BIDS, since it has errors.
Inside the Package Details tool window, located below the package designer, you’ll be able to edit the File System task’s properties.

For the Copy File operation, there are Source and Destination groups, similar to the BIDS dialog. The Source method default is a File connection. However, if you click on the File Connection dropdown, you’ll see that it only contains a value for (No Selection). Thus, you’ll need to create a connection. You can follow the steps in the Mist User Guide’s Create New Connection section to create a connection, although you’ll want to make a File connection instead of an Ole Db connection.
The designer for the File connection has one red bordered field, clearly indicating that you need to provide a file path.

Clicking on the ellipses button, to the right of the red border, displays an Open File dialog to help you find your file.
Matching the BIDS sample, provide an appropriate file path for your file connection. Also, feel free to rename this connection so it’s easy to identify, and to make it easy to use elsewhere.

Now, reopen the package and select the File System task to view its details again. In the Source group’s File Connection combo box, you can now select DailyDataFileConnection.

In the Destination group, to match the BIDS sample, you’ll need to assign a variable that contains the destination path. To do that, go to the Method dropdown and select Variable.

Once you select Variable, the Destination group UI changes to provide a Variable dropdown.

If you open the dropdown, you’ll see all the System variables that already exist. To create a new one, click in the designer’s white background area to re-select the Package. Then, in the ribbon, click on the Variable button.

This adds a Variable to the package. When you press the Variable button, the Variables tool window comes to the front and the new variable is selected.

To match the BIDS sample, double click in the variable’s Value cell and enter the folder path. You can also double click in the variable’s Name cell to change its name.

Next, reopen the package and select the File System task to view its details. In the Destination group, you can now select your variable from the Variable dropdown. Also, you can check the Overwrite Destination check box to enable that capability.

If you switch the Operation to Set Attributes, via the Operation combo box, you’ll see an Attributes group with four checkboxes.

Similar to the BIDS dialog, you can check or uncheck each of these to control which attributes to set.
Next Time:
One important limitation for this task is that it only operates on a single file or directory. Thus, if you want to perform file operations using a path with wildcards, such as C:Logs2009*.csv, this task can’t help you. Next time, I’ll demonstrate how to overcome this deficiency.
Links:
File System documentation for the BIML language
File System task - MSDN
File Attributes - MSDN
Craig
How To - Tasks and Transformations: Execute Process
For the past three weeks, I’ve been demonstrating how to construct and use SSIS workflow related tasks. Continuing with that theme, I’m going to walk through the Execute Process task.
Background:
The Execute Process task provides flexibility in your package workflow, by allowing you to run a Windows application or batch script. There are tons of scenarios where this may be useful. Common ones include compressing or expanding a file before using it further in your workflow; for instance, you may have a file generated by the WMI Data Reader task that you want to compress before sending it to someone via the SendMail task. Alternatively, if you need custom information that can’t be obtained via an existing SSIS task, you could use Execute Process to run an application that generates the data you need, and then use that data in your workflow.
For this post’s example, I’m going to implement an Execute Process task in BIDS that executes a sample application. While this is very similar to executing an application that will zip or unzip a file, it gives me an opportunity to point out differences.
Using BIDS:
As always, the first step is to find the task in the Toolbox.

Then, drag and drop the task onto the package’s design surface.

The red X icon the task indicates the task has errors.

Double clicking on the Execute Process task brings up its task editor dialog. Clicking on the Process menu item in the left ListBox will let you see the Execute Process task specific properties.

The two key properties in this task are Executable and Arguments; both are located near the top of the dialog. Both properties relate to running a command in a command prompt. For instance, if you want to extract a file from a zip file, you could:
Open a command prompt Use the cd command to change the directory to C:Program Fileswinzip Then run wzunzip.exe /e C:docsfileToUnzip.zip C:unzippedFilesDir where C:docsfileToUnzip.zip is the zip file and C:unzippedFilesDir is where the extracted file should be placed. To emulate this with the Execute Process task, you would set the Executable property to C:Program Fileswinzipwzunzip.exe and set the Arguments property to /e C:docsfileToUnzip.zip C:unzippedFilesDir. Notice that the Executable property takes an absolute path to the executable.
For my sample, I have a small Visual Basic application that I am going to run with the Execute Process task. Of course, you can run any Windows application using this task.
To set the Executable property, click inside the Executable property’s text field. One option here is to simply enter the full path to your executable.

If you prefer a graphical approach, or need to search for the executable, click on the ellipses button to display a dialog box that will let you select an executable.

Related to the Executable property are the RequireFullFileName and WorkingDirectory properties. RequireFullFileName lets you fail the task if the executable isn’t found at its specified location. I am keeping its default value of true since I want to be notified if the executable is missing. The WorkingDirectory property lets you specify a folder where the executable can be found. I prefer to leave WorkingDirectory blank and provide a fully qualified path to the executable in the Executable property.
The next step is to enter your arguments.

The Arguments property uses a plain text field. My sample application takes two arguments, which I’ll enter here. My sample application reads files that contain customer order information, filters out some data, and then stores the remaining data in another directory. Thus, both my arguments are file paths.

Although this works great for static arguments that won’t change, you may be wondering how to create arguments that can change each time the task is run. For example, let’s say you had an application that created log files and it took a date as an argument. You could create an argument, in the Execute Process task, that always passes in the current date as a string.
To do that, start by clicking on the Expressions item in the task dialog’s left ListBox.

Next, click on the Expander symbol to the left of the Expressions item.

That replaces the Expander box with an Expressions property and a field with an ellipses button. Click on the ellipses button to display the Property Expressions editor dialog box.

Using this dialog, you can assign SSIS expressions to various properties on this task. To set an expression on the Arguments property, click inside the selected Property cell.

The cell becomes a ComboBox. If you click on the down arrow, a dropdown list appears; select the Arguments property.

Next, click on the ellipses button at the end of the row to open the Expression Builder dialog box.

Here, you can author a SSIS expression whose value will be evaluated at runtime. Since I want to provide the date to an application, as a string, I would enter the following expression:

Notice that instead of entering a SSIS expression, I can also assign a Variable to an argument. Finally, if I need multiple arguments, one option would be to use an expression that uses multiple variables, separated by spaces.
Note that the Expression Builder dialog has some significant deficiencies. When entering an expression, you don’t get Intelliprompt support, and there is no syntax highlighting for your expression. Later on in this post, I’ll demonstrate how Mist has improved this experience.
Returning back to the Execute Process dialog, next up are the StandardInputVariable, StandardOutputVariable, and StandardErrorVariable properties. These all enable you to interact with an application’s input and output streams.
For example, my sample application prints the name of each file that’s processed. To store that output in a file on the command line, I would run SampleApp.exe > outputFile.txt. Using the Execute Process task, that output can be stored in a variable.
To do that, you need to assign a variable to the StandardOutputVariable property. Begin by clicking inside the field for the StandardOutputVariable property.

Next, click on the arrow button to open a dropdown.

Select the New variable… menu item to open the Add Variable dialog box.

This dialog allows you to set various properties on your new variable:
Name Description Container Indicates the scope of the variable. By selecting Package1, this variable becomes available to all containers, tasks, and event handlers within the package. Name Specifies a name for the variable Namespace SSIS provides two namespaces, System and User. The System namespace contains system variables and the User namespace contains custom variables. However, you are also allowed to create additional namespaces. Value type Specifies the type of literal that the variable stores. Note that the variable’s value must be of the value type. For example, having a variable value of abc with a value type of DateTime won’t work. Value The value that the variable stores. In order to make the purpose of this variable clearer, rename it to ProcessOutput. You can leave the remaining properties as-is.

Press OK to return to the task editor dialog box.

If the process you’re running prints to the error stream, you can repeat the above using the StandardErrorVariable property to capture error output in another variable.
As you may expect, the StandardInputVariable property lets you interact with a process’s standard input stream. On the command line, this is the equivalent of SampleApp.exe < inputFile.txt. For the task, instead of having input be stored in a file, the input would be placed in a variable’s Value field, and that variable would be assigned to the StandardInputVariable property.
Along with properties that control the executing process, the Execute Process task also lets you control what happens once the executable is running and how the executable’s behavior affects your workflow.

The SuccessValue property lets you specify the value that’s returned by your executable to indicate success. The default value is 0 and that’s the typical success value for most applications.
By setting the FailTaskIfReturnCodeIsNotSuccessValue property to true, the Execute Process task will compare the process’s return code to the value in SuccessValue. If they don’t match, the Execute Process task will fail.
For my scenario, I definitely want to be aware if my process fails so I will leave this property assigned to true.
The TimeOut property indicates how long your process can run, in seconds. The default value is 0, meaning the process can run indefinitely and won’t be stopped. If you set a value for TimeOut and the process is still running at that point, the process is allowed to finish but your task then fails.
If set to true, the related TerminateProcessAfterTimeOut property will cause the running process to be terminated if it runs past the task’s TimeOut value. You may have noticed that this property is initially disabled; it becomes enabled if you set a positive value for the TimeOut property.
If my process runs unexpectedly long, I want to be notified immediately. Thus, I am going to set the TimeOut property to 300, giving my process 5 minutes to run. To do that, I can simply click inside the TimeOut property’s text field and type in my value.

The final property in the dialog is the WindowStyle property, which controls how the process’s main window will appear when it’s executed.
Value Description Normal The process’s window will appear normally. Maximized The process’s window will be maximized. Minimized The process’s window will be minimized. Hidden You won’t be able to see the process’s window. Since I’m storing the process’s output in a variable, I am going to choose to hide my process’s window.
You can select a different window style by clicking inside the WindowStyle property field. A down arrow button will appear; click on it to open a dropdown.

You can then select a WindowStyle within the dropdown.
And with that, the Execute Process task is now ready to run.

Using Mist:
Now let’s see how to implement the Execute Process task in Mist.
To start, you’ll need to create a package. If you’re unfamiliar with how to create a package, you can follow the first couple steps in the Mist User Guide’s Creating a Package topic.
Once your package is open, navigate to the Toolbox tool window.

Select and drag the Execute Process task onto the Package’s design surface.

This task has a red X icon, just like in BIDS, since it has errors.

In past posts, at this point, I would point out the Package Details tool window and start entering values for the appropriate task properties. However, today I want to demonstrate the Biml editor.
Biml stands for Business Intelligence Markup Language, and is a XML language for describing BI assets. As you create assets in the Mist UI (packages, tasks, variables, expressions, cubes, tables, etc…), Mist generates Biml for each asset, which is saved when saving your project.
In Mist, the Biml editor is, by default, layered behind the designer.

If you click on the Package1.biml tab, it brings the Biml editor to the front.

Note that if you click and drag the Biml editor tab to the right, you can have the designer and Biml editor side-by-side.

In the Biml editor, start by clicking inside the ExecuteProcess element, right before its close tag element, e.g. /> Press your spacebar to see an Intelliprompt pop-up of all properties for the ExecuteProcess task.

Double click on the Executable property to insert it in the ExecuteProcess element.

Within the Executable attribute’s quotes, you can enter the path to your executable. Note that if you need to use the open dialog to find your executable, that’s available in the Package Details tool window via the ellipses button to the right of the Executable property’s text field.

Next, you can hit space bar, to the right of the end quote for the Executable path, to again display the properties list for the ExecuteProcess task.

If you single click on the Arguments property, notice that a pop-up appears that provides a brief description of the property’s purpose. Press the enter key to insert the Arguments property in the ExecuteProcess element.

You can type in your process’s arguments between the quotes.

To create a variable for the StandardOutputVariable property, click on the designer tab’s to return to the package’s designer.

With the ExecuteProcess task selected, click on the Variable button in the Mist ribbon.

This will add a variable to the ExecuteProcess task and will bring the Variable tool window to the front of the Mist UI.

The newly created variable is already selected. Matching the BIDS sample, rename this variable to ProcessOutput by double clicking on the variable’s Name cell and entering the new variable name.

Now, click on the Biml editor tab and notice that a Variables collection has been added in the Biml.

To tie this variable to your task’s OutputVariable, display the Intelliprompt pop-up again and double click on StandardOutputVariableName. Within the attribute’s quotes, enter the variable’s name.

You may have noticed that Mist filters already set properties from the Intelliprompt pop-up, to remove unnecessary items.
Matching the BIDS sample, you can keep using Intelliprompt to insert the Timeout property and set its value to 300, and then insert the WindowStyle property and set it to Hidden.

At this point, you could right click on Package1 in the Logical View tool window and run Build & Open in BIDS to build your Mist project and then open it in BIDS to run it.

Now, if you’re wondering about using an expression for the Arguments property, you can certainly do that in Mist as well.
To do that, first remove the Arguments property in the Biml editor.

Then, return to the package designer and in the Mist ribbon, click on the Expression button.

This creates an expression in the ExecuteProcess task and brings the Expressions tool window to the front of the window.

Double click on the expression’s Property cell to display a ComboBox. Click on the ComboBox to display its pop-up.

Select the Arguments property. Next, double click inside the property’s Expression cell.

Press the ellipses button to display Mist’s Expression Builder dialog.

One thing you’ll notice is the resize gripped down the middle of the dialog, and the additional resize gripped between the Expression and Result areas. This dialog is designed to give you lots more flexibility so you can focus on the areas you intended to work, and minimize the portions you don’t need.
If you click inside the Expression text area and start typing, you’ll notice that we immediately provide an Intelliprompt pop-up, along with a tooltip that describes what you’re entering. Also notice that expression text has color highlighting.

As I type in my expression, notice that I continue to see Intelliprompt.

If I press enter to select the DT_WSTR cast, it’s inserted in the Expressions text box with placeholders for the other values that are expected; in this case, the string’s length.

Once you’ve finished entering your expression, you can press the Evaluate button to obtain the expression’s value.

Notice that we display the expected and actual type of the expression’s value.
Once your expression is entered, press OK to dismiss the dialog. In the Biml editor, you’ll see that the expression is added, although formatted poorly.

To fix the formatting, go into the Biml Editor tab in the Mist ribbon, and press the Format Document button.

The Format Document button alters the document’s indentation to make it easier to read.

Extras:
One topic I didn’t cover here is getting the exit code from the application being run. You can check out this Stack Overflow post for details on how to do that.
Links:
Execute Process documentation for the Biml language
Execute Process task – MSDN
Craig
Drillthrough in Vivid
Vivid provides the ability to do two things with drillthrough that are not supported by SQL Server Analysis Server (SSAS) or Excel: (1) Drillthrough on a calculated measure and (2) drillthrough in the presence of multiselect filters. In this entry you’ll learn about how Vivid successfully handles both of these.
Drillthrough on Calculated Measures
Drillthrough on calculated measures is difficult to get right for a variety of reasons (http://www.biblogs.com/2008/09/01/drillthrough-on-calculated-measures/). For example, assume the following calculation:
MEMBER [Measures].[Calculation1] AS
   [Measures].[Internet Order Count] / [Measures].[Customer Count]
Doing a drillthrough on a calculated measure needs to return all of the rows that correspond to all of the measures that constitute the calculation. In this case we have the [Internet Order Count] and [Customer Count] measures. Vivid does drillthrough, on a calculation with a series of steps we outline here:
-
Parse and decompose the calculation, finding all of the measures in the calculation. Note that if there are calculations within the calculation then Vivid will recursively decompose the calculation.
- In this example there are two measures [Internet Order Count] and [Customer Count], with no calculations to recursively decompose.
-
Find the measure groups associated with each measure.
- [Customer Count] comes from the measure group Internet Customers and [Internet Order Count] from Internet Orders.
-
Perform a drillthrough on each distinct measure group, requesting as part of the drillthrough result set all of the measures that were used in the calculation (from that measure group).
- In the above example, Vivid will perform two drillthroughs, as there are two distinct measure groups.
Thus doing a drillthrough on a calculation can result in multiple drillthroughs performed, and therefore multiple sheets created (each drillthrough gets its own sheet). A single drillthrough will only be performed if all the measures in the calculation are from the same measure group.
While this works great much of the time, it does have some limitations.
- Vivid parses the MDX expression, but for complex expressions it may be the case that a given measure doesn’t contribute any value for a given tuple. Vivid will still return a sheet to correspond to that measure/measure group.
- Vivid always performs the drillthrough on the current coordinate. If the calculation is retuning data from a different coordinate, e.g., using ParallelPeriod, then Vivid’s drillthrough will return a potentially different set of data than expected. So be mindful when your calculations are internally manipulating coordinates. One useful feature in Vivid is that you can hover over a calculation in the pivot table editor to see its expression.
Drillthrough with MultiSelect Filters
Multiselect filters in Excel also block the standard SSAS drillthrough command. Vivid can handle them, but it is useful to understand how Vivid does them, in order to get the best performance.

First, it is important to note the inability to drillthrough on multiselect filters is an SSAS limitation, which effects Excel as a client. Given that the way Vivid performs a drillthrough with multiselect filters is by avoiding actually performing a drillthrough with multiselect filters. This is best demonstrated by explaining the steps Vivid goes through for mulitselect filters.
- Find all of the multiselect filters and store the selected values. We will use them later.
- Perform a drillthrough on the value, but first remove all of the multiselects from the query. Thus the drillthrough is on a query that has only single select filters (or no filters at all).
- Filter the result from step 2 using the stored selected values from step 1.
Note that step 2 can result in a drillthrough result set that is much larger than the final result set. In theory, you could get back from SSAS a million rows (or more), but the final result set is empty (after filtering on the client). For this reason, do try to use as many single selects as possible, as each of them constrains the drillthrough on the server. Another ramification of this is, by default, Vivid does MAXROWS 10000 on drillthrough, so you may get back a dialog requesting to do a drillthrough that doesn’t cap MAXROWS, yet the final result set you receive might be smaller than 10,000.
It’s worth noting that Vivid treats slicers as a multiselect filters.
Lastly, the presence of multiselect filters does require that you specify the drillthrough columns the associated measure group. The reason for this requirement is that we need to return a custom set of drillthrough data, in order to properly filter (from step 3). Rather than underspecifying the columns that the user wants returned, we simply require the user to specify exactly what they’d like returned. Custom drillthrough columns is an extremely useful feature on its own, so the forced discovery is really serendipity.

Kang Su Gatlin
Replacing template columns with EditingElementStyle
For a long time, I assumed that whenever I needed a DataGridCell to display a custom control, my only solution was to use a DataGridTemplateColumn. And admittedly, a DataGridTemplateColumn is a reasonable way to display custom cells. However, I recently discovered an alternative approach for creating custom cells, using a DataGridColumn's EditingElementStyle property, that helped me out and definitely warrants discussion.
My scenario was that the Expression DataGrid in Mist needed a custom text cell for an Expression's expression property. Along with a text field, I wanted to provide a button to display the expression builder dialog box. I wrote a custom control for the cell, which is basically a Grid with two columns; the left column is the TextBox and the right column contains the button.

My initial approach was to use a DataGridTemplateColumn to display the custom cell:

However, it turns out that this approach has weaknesses. For example, let's say I'm making an edit in an External Property cell. I then press the tab key to switch to the Expression cell so I can continue my edits. However, when I press another key, to being entering my expression, nothing happens. I end up needing to press a second key to begin entering input. Another annoyance occurs if I tab to the Expression cell and press the spacebar. No edits occur on the first press, as before, but subsequent spacebar presses are also ignored. While I'm sure these focus issues could be fixed with some work, they're still annoying. And spending hours debugging WPF focus oddities isn't my favorite activity.
The alternative is to go back to using the humble DataGridTextColumn and customize it using its EditingElementStyle property:

Visually, this looks the same as using the template column solution. However, this approach keeps tab navigation and keyboard focus working as desired. It's worth noting that ComboBox and CheckBox columns can also use this technique.
Craig
How To – Tasks and Transformations: WMI Event Watcher
In my previous post, I gave an example of using the WMI Data Reader task to query for information about a computer’s hard drive, and write that information to a file on disk.
In this post, I’m going to demonstrate the related WMI Event Watcher task.
Background:
Whereas the WMI Data Reader task returns data about the system, the WMI Event Watcher task detects changes in your system. Like the WMI Data Reader task, the WMI Event Watcher task also uses WQL to describe the event(s) it’s listening for. You might use the task to determine:
When a file is added to a folder When a server’s hard disk free space drops below a certain percentage When a server’s free memory drops below a certain percentage When an application is installed Although discussing all the intricacies of WQL queries is beyond the scope of this post, I do want to show a couple examples.
To detect when a file is added to a folder, say C:WMIFileWatcher, the query would be:
SELECT * FROM __InstanceCreationEvent WITHIN 10 WHERE TargetInstance ISA "CIM_DirectoryContainsFile" and TargetInstance.GroupComponent= "Win32_Directory.Name="c:WMIFileWatcher""
To understand this query, I’m going to start with the WHERE clause. The WHERE clause is checking for a TargetInstance whose type is CIM_DirectoryContainsFile and whose GroupComponent is the path I’m listening for changes in.
CIM_DirectoryContainsFile is a WMI class that associates an instance of CIM_Directory and CIM_DataFile. Not surprisingly, CIM_Directory represents a file system directory and CIM_DataFile represents a logical file. Thus, there’s an instance of CIM_DirectoryContainsFile for every file in every directory in your file system. It also means that when a file is added to C:WMIFileWatcher, a new CIM_DirectoryContainsFile instance is created.
If you now look at the SELECT and FROM clauses, you’ll see that I’m selecting all InstanceCreationEvents. __InstanceCreationEvent is a WMI class that represents the creation of a new WMI class instance. So, I’m selecting all WMI instance creation events, looking for the creation of a CIM_DirectoryContainsFile instance for the C:WMIFileWatcher directory.
Finally, the WITHIN clause indicates that the task will notify me of all instance creation events, that meet my WHERE clause criteria, every 5 seconds.
Note that there are two other event classes. One is the __InstanceDeletionEvent class, which represents the deletion of a WMI instance:
SELECT * FROM __InstanceDeletionEvent WITHIN 5 WHERE TargetInstance ISA "Win32_Process"
This query detects every time a Win32_Process WMI instance is deleted. Effectively, this means it detects every time a Windows process is terminated.
There’s also the __InstanceModificationEvent class. A key difference with this class is that you also have access to a PreviousInstance value, which enables you to compare your PreviousInstance with your TargetInstance.
For this example, I’m going to have the WMI Event Watcher notify me when my machine’s free memory falls below 100 MB. When that happens, I will use a WMI Data Reader task to write out a file that lists all processes running and the physical memory they’re using, to see which processes are hogging system resources.
Using BIDS:
To author the WMI Event Watcher task, start by finding it in the Toolbox.

Drag and drop the task onto the package’s design surface. You’ll see a red X icon within the task, indicating that there are errors.

In the error list, the sole error is:

To set-up the task, and resolve this error, double click on the WMI Event Watcher task. That will bring up the WMI Event Watcher Task Editor dialog.

To start, you can supply the task with a WQL query. The query’s content can come from different sources; the WqlQuerySourceType property lets you select the query’s source. Its dropdown allows you to choose from:
Type Description Direct Input Enter text directly into a property File Connection Specifies a file that contains the content. The file may already exist or may be created at runtime. You might choose to store your queries in a file that you can change outside of BIDS. Variable Create or choose a variable that contains the content. Use Direct Input and then click inside the WqlQuerySource field.

An ellipses button will appear; click on it to open the WQL Query dialog.

This is a simple dialog box that’s useful for entering multiline queries. As mentioned earlier, I want to detect when my system’s free memory falls below 100 MB. To do that, the query is:

The key portion of this query is the second part of the WHERE clause. I’m comparing the FreePhysicalMemory field on my Win32_OperatingSystem instance to 102,400 KB. Within 5 seconds, of each time the FreePhysicalMemory value is modified, this Event Watcher will test if the value has fallen below 102,400 KB.
You may be wondering why I don’t suggest a more robust comparison, such as checking if less than 20% of the system’s memory is available:
SELECT * FROM __InstanceModificationEvent WITHIN 5 WHERE TargetInstance ISA "Win32_OperatingSystem" AND (TargetInstance.FreePhysicalMemory / TargetInstance TotalVisibleMemorySize) < 0.2
There are two problems with this approach. First, FreePhysicalMemory and TotalVisibleMemorySize are both uint64 types. So dividing them will produce an integer value, making them inappropriate for a percentage comparison. The second problem is that WHERE clauses in WQL queries are limited. The two allowed formats are:
SELECT * FROM class WHERE property operator constant SELECT * FROM class WHERE constant operator property You’ll notice that you must compare a property to a constant; you can’t compare an expression to a constant.

The next step is to create a WMI connection, so the task knows where to run the query. To do that, you can use the WmiConnection property, which lets you set the target system to run the WQL query on, as well as authentication for the connection. If you click inside the WmiConnection field, you’ll see a down arrow button. Click on the button to open a dropdown.

Inside the dropdown, click on ‘New WMI connection…’ to open the Connection Manager Editor dialog.

This dialog creates a new connection manager for the WMI data reader; the important fields are Server name and Namespace.
Server name identifies the machine to run this query on. Currently, it’s set to localhost. Since I’ll be running this task on my local machine, I’ve checked the Use Windows Authentication checkbox. If I don’t check it and try to run the task in BIDS, I’ll get an error that ‘User credentials cannot be used for local connections.’ Pressing the dialog’s Test button would also indicate the problem.
Namespace is a key field for WMI. The brief explanation is that different namespaces provide different types of functionality, known as classes. The rootcimv2 namespace (cimv2 is an abbreviation for Common Information Model v2) allows you to access most physical and logical components in a system. You can browse additional namespaces and their classes using tools such as WMI CIM Studio and Scriptomatic 2.0.
Once you’ve set up your server name and namespace, press OK in the dialog.

With the WMI connection and WQL query entered, it’s time to consider what happens in your workflow when an event fires.

The ActionAtEvent property offers you two choices, both of which include logging the event notification. Your actual choice is whether an SSIS action is initiated as well. As of this post in the series, I haven’t discussed SSIS events and you won’t need SSIS events for this example, so I suggest you select the Log the event option.
Notice that there are also options for what the WMI Event Watcher does after an event it’s listening for fires. The AfterEvent property lets you choice from three options:
Name Description Return with success Return success when the event is detected Return with failure Return failure when the event is detected Watch for the event again Once the event is detected, continue watching for the event to occur again The success and failure values matter for your workflow; the next task in your workflow may be different depending on which value your Event Watcher task returns. In this case, you can keep the ‘Return with success’ default.

While I’m discussing events, let’s look at the NumberOfEvents property. This property specifies the number of times the task watches for the event before completing. You can keep the default at 1.
Along with limiting the number of times the task listens for an event, you can also control how long the task waits for events using the Timeout property. The Timeout property specifies the maximum number of seconds the task will run; 0 indicates the task will not timeout. If the number of processed events doesn’t reach the NumberOfEvents value before the Timeout’s seconds have elapsed, the task completes due to the timeout.
Notice that there are properties specifically for actions to be taken at and after a timeout, analogous to the properties for events. These are the ActionAtTimeout and AfterTimeout properties. For ActionAtTimeout, you can change its value to simply Log the event. The AfterTimeout value really depends on the scenario. In this example, the task never times out; the task will keep waiting until the system’s free memory falls below 100 MB. Thus, the ActionAtTimeout and AfterTimeout values are meaningless. However, if you were trying to test a machine over a particular period of time, say 3 hours, then you would want to set the Timeout property and you would use ActionAtTimeout to control your workflow, based on whether the event fired or the timeout was reached.

With that done, you can press OK to save your changes and dismiss the dialog. Now you’re ready to add a WMI Data Reader task to complete the example. You can consult my previous post on how to construct that task.
Two key differences from the previous post are:
The query to use for this example is: SELECT Name, ProcessId, WorkingSetSize, PeakWorkingSetSize FROM Win32_Process You might want to change the OverwriteDestination to ‘Append to destination’ With both tasks present in the designer, you now need to connect them to build the workflow. To do that, first select the WMI Event Watcher task.

Then drag the arrow from the WMI Event Watcher Task to the top of the WMI Data Reader task.

When you release your mouse, the arrow will be extended to the WMI Data Reader task.

Double clicking on the arrow opens the Precedence Constraint Editor dialog box.

In this case, the dialog simply confirms that if the Event Watcher catches an event indicating that available memory has fallen below 100 MB, it will return success so that the Data Reader task runs.
With that, your workflow is now complete and this package could be used to detect a low memory situation and report all processes running on your system at that time.
Using Mist:
Now let’s see how to do the above in Mist.
To start, you’ll need to create a package. If you’re unfamiliar with how to create a package, you can follow the first couple steps in the Mist User Guide’s Creating a Package topic.
Once your package is created and opened, navigate to the Toolbox tool window.

Select and drag the WMI Event Watcher task onto the Package’s design surface.

The task has a red X icon because it has errors.

You’ll need to provide values for the WmiConnection and Source properties.
Inside the Package Details tool window, you’ll find the same properties as the WMI Event Watcher dialog in BIDS.

Our first step is to enter the WQL query. In the Source area, there is the Method dropdown, which lets you control the WqlQuerySourceType property. It’s already set to the default value of Direct. If you were to click on the dropdown, you’d see that Mist offers the same options that BIDS provides.

In the text box beneath the dropdown, you can enter the WQL query.

If you click on the WMI Connection dropdown, it only contains a value for (No Selection). Thus, you’ll need to add a WMI Connection to the project. You can follow the steps in the Mist User Guide’s Create New Connection section to create a connection, although you’ll want to make a WMI connection rather than an Ole DB connection.
The designer for the WMI connection has two red bordered fields, clearly indicating what you need to enter.

From the BIDS sample, provide an appropriate namespace and server name, and set Use Windows Authentication to true.

Now, reopen the package and select the WMI Event Watcher task to view its details again. In the WMI Connection combo box, you can now select WmiConnection1.

To match the BIDS sample, you now need to change the ActionAtEvent property to Log Event and you need to change the ActionAtTimeout property to Log Timeout.

To finish the workflow, you should add the WMI Data Reader task; again, you can consult my previous post to see how to construct that task.
Once both tasks are in the package, you’ll need to connect them to create your workflow. Start by clicking on the WMI Event Watcher task’s bottom anchor. Click and drag a line from the bottom anchor to the WMI Data Reader’s top anchor.

Then let go of your mouse.

As you can see, the straight line you dragged is replaced with an arrow. If you click on the arrow, the package details area updates with the Precedence Constraints editor. In this case, the already created input specifies that a precedence constraint is coming from the WMI Event Watcher task and its evaluation value is success.

You can leave this as-is.
With that finished, you can right click on your package and select the Build & Open in BIDS menu item.

This menu item builds the Mist package, and then opens the produced package in BIDS. You can then execute your package in BIDS. Mist is able to do this since the assets it produces are real SSIS assets; Mist-built assets never contain proprietary elements.
Links:
WMI Event Watcher documentation for the BIML language
WMI Event Watcher task – MSDN
WMI Win32 classes
WMI Tasks for Scripts and Applications - This site links to pages that offer script samples of different WMI tasks. Although not exactly the same as WQL, the scripts use WQL and are very readable, so they can be a good source of guidance for learning how to write various queries.
Craig
Smart Filtering for Pivot Tables
Not all measures in an SSAS cube or PowerPivot cut all the hierarchies and vice-versa. This is best explained by example. Let’s use the Adventure Works sample cube and Microsoft Excel 2010.
Start with a pivot table that only has Geography in the rows. In the Adventure Works cube the “Internet” measures don’t cut Geography, so if we were to add a measure from the Internet Customers measure group, e.g., Customer Count, we’d see a peculiar result:

Indeed, we see 18,484 for all of the values for all of the countries. Is that accurate? No, that is the value for the total of all countries, but there is no breakdown by countries in the cube. By default this duplication of values is what you’ll see when you have a measure that doesn’t cut a hierarchy in a pivot table.
Looking at any given hierarchy/measure it’s not too difficult to determine what measures/hierarchies cut it. But as you add additional fields into the pivot table, determining which fields cut those that are in the pivot table becomes increasingly difficult.
Vivid’s SmartFilter fixes this issue with a simple solution. If you have the SmartFilter enabled the pivot table editor will only display those measures which cut all of the hierarchies in the pivot table, and only those hierarchies that cut all of the measures in the pivot table.

Here's an example of two pivot table editors side by side. The one of the left has SmartFilter disabled while the one on the right has it enabled. Notice that the pivot table on the right has many measure groups and dimensions hidden as they don't cut all of the measures/hierarchies in the current pivot table. It greatly reduces the complexity and clutter associated with large cubes.
SmartFilter Computation
For determining which measures remain visible, Vivid takes all of the hierarchies that are in the row or column of the pivot table (page filters and slicers are not used for computing SmartFilter function) and places the measure groups that cut each of them into a set for each hierarchy. Thus if there are n hierarchies in the rows/columns then there are n sets of measure groups. Vivid applies set intersection to the n sets which results in a single set that is the set of measures that will be visible in the pivot table editor.
The same rules apply to displaying the hierarchies in the pivot table field list.
How To – Tasks and Transformations: WMI Data Reader
After discussing the Send Mail task last time, I’m going to continue the theme of workflow tasks and review WMI Data Reader.
Background:
WMI stands for Windows Management Instructions, and is an infrastructure that lets you manage data and operations on Windows systems. More simply put, WMI provides an interface for interacting with the Windows OS and hardware components. This interface can be used from C/C++, VBA, .NET, PowerShell, and SSIS.
The WMI Data Reader task enables you to use WMI in your package workflow. A common scenario for the WMI Data Reader task is to query a machine for information.
Common examples of the type of information you might retrieve with WMI include:
Data from the system’s event logs Obtain the status and properties of hardware components The applications, and their versions, installed on the system Realize that WMI can go much deeper than the above examples. For instance, you can learn the capacity, type (e.g., SRAM, SDRAM, DDR, DDR-2), and operating status of physical memory in a machine. Or you can retrieve performance data about physical disks, such as how much data the disk is reading and writing per second.
Getting at this data requires using the WMI Query Language (WQL). Microsoft describes WQL as a dialect of SQL and it does look similar to T-SQL. As you’ll see in our example, a basic WQL statement can have a familiar pattern of:
SELECT FROM WHERE
With that in mind, let’s check out how to add a WMI Data Reader in BIDS and Mist.
Using BIDS:
Start by finding the WMI Data Reader task in the Toolbox.

When you drag and drop the task onto the package’s design surface, you’ll see the red X icon, indicating that there are errors.

Opening the error list, you’ll see the sole error is:

To solve that problem, double click on the WMI Data Reader task in the designer, to bring up its properties dialog.

Since BIDS is unhappy with the lack of a query, you can start by adding one. The query’s content can come from different sources; the WqlQuerySourceType property lets you select the query’s source. Its dropdown allows you to choose from:
Type Description Direct Input Enter text directly into a property File Connection Specifies a file that contains the content. The file may already exist or may be created at runtime. You might choose to store your queries in a file that you can change outside of BIDS. Variable Create or choose a variable that contains the content. Use Direct Input and enter a query in the WqlQuerySource field. The example query below returns the free space, capacity, device ID, and description of my computer’s D drive. Naturally, you’ll want to change the drive letter to reflect the machine you’re running this query on.

Now, based on the error list in BIDS, it would appear this is sufficient to make the task ready for use. However, if you were to press OK in the Task Editor dialog and open the error list again, you’d see:

This quirk, of identifying the lack of a connection only after solving the previous error, can be annoying. Later on, I’ll show you how Mist improves on this.
In the meantime, the next step is to create a WMI connection, so the task knows where to run the query. To do that, you can use the WmiConnection property, which lets you set the target system to run the WQL query on, as well as authentication for the connection. If you click inside the WmiConnection field, you’ll see an ellipsis button. Click on the button to open a dropdown.

Inside the dropdown, click on ‘New WMI connection…’ to open the Connection Manager Editor dialog.

This dialog creates a new connection manager for the WMI data reader; the important fields are Server name and Namespace.
Server name identifies the machine to run this query on. Currently, it’s set to localhost. Since I’ll be running this task on my local machine, I’ve checked the Use Windows Authentication checkbox. If I don’t check it and try to run the task in BIDS, I’ll get an error that ‘User credentials cannot be used for local connections.’ Pressing the dialog’s Test button would also indicate the problem.
Namespace is a key field for WMI. The brief explanation is that different namespaces provide different types of functionality, known as classes. The rootcimv2 namespace (cimv2 is an abbreviation for Common Information Model v2) allows you to access most physical and logical components in a system. You can browse additional namespaces and their classes using tools such as WMI CIM Studio and Scriptomatic 2.0.
Once you’ve set up your server name and namespace, press OK in the dialog.
The next step is to choose the format of the returned WMI Data. This is specified in the Output Type property and you can choose from Data Table, Property name and value, and Property value. You can keep the default Data Table. Further down, I’ll show you how the output looks when you use the different types.
Now that you’ve entered the query, the machine to run the query on, and the format of the query results, you need to specify where the data will go.
The Destination Type property specifies if the destination is a variable or a file. For this example, keep the default and save the data to a file.
To specify the file, click inside the Destination property’s text field and click on its ellipses button. Just like the WmiConnection property, click on New Connection to open the File Connection Manager Editor.

Change the Usage type to Create file, and specify where you want the file created.

Our final step is to set the OverwriteDestination property. This property controls what happens if your destination file already has data when you run a query. You can choose to:
Type Description Keep original Keeps the destination file’s data untouched Append to destination Appends your new data to the file Overwrite destination Overwrite the file with your new data Use the Keep original default.
With those steps done, the WMI Options are set as follows:

You can now press OK to close the dialog and return to the designer. The task’s red X icon is gone since it now has all the information it needs.
If you run this task in BIDS, by pressing F5, you should see it turn green. Furthermore, if you navigate to C:WMI Data, you should see a data.csv file. If you open it in notepad, you’ll see something like:

Note that if you try to run this task again, you’ll get an error since C:WMI Datadata.csv already exists. To prevent that, you’ll need to change the OverwriteDestination value to append or overwrite.
If you re-run this task with the ‘Property name and value’ output format, the generated file contains:

If you select just Property Value, the contents are:

Using Mist:
Now let’s see how to do the above in Mist.
To start, you’ll need to create a package. If you’re unfamiliar with how to create a package, you can follow the first couple steps in the Mist User Guide’s Creating a Package topic.
Once your package is open, navigate to the Toolbox tool window.

Select and drag the WMI Data Reader task onto the Package’s design surface.

This task has a red X icon, just like in BIDS, since it has errors.

However, you’ll notice that unlike BIDS, we list all errors upfront, along with recommendations for fixing them.
Inside the Package Details tool window, you’ll find the same properties as the WMI Data Reader dialog in BIDS.

Our first step is to enter the WQL query. In the Source area, there is the Method dropdown, which lets you set the task’s WqlQuerySourceType property. It’s already set to the default value of Direct. Beneath the drop down is a text area, where you can enter the query. Afterwards, update the Overwrite Destination property to Overwrite.

The next step is to set the two connections you’ll need.
If you click on the WMI Connection dropdown, it only contains a value for (No Selection). Thus, you’ll need to add a WMI Connection to the project. You can follow the steps in the Mist User Guide’s Create New Connection section to create a connection, although you’ll want to make a WMI connection rather than an Ole DB connection.
The designer for the WMI connection has two red bordered fields, clearly indicating what you need to enter.

From the BIDS sample, provide an appropriate namespace and server name, and set Use Windows Authentication to true.

Next, create a File connection and open its designer.

Matching the BIDS sample, switch the File Usage type to Create File. Clearly, you also need to enter a File Path. You can also rename this connection in case you want to use it elsewhere.

Now, reopen the package and select the WMI Data Reader task to view its details again. In the WMI Connection combo box, you can now select WmiConnection1. In the Destination’s File Connection combo box, you can select WMIDataCsvConnection.

And that’s it. Your task is done and ready to run. To test this package, let’s run it using DTEXEC. To do that, right click on the package in the logical view.

Select the Build & Run menu item. This menu item builds the Mist package, which produces a DTSX package that DTEXEC will execute, just like in BIDS.
Next Time:
In my next post, I’ll look at a sample using the WMI Data Reader task and a related task.
Links:
WMI Data Reader documentation for the BIML language
WMI Data Reader task – MSDN
WQL Keywords
WQL Operators
WMI Win32 classes
Craig
How To - Tasks and Transformations : Send Mail
In my last post, I discussed the basics of the Execute SQL task, and how to build it in both BIDS and Mist. Today, I’m going to discuss a more straightforward task – Send Mail – and show how you might use it with Execute SQL to create a simple workflow.
Background:
It should come as no surprise that the Send Mail task is used to send messages. A common use case is notifying a user about the success or failure of tasks in your workflow.
The properties that are unique to the Send Mail task align with email fields:
- To
- BCc
- Cc
- From
- Priority
- Subject
- Attachments
Using BIDS:
To add a Send Mail task to a package in BIDS, first open the Toolbox tool window and find the Send Mail task.

Drag and drop the task onto your package’s design surface. You’ll notice that the task has a red X icon, indicating that there are errors.

If you open the error list, you’ll see some errors and warnings pertaining to the task.

You can begin tackling these errors by double clicking on the Send Mail task in the designer. This opens up a modal dialog that lets you set various properties on the task. The above errors all pertain to missing or invalid properties on the Send Mail task. We’ll need to edit the Send Mail task’s properties to correct the issues.

The From, To, Cc, BCc, and Subject properties are all strings so you can just enter text directly. BIDS will check that address lines have properly formatted strings.
For example:

The actual email message’s content can come from different sources. The MessageSourceType property indicates the type of source; its dropdown allows you to choose from:
Type Description Direct Input Enter text directly into a property File Connection Specifies a file that contains the content. The file may already exist or may be created at runtime. This may be used if you want the mail to include the contents of a log file. Variable Create or choose a variable that contains the content.
For the Direct Input scenario, you can enter text directly in the MessageSource field. While doing this, try changing the message’s priority to High so it gets Bob’s attention.

With the basic email ready, you now need to provide a SMTP Connection so that when the package runs, it can actually send this email. In BIDS, clicking on the dropdown button in the SmtpConnection field allows you to create a new connection by opening the STMP Connection Manager Editor.

The important field here is the SMTP server field. For this example, I entered a phony SMTP server; naturally, you’d enter a real one.
Finally, you can add an attachment. If you click inside the Attachments field, you’ll see a button with an ellipsis.

Click on the button to display an Open file dialog box, which allows you to select attachments for your mail. If you want to attach multiple files, you’ll need to open each one separately via the Open file dialog box. BIDS will add a | character between each file path. Note that this method of referencing files differs from elsewhere in SSIS, where connection managers are used instead.

With that, you can press OK in the Send Mail Task Editor dialog to return to the designer. You’ll see that the red X icon is gone since the task now has all the information it needs.
Now that you’re done with setup, you still need to know when to run the task. As mentioned at the beginning of this post, a typical use of Send Mail is to notify a user when a task succeeds or fails. For instance, if you had an Execute SQL Task that failed, you might want to tell someone.
For this example, imagine that you have the Execute SQL task that was built in the previous blog post. You can connect that task to the Send Mail task, so that the result of the Execute SQL task controls whether the Send Mail task runs. To do that:
- Select the Execute SQL Task
- Drag its arrow from the Execute SQL Task to the Send Mail task
- Double click on the arrow

When you double click on the arrow, the Precedence Constraint editor will open. This dialog lets you control when the Send Mail task runs. In this case, if the Execute SQL Task fails (notice that the Value field is set to Failure), the workflow will follow your arrow by executing the Send Mail task.

Using Mist:
Now, I’m going to show you how to create the same Send Mail task and workflow in Mist.
To start, you’ll need to create a package. If you’re unfamiliar with how to create a package, you can follow the first couple steps in the Mist User Guide’s Creating a Package topic.
Double click on your package to open it in the designer. The designer will be empty since nothing has been added to the package yet.

Now is a good time to locate the Package Details and Toolbox tool windows. The Package Details window is typically located in the lower portion of the Mist window.

The Toolbox tool window is typically in the lower right portion of the Mist window.

Once you locate the Toolbox tool window, select and drag the Send Mail task onto the Package’s design surface.

Just as in BIDS, there’s a red X icon to indicate that the Send Mail task has errors. And just like in BIDS, the error list window lists the errors pertaining to this task

One thing you may have noticed when you dropped the Send Mail task onto the package is that the Package Details area is immediately updated to display the Send Mail task’s properties.

Just like in the BIDS dialog box, you can fill in addresses for From, To, Bcc, and Cc., along with a subject line.

If you click on the dropdown for the SMTP Connection,you’ll see that it only contains a (No Selection) entry, meaning that you need to add a new SMTP connection to your project.
To do that, you can follow the steps in the Mist User Guide’s Create New Connection section to create a connection, although you’ll want to select a SMTP connection type.

Once created, select the new SMTP Connection in the Logical View and switch to the Properties tab to see its values.


You’ll see the Smtp Server property has a red border, indicating that leaving this property blank produces an error. To fix the issue, you can enter smtp.example.com. This causes the red border to disappear, indicating that the error has been fixed.

Mist is all about reusing assets whenever possible. This SMTP connection can be used for every task in your project. Additionally, you can edit the connection in one place if you need to change it in the future.
To simulate the BIDS workflow, drag and drop an Execute SQL task from the Toolbox onto the design surface. Then drag a line from the bottom anchor of the Execute SQL task to the top anchor of the Send Mail task.

Once done, you’ll end up with an edge between the tasks. If you select the edge, the Package Details area updates to display precedence constraints in the workflow.


Notice that there’s a Data Grid that specifies the actual task whose output will control the execution of the Send Mail task. This is especially useful when a task has several inputs. As before in BIDS, you can choose an appropriate Evaluation Operation and an Evaluation value.
Alternatives:
For reporting errors on a whole container or package, you would typically take a different approach than the one we’ve outlined. You might be tempted to attach an OnError event handler to the container and, within the handler, add your Send Mail task. However, this approach is not recommended as it can result in being bombarded by error emails. Check out this link for a suitable way to handle this scenario.
Summary:
This concludes my look at the Send Mail task, and building a simple workflow with the Execute SQL task. Next time, I’m going to review another workflow task.
Links:
Send Mail documentation for the BIML language
Send Mail task - MSDN
Craig
How To - Tasks and Transformations : Execute SQL
While developing Mist, we found that there’s little in the way of online resources for learning how to use tasks and transformations in your workflows. While you can find explanations of tasks and transformations, examples aren’t as common for most of them.
Additionally, our experience with BIDS is that editing packages can be cumbersome. One goal for Mist was to make package workflows faster and easier to author.
Thus, this begins a series of blog posts that demonstrate how to use the over sixty various tasks and transformations in your packages, with examples in both BIDS and Mist.
Background:
For our inaugural post, I’m going to discuss the Execute SQL task. You might be wondering why I’m starting with a task that already has a ton of articles on it. Well, there’s a reason it warrants a lot of coverage; it’s a complex task. Additionally, it’s a great starting point for seeing with Mist can do and how it improves on BIDS. I’ll also be referring to this task in upcoming posts in this series.
The task’s purpose is to allow you to run SQL statements or stored procedures within a package’s workflow. You can capture values from the execution of the SQL query to be used later in the package. Some of the operations you might perform with the Execute SQL task include:
- Creating tables and views
- Returning a rowset from a query and saving it in a variable
- Executing a stored procedure
- The example I’m going to show you how to build will run a query on the AdventureWorksOLTP database, with that query stored in a SSIS variable and its result placed in another variable.
Using BIDS:
The first step is to add the Execute SQL task to a BIDS package. To do that, find the Execute SQL task in the Toolbox tool window.

Then drag and drop the task onto your package’s design surface. You’ll see a red X icon in the task, indicating that there are errors.

Opening the BIDS Error List tool window shows the actual errors pertaining to this task.

When you’re finished, there should be no errors on the Execute SQL Task, and the red X icon should be gone from the task.
Double click on the Execute SQL task to begin setting it up. A dialog box will open that lets you set properties on the task.

You can start by configuring where the SQL statement will run. Find the ConnectionType property in the SQL Statement group. Click inside the ConnectionType property field, and click on the down arrow to display its dropdown.

This dropdown lists the different connection types you can use. Since AdventureWorks is a SQL Server database, you’ll want to stick with the default, OLE DB connection type.
Beneath the ConnectionType property is the Connection property. If you click inside the Connection property field, you’ll again see a down arrow. Clicking on it displays a pop-up.

Select the New connection… item to bring up the OLE DB Connection Manager dialog box.

This dialog lets you create and manage data connections. For instance, if you already had a connection to Adventure Works, you could simply select it from the Data connections list and press OK. However, since there aren’t any connections, you’ll need to create one by pressing the New button, which greets you with a Connection Manager dialog box.

If you’ve installed Adventure Works on your local machine, you can type in your machine name in the Server name text field. Or you can simply enter a period to represent your local machine. Pressing the down arrow in the Server name text field causes the dialog to scan the network for SQL instances, which may take several minutes in some environments.

Once you enter a server name, you’ll notice that the radio buttons, in the Connect to a database groupbox, become enabled.

Select the AdventureWorks database from the enabled dropdown.

Finally, press OK to finish creating the connection. This will return to you to the Connection Manager dialog, which now lists the new connection.

Press OK again to set this data connection on the Execute SQL task.

Next up is the SQLSourceType property. This property specifies where the SQL statement comes from. The dropdown allows you to choose from three options:
Name Description Direct Input Enter text directly into a property File Connection Specify a file that contains the SQL statement. The file may already exist or may be created at runtime. Variable Create or choose a variable that contains the SQL statement. Select Variable from the SQLSourceType dropdown.

Notice that the SQLStatement property, directly underneath SQLSourceType, has been renamed to SourceVariable. Opening its dropdown lists all the built-in variables available to us.

However, the dropdown also includes a New variable… item at the top. Select that item to open the Add Variable dialog box.

This dialog allows you to set various properties on your new variable:
Name Description Container Indicates the scope of the variable. By selecting Package1, this variable becomes available to all containers, tasks, and event handlers within the package. Name Specifies a name for the variable Namespace SSIS provides two namespaces, System and User. The System namespace contains system variables and the User namespace contains custom variables. However, you are also allowed to create additional namespaces. Value type Specifies the type of literal that the variable stores. Note that the variable’s value must be of the value type. For example, having a variable value of abc with a value type of DateTime won’t work. Value The value that the variable stores.
In order to make the purpose of this variable clearer, rename it to SqlQuery. You can leave the remaining properties as-is.

Press OK to return to the properties dialog.
The last property in the SQL Statement group is BypassPrepare. The Execute SQL task can run the prepare command on a SQL statement before it executes on our specified connection. The BypassPrepare property makes it possible to skip that preparation. This is typically used when a SQL statement includes a keyword that the prepare command doesn’t support.

You’ve now established where the SQL statement will run and identified where the SQL statement will be stored. The next step is to actually write the SQL statement. To bring up the Query Builder dialog, click on the Build Query… button in the Execute SQL Task Editor dialog.

For this example, you can query your product inventory for items where the quantity on hand is less than 100. A query like this might be useful to inform someone that they need to increase production of an item. The most direct way to enter a query is to type it in the textbox where SELECT and FROM are already present.

After entering the query, if you click in the white space area above the data grid, you’ll see that:
- The query text is reformatted
- The data grid is populated with values that match my query
- A visual representation of the table and the column selections appears at the top of the dialog

By pressing the Run button in the Query Builder’s toolbar, you can have the dialog execute your query so you can see the results.


This is great for confirming that your query returns the results you expect.
Now, press OK to save the query in the variable.
Returning to the Execute SQL Task Editor dialog, it’s time to discuss the ResultSet property. This property lets you control the format of the results from the executed query. The property value is a dropdown that lets us choose from:
Type When To Use None When the query returns no results, such as a statement to delete records from a table. Single Row When the query returns one row, such as a SELECT statement that returns a count. Full result set When the query returns more than one row, such as a SELECT statement that retrieves all the rows in a table. XML When the query returns a result set in an XML format.
In this example, it’s clearly possible to return multiple rows. Thus, you should select Full result set from the dropdown.

The final step is to define where the result set produced by the SQL query will be stored in the package. To do that, switch from the dialog’s General view to the Result Set view. Below, you can see that Result Set is selected in the left list box.

To add a Result Set mapping, click the Add button, which will add a default mapping to the list.

To provide a clearer name, change the result name to ‘ExecuteSqlResult’ and create a new variable named Result to store the result. Note that when creating this variable, its value type needs to be Object.

Unfortunately, if you try to run this task, you’ll hit an error that “The result binding name must be set to zero for full result set and XML results.” It turns out that there are specific rules about result set names when using various result set types. Microsoft has a webpage that lists these rules. In our case, we need to rename our Result to the number 0.

With that change, the Execute SQL task can be run successfully.
Using Mist:
Now that you’ve created the Execute SQL task in BIDS, let’s review how to create it in Mist. As I demonstrate the process, you’ll notice that the procedure for creating tasks will be familiar to BIDS users, but with some differences that help streamline the process of editing tasks.
To begin, you’ll need to create a package. If you’re unfamiliar with how to create a package, you can follow the first couple steps in the Mist User Guide’s Creating a Package topic.
Once your package is open, navigate to the Toolbox tool window.

Drag and drop the Execute SQL task onto the Package’s design surface.

The task has a red X icon, just like in BIDS, since it has errors.
Furthermore, the Error List tool window lists all the errors for the Execute SQL task upfront.

You’ll notice that these errors are much clearer than BIDS. Additionally, Mist lists all errors with the task upfront, unlike BIDS, which initially missed that SqlCommand was blank.
The next step is to display the Package Details tool window. The Package Details window is typically located in the lower portion of the Mist window.

If you can’t find the Package Details tab, you can make the window appear by switching to the Home ribbon tab and clicking on the View popup button.

In the list, click on the Package Details item to make the window appear.
The Package Details area displays settings for the selected task or transformation in the package. If the Execute SQL task isn’t selected, click on it in the designer to select it. The Package Details area will now be populated with properties for the task.

These properties should look familiar, since they’re the same properties you saw in the BIDS Execute SQL Task Editor dialog. However, you’ll notice that Mist is not using a modal dialog. In Mist, we’ve avoided dialog boxes as much as possible. Additionally, using tool windows lets you easily switch between tasks or make changes on the fly, instead of having to dismiss several dialogs and reopen them later.
Following the steps in the BIDS example, the first step is to create a connection to Adventure Works. To do that, you can follow the steps in the Mist User Guide’s Create New Connection section to create a connection, although you’ll want the Initial Catalog to be AdventureWorks, not AdventureWorks LT. It’s also worth reemphasizing that this approach allows you to easily find and reuse this connection elsewhere in your Mist project, including other packages
To associate this connection with the Execute SQL task, reopen the Package by double clicking on it. Then click on the Properties tab to display the Properties window. The Properties window is typically located in the lower right portion of the Mist window. If you can’t find it, you can use the aforementioned View button dropdown to make it appear.

You’ll see that the Connection property dropdown has a red border surrounding it. The red border makes it clear that this property needs to be set, and you’ll experience a build error until this is fixed. You can fix it by clicking on the dropdown’s arrow and selecting the AdventureWorks connection.

The next step is to write the SQL query. To do that, go back to the Package Details tab and look at the T-SQL Editor.

This control is designed to let you enter a T-SQL query, providing syntax highlighting and Intelliprompt along the way. You’ll notice that the Connection dropdown reads AdventureWorks; this dropdown is linked to the Execute SQL Task’s Connection property. The green icon to its right means that we’ve established a connection to the database, thereby enabling Intelliprompt.
As you type in the query, the Intelliprompt popup will offer you possible values. And those possibilities will be filtered as you continue typing.

Once you’ve entered the query, you can press the Preview Query button to execute the query and retrieve the first 100 results. Just like in BIDS, this lets you confirm that your query returns the results you expect.

Now that you’ve authored the query and know it’s valid, you need to move it into a variable and associate that variable with this task.
To start, select the SQL query and press Ctrl+C to copy it to the clipboard.
To create a package variable, go into the package designer surface and click anywhere in the white area. This causes the package to be selected. You may have noticed that the ribbon’s contents changed a bit when you did this. While all tasks and transformations have a common set of assets, the ribbon also lets you add items specific to the selected task or transformation. For instance, when the Execute SQL task is selected, the ribbon appears as:

Notice that the ‘Task Specific’ group, at the right, contains Parameter and Result buttons. Selecting the package changes the ribbon’s contents to:

The Parameter and Result buttons have been replaced with Connection Reference and Package Configuration buttons. Note that the first six buttons haven’t changed since they’re common to all tasks and transformations.
With the Package selected, click on the Variable button in the ribbon. This will add a variable to the package. Additionally, the Variable tool window will be brought to the front of the window.

The newly created Variable is already selected. Matching the BIDS sample, rename this variable to SqlQuery and set its namespace to User. To change its name, you can double click on its default name in the Variable column and type in the new name.

To store the query in this variable, double click on the Value cell and press Ctrl+V to paste in the query.
To associate the variable with the Execute SQL task, select the Execute SQL task in the designer. In the Package Details area, find the Method dropdown. This dropdown parallels the SqlSourceType dropdown in BIDS. Click on the dropdown to select Variable.

You’ll then see that the T-SQL editor vanishes and is replaced with a Variable dropdown. Don’t worry – if you want to test the query again or try another query, you can switch back by changing the Method value back to Direct.
In the Variable dropdown, scroll down to the bottom and select the User::SqlQuery variable.

To finish this up, you need to create a Result Set. First, go to the Result Set dropdown, directly underneath the Name textbox and select Full.
Next, in the ribbon, click on the Result button.

When you do that, you’ll see that the Result item was added to the Results data grid in the Package Details area.

Now you need to create another variable, using the same steps as before, named User::Result. Recall that the variable’s Type needs to be Object.

With that done, you can double click on the Result’s Variable cell to open its popup and select the User::Result variable.

Finally, change the Result’s Name to 0.
And with that, you’ve built a matching Execute SQL task in Mist. If you build your package, following the steps in the Mist User Guide’s Build the Example Project topic, you can open the Package1.dtproj in BIDS to see that it matches the sample you manually built in BIDS and also runs successfully.
Summary:
This concludes our first look at Mist’s package editing capabilities, along with how to construct an Execute SQL task. Next time, I'll talk about what you might do in your workflow if the Execute SQL task fails during execution.
Links:
Execute SQL documentation for the BIML language
Craig
Time Functions with Date Intelligence
What is Date Intelligence?
Date Intelligence in Vivid is not a single feature, but rather a suite of related features. To get the most out of the BI data, analysts need to be able to query their cubes to obtain the dataset from specific points in time. Relevant time periods are highly variable between industries and ever-changing within companies. Our Time Functions are designed to make date ranges easier to work with.
The Time Functions
Vivid’s Time Functions make it simple for users to create Excel calculations that perform sophisticated date/time manipulation. To access the Time Functions, simply right click the name of the measure from the pivot table overlay that you wish to analyze over a period, and then select “Time Functions:”. From there, select the Time Function you’d like to invoke: Periods to Date, Parallel Periods, or Rolling Results. The final result is a new calculation that can be placed in the pivot table. These are native Excel calculations, fully functional for your team members who don’t yet use Vivid. Additionally, these calculations can be used in the formula of other custom calculations you create with Vivid.

Periods to Date
For a given measure, Periods to Date will create a calculation that will compute a roll-up for the specified period to the located date in the pivot table. Here is a pivot table that has a measure (Internet Order Count) and a calculation which is the Periods to Date version of this measure. The period used for this example is Fiscal Quarter:

From the screenshot above we can observe the following:
We see blanks for Parallel Inter net Order Count for two distinct reasons: - Since we’re lagging one quarter, periods that are of larger granularity don’t map to lagging by a quarter. For example, there is simple notion of a Fiscal Year that lags the current Fiscal Year by a quarter. - Q1 FY 2002 is blank and this is because there is no data prior to that quarter in the cube. - Regardless of which row you’re looking at, the Parallel Periods calculation is always lagged by one quarter. It doesn’t change on a row by row basis.
The underlying MDX created for this query looks like this:
([Measures].[Internet Order Count], ParallelPeriod([Date].[Fiscal].[Fiscal Quarter], 1, [Date].[Fiscal].CurrentMember))
Rolling Result
Rolling results will compute the rolling aggregation for a specified measure. Rolling results asks you to specify which hierarchy to roll against, most commonly a hierarchy from a time dimension. Additionally you specify the number of periods to roll-up. Like Periods To Date, you can also specify your aggregation operator. In the below example we use the SUM aggregation and set the Rolling Result:

Notice that Q1 FY 2002 is the same for both Internet Order Count and RR Internet Order Count, that’s because there’s no previous quarter to sum in the roll-up. - The rolling calculations is set to roll the past two periods for whichever level they’re at. Here are some examples: - Q2 FY 2002 is the sum of 565 and 448, the current and previous quarter. - 2003 is the sum of 3222 and 2206, the current and previous years. - August 3, 2002 is the sum of 6 and 8, the current and previous days. - The underlying MDX created for this query looks like this:
Sum(LastPeriods(2, [Date].[Fiscal].CurrentMember), [Measures].[Internet Order Count])
Editing Calculations
While the Vivid UI can create these custom Date Intelligence calculations, you can also tweak these calculations using MDX. Simply right-click the calculation in the Pivot Table Editor and select “Edit…” from the context menu. In the Edit Calculations dialog you can modify the calculation to do exactly what you want.
Feedback
Please feel free to give us feedback on our forums regarding your use of these Time Functions, as well as suggestions for any additional Time Functions that you’d find useful.
Kang Su Gatlin
Overriding a WPF binding value without bindings
First off, let me briefly introduce myself. My name is Craig and I'm the lead developer on Mist. My blog posts will typically be focused on developing Mist and developing BI solutions in Mist.
I recently encountered a situation where I needed to override a binding's value without changing the binding. If that statement seems confusing to you, allow me to back up and explain further.
Background:
All of the designers in Mist are implemented as WPF Pages. Within each designer is a variety of controls, e.g., ComboBoxes, DataGrids, CheckBoxes. Many of these controls have their IsEnabled bindings set in XAML.
A scenario arose where we wanted the user to be able to view an editor's content, but not edit it. Sort of a 'look but don't touch' behavior. At first glance, this seemed like a trivial problem; simply add or alter IsEnabled bindings to detect when to disable each control. The problem I faced was that each designer has lots of controls, all of which would need to implement this behavior. Furthermore, many of them already have IsEnabled bindings. I really didn't want to deal with the time consuming and cumbersome choice of adding or editing each control's IsEnabled binding. I also wanted to avoid the maintenance cost of ensuring that all future changes account for this new IsEnabled logic.
Solution:
Some of you may already be thinking that the right way to solve this is to use default styles. And you're right. (For those of you unfamiliar with default styles, check out MSDN Default (Theme) Styles and view a simple example at Inheriting Default Styles in WPF). But the problem remains of how to change the default style so we can override the control's IsEnabled value while still preserving its binding.
Your title here...The way I chose to solve this was by using an attached property:
public static class ControlExtension
{
    public static readonly DependencyProperty IsReadOnlyProperty =
        DependencyProperty.RegisterAttached(
            "IsReadOnly",
            typeof(bool),
            typeof(ControlExtension),
            new PropertyMetadata(false, new PropertyChangedCallback(OnIsReadOnlyChanged)));

    public static void SetIsReadOnly(DependencyObject element, string value)
    {
        element.SetValue(IsReadOnlyProperty, value);
    }

    public static object GetIsReadOnly(DependencyObject element)
    {
        return element.GetValue(IsReadOnlyProperty);
    }

    private static void OnIsReadOnlyChanged(DependencyObject d, DependencyPropertyChangedEventArgs e)
    {
        if (e.NewValue is bool)
        {
            if ((bool)e.NewValue)
            {
                d.SetValue(UIElement.IsEnabledProperty, false);
            }
            else
            {
                d.ClearValue(UIElement.IsEnabledProperty);

                var bindingExpression = BindingOperations.GetBindingExpression(d, UIElement.IsEnabledProperty);
                if (bindingExpression != null)
                {
                    bindingExpression.UpdateTarget();
                }
            }
        }
    }
}
When IsReadOnly becomes true, we set the DependencyObject's IsEnabled property to false, thus forcibly disabling the control. Note that any IsEnabled bindings on that DependencyObject will be ignored, due to SetValue. If IsReadOnly returns to being false, we first clear the IsEnabled property's value and, if the control has an IsEnabled binding, we then call UpdateTarget to refresh the binding's value.

To add this behavior in XAML, we can create or edit a default style for each relevant control, setting a binding to its IsReadOnly attached property. Our controls will then inherit their theme styles and use the new behavior.
Craig Lichtenstein
Why is Vivid an Excel AddIn?
A new user’s first reaction after using Vivid for a few days is usually “I’ll never use Excel without this again!” This raises the question – why is Vivid a Microsoft Excel add-in rather than a standalone application? Vivid provides enough unique functionality to justify its licensing as a stand-alone product. Here are some reasons why we’ve chosen to develop and market Vivid as an Excel Add-In:
-
Excel is already the dominant SSAS analysis client. Every BI analyst keeps Excel open on their desk and already knows how to use it. Why add a completely new tool with all new idioms and patterns? We instead build on the Excel idioms and patterns, so that current users feel right at home.
-
Excel has some very excellent BI capabilities. This hasn't always been the case, but since 2007 Microsoft has greatly increased the BI capacity of Excel. Rather than reinventing the wheel and reimplementing all Excel's functionality, we decided to create a new and unique BI feature set on top of Excel's capabilities. Since we don't have to implement things like drilldown, filters, or slicers, we can focus on adding the features Excel chronically lacks.
-
Vivid-enhanced Excel projects still work with non-Vivid users. By building ourselves directly into Excel and building on Excel workbooks, users can add value with Vivid, but if they don't have Vivid, the pivot tables created still work. An individual analyst using Vivid, working with a team that still uses vanilla Excel, can share workbooks with no friction. Of course, getting everyone on Vivid has great synergistic benefits – but it’s a choice, not a fixed conversion cost.
-
Vivid users retain full access to Excel charts. Charting is an important aspect of any BI tool, and again this is an area where Excel has good support. Since we use native Excel pivot tables, Vivid users continue to be able to use all of the capabilities associated with Excel charts.
-
Vivid works with other Add-Ins. The Excel add-in model allows Vivid to work side by side with other add-ins. So if your organization has investments in other Excel add-ins to improve workflow, Vivid fits right in. There is no concern that you lose functionality provided by an add-in when you decide to use Vivid. With Vivid, users continue to leverage all of their existing investments in Excel.
As an Excel Add-In developer we really take to heart making you more productive, and we've taken the important step of making sure you're productive in your day-to-day tool, Microsoft Excel.
Kang Su Gatlin
Vivid 1.5 Released from Varigence!

Vivid is an indispensable tool that brings advanced analytics capabilities directly into Microsoft Excel. The new 1.5 version of Vivid adds powerful new self-service analytics features for both teams and individual analysts.
Vivid: A Recap
Vivid is an add-in that transforms Excel (2007/2010) into a world class self service BI tool with over 60 new features and capabilities. In addition to using Excel pivot tables more effectively with SSAS cubes and PowerPivot workbooks, Vivid offers a rich collaborative commenting model that makes your entire team more effective. Since Vivid builds directly on native Excel Pivot tables, you can seamlessly share your spreadsheets with non-Vivid users, Excel Services, and SharePoint. If you use standalone analytics clients such as ProClarity and wish many of those advanced features were available in Excel, Vivid is the answer. For more information about Vivid, visit its product page.
The Vivid 1.5 Release
Vivid 1.5 adds the following capabilities:
- PowerPivot support. Use the Vivid Pivot Table Editor to browse and create pivot tables for PowerPivot workbooks, either hosted in Sharepoint or embedded in the Excel document.
- Slicer support (Excel 2010) directly in the overlay and in the Vivid Pivot Table Editor.
- Virtual Dimensions, where you can cluster hierarchies. Useful for creating dimensions that don't exist on the actual cube.
- Virtual Hierarchies, which allow you to create a new pseudo-user hierarchy. These define a drilldown path, and are of particular use for PowerPivot, which doesn't have built-in support for user hierarchies.
- Several bug fixes and performance improvements.
Vivid 1.5 is available for download today here with a 14-day free trial. Vivid 1.4 customers can upgrade to Vivid 1.5 at no cost.
Welcome to the Varigence Blog
You've made it to the Varigence blog, welcome!
The first thing you should know is who we are. Varigence team members live and breathe business intelligence and application development. We were brought together by a vision that business intelligence could be made much more efficient and effective. As a business we currently have one shipping product, Vivid, and another product, Mist, slated for release at the end of January 2011. Varigence also provides consulting and training services to help customers accelerate adoption of our products and frameworks.
The goals of this blog are:
- Develop content that will enable you to rapidly build better solutions with the Microsoft SQL Server product family.
- Demonstrate the advantages of building Microsoft SQL Server solutions with the Varigence tools and frameworks.
- Share discoveries and insights about the Microsoft SQL Server product family that were made during product development.
- Provide insight into the decisions and motivations used in building products such as Vivid and Mist.
- Go under the hood on technical aspects of building our business intelligence products.
Here you'll see articles that range from talking about new product releases, tips on how to better use features in our products, general BI and data warehousing development strategies, .NET developer tips, Office developer tips, musing about the industry, and anything else we think would be of value to the readers. Let us know if there is something specific you'd like us to write about.
